
General
The preferences section is where you can customize the modules in Zoho Inventory to match your business workflow.
To access this section,
- Click the
 icon in the top right corner.
 - Navigate to the Organization Settings.
- Click General under the Setup & Cofigurations.
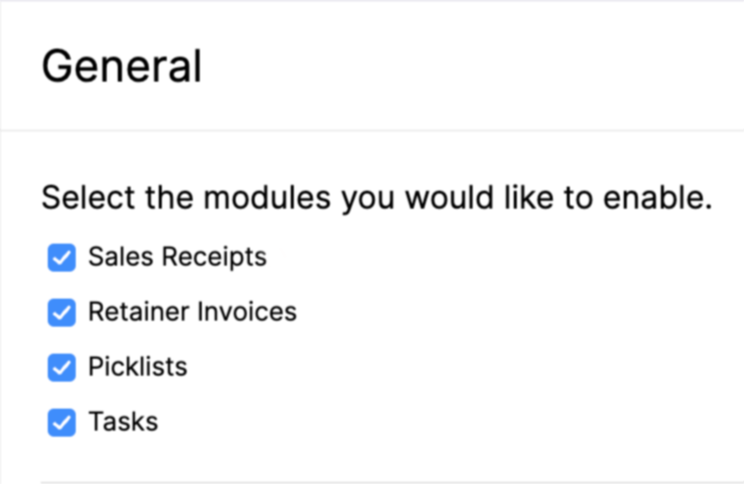
Enable Modules
Select the modules you want to enable in Zoho Inventory. Once you enable them, they will be shown in the left sidebar. You’ll be able to access and configure these modules only when you enable them in this page.
Note: You can access the modules via API even if they are disabled in the Zoho Books browser application.
General Preferences
This section consists of generic functions provided in the modules which can be customized.
- Discounts
- Tax On Item Prices
- Additional Charges
- Sales Persons
- Enable Profit Margin
- Transaction Approval
- Mode of Stock Tracking
- Rounding Off Sales Total
- Address Format
Discounts
- If you offer discounts to your customers, choose whether the discount should be applied at the item level or at the transaction level.
- At the transaction level, you can choose to apply the discount before or after tax.
- If you do not offer any discounts, choose the I don’t give discounts option.
Tax On Item Prices
Choose the tax preference for your items.
- If your item rate includes tax, choose Tax Inclusive.
- If your item rate does not include tax, choose Tax Exclusive.
- If some items include tax and some don’t, choose Tax Inclusive or Tax Exclusive.
Additional Charges
Select the additional charges you’ll like to add:
- Shipping Charges: If you want to include shipping charges in your sales transactions.
- Adjustments: If you want to make any adjustments to the total amount in your sales transactions.
- Leave them unchecked if this does not apply to you.
Sales Persons
- Check this option to display the Sales Person field on your sales transactions. You can assign a sales person to every sales order or invoice to track their sales record.
- Leave it unchecked if this does not apply to you.
Enable Profit Margin
Profit Margin is the difference between an item’s rate at which it is sold, and its cost price. In Zoho Inventory, it shows the estimated cost price and gross profit margin for each line item in sales transactions by comparing it with the line item’s rate. This way, it helps businesses to monitor margins, set rates optimally, and keep track of profits from every sales transaction.
Note: Visit the pricing page to check if this feature is available in your current plan.
To enable Profit Margin in Zoho Inventory:
Go to Settings.
Select General under Setup & Configurations.
Under Profit Margin, check the Enable Profit Margin estimation at line item and transaction level option.
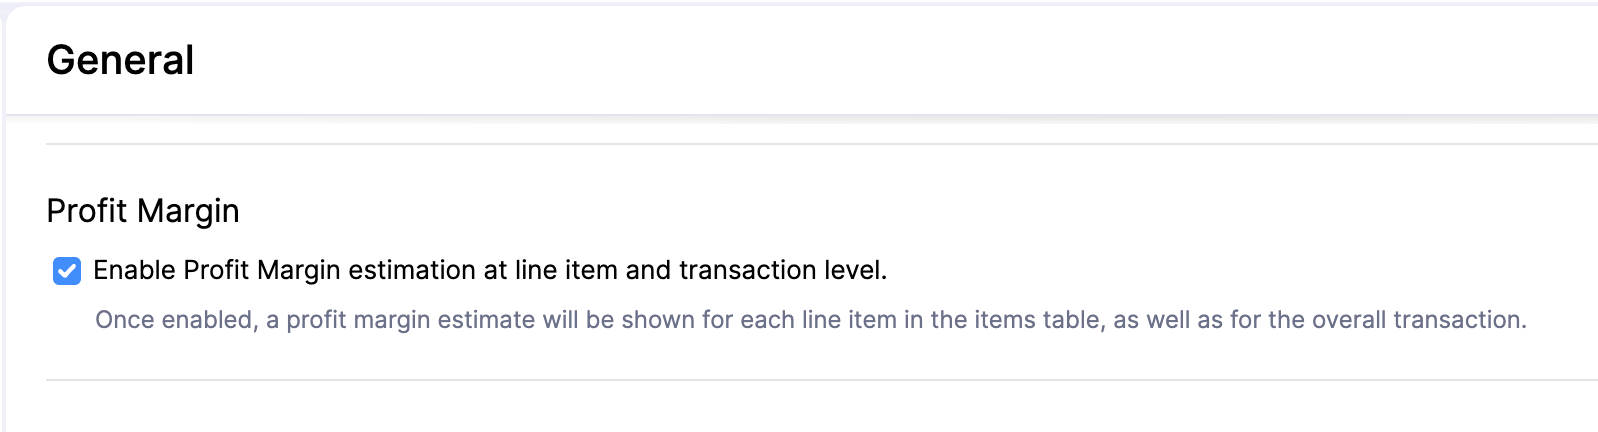
Click Save.
The Profit Margin will be enabled. Once done, new columns will appear in the Item Table of sales transactions such as Quotes, Sales Orders and Invoices. It includes:
Cost Price: It displays the estimated cost price for each line item. You can choose any one of the cost price estimation methods:
- Purchase Rate: This method is available only for transactions converted from a bill or an expense and displays the amount associated with the item.
- Inventory Valuation Method: It applies only to the items for which inventory-tracking is enabled. It estimates cost price for an item using the valuation methods like FIFO (First In First Out) or WAC (Weighted Average Costing) assigned when you create the item. For inventory items, the cost price will be estimated using the current available lots.
- Item Record: The cost price you provided when you created the item will appear here.
- Custom: It allows you to enter the cost price for the line item manually.
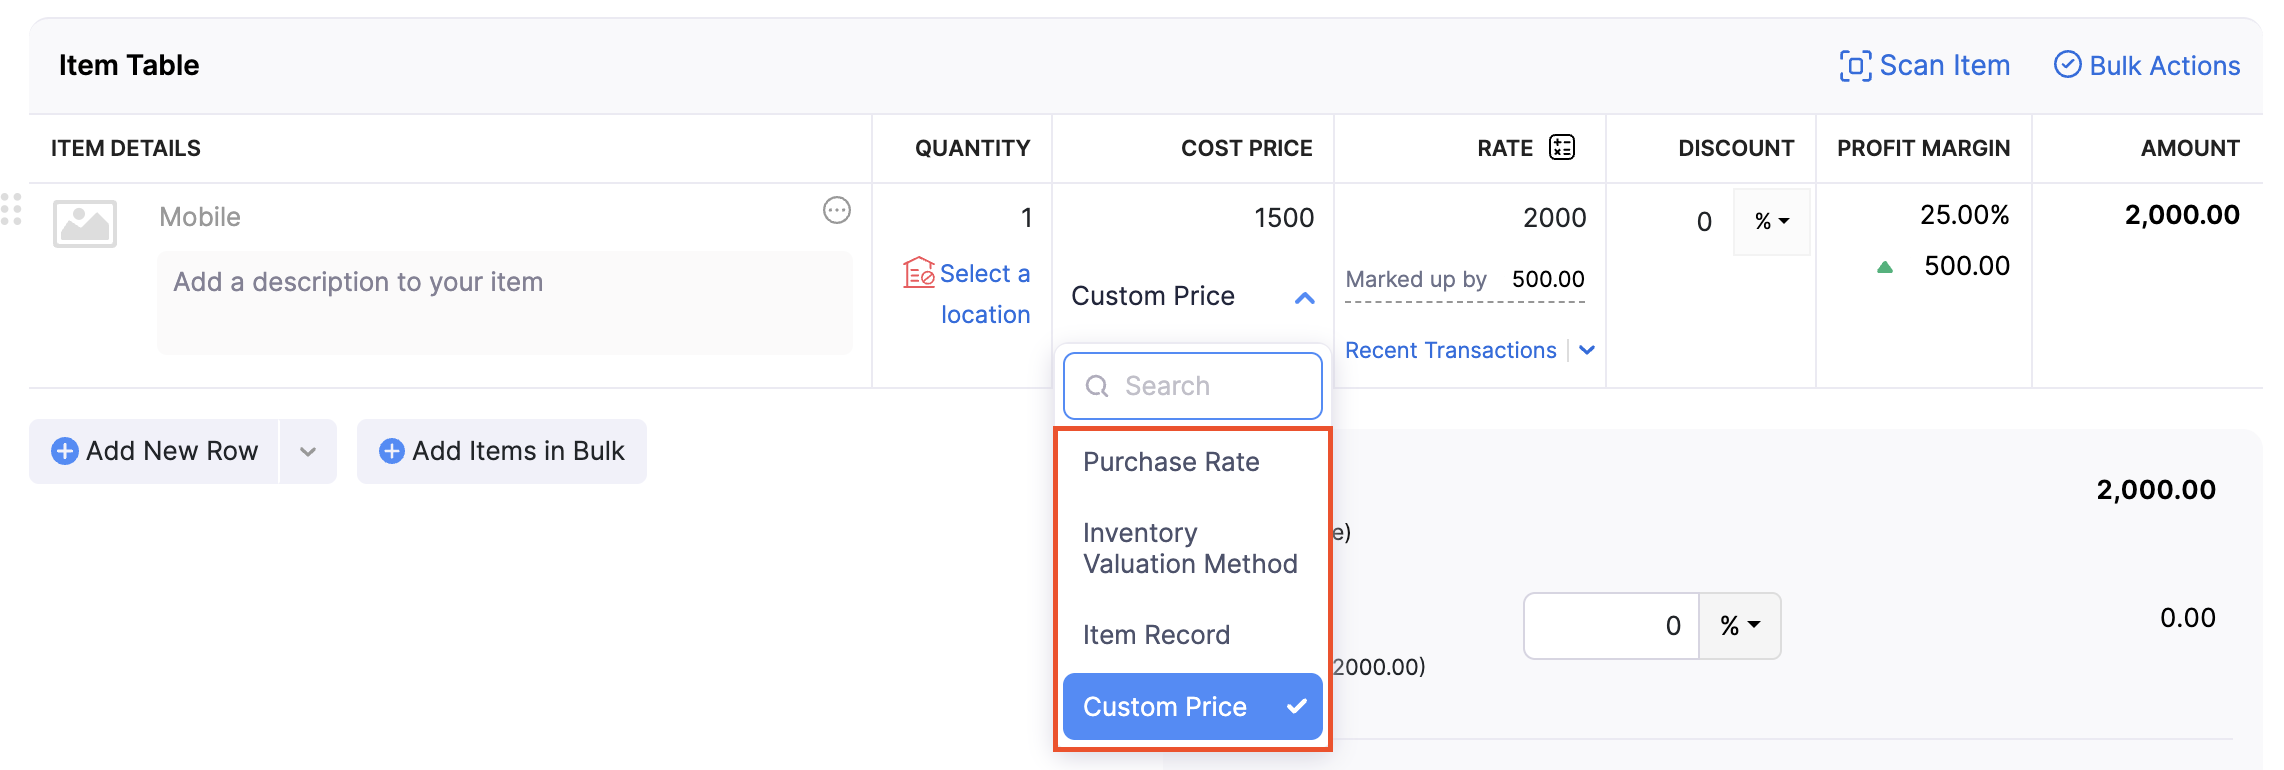
Profit Margin: It displays the estimated gross profit for each line item based on its rate and cost price.
- If you apply any discounts at the line item level, the profit margin for that line item decreases.
- The profit margin for a transaction will be displayed below its Total amount. It is calculated using the subtotal and the total estimated cost prices of all line items. Any transaction level discount you apply will reduce the profit margin.
- It does not include the other charges such as tax, shipping charges, adjustments, and more.
Configure Access for Fields
Once Profit Margin is enabled, new fields related to it are automatically created for Quotes, Sales Orders, and Invoices. You can configure role-based access for the Cost Price and Profit Margin fields to control which users can view or edit these fields.
To configure access for these fields:
Go to Settings.
Under Sales, select the module for which you want to configure access. For example, select Invoices under Sales.
Navigate to the Field Customization tab.
Hover over the Profit Margin or Cost Price field and click the More icon.
Select Configure Access.
In the pop-up, set the access level for each role:
- Read and Write: Users can view and edit the field.
- Read Only: Users can only view the field but cannot edit it.
- Hide Field: The field will be hidden from users with this role.
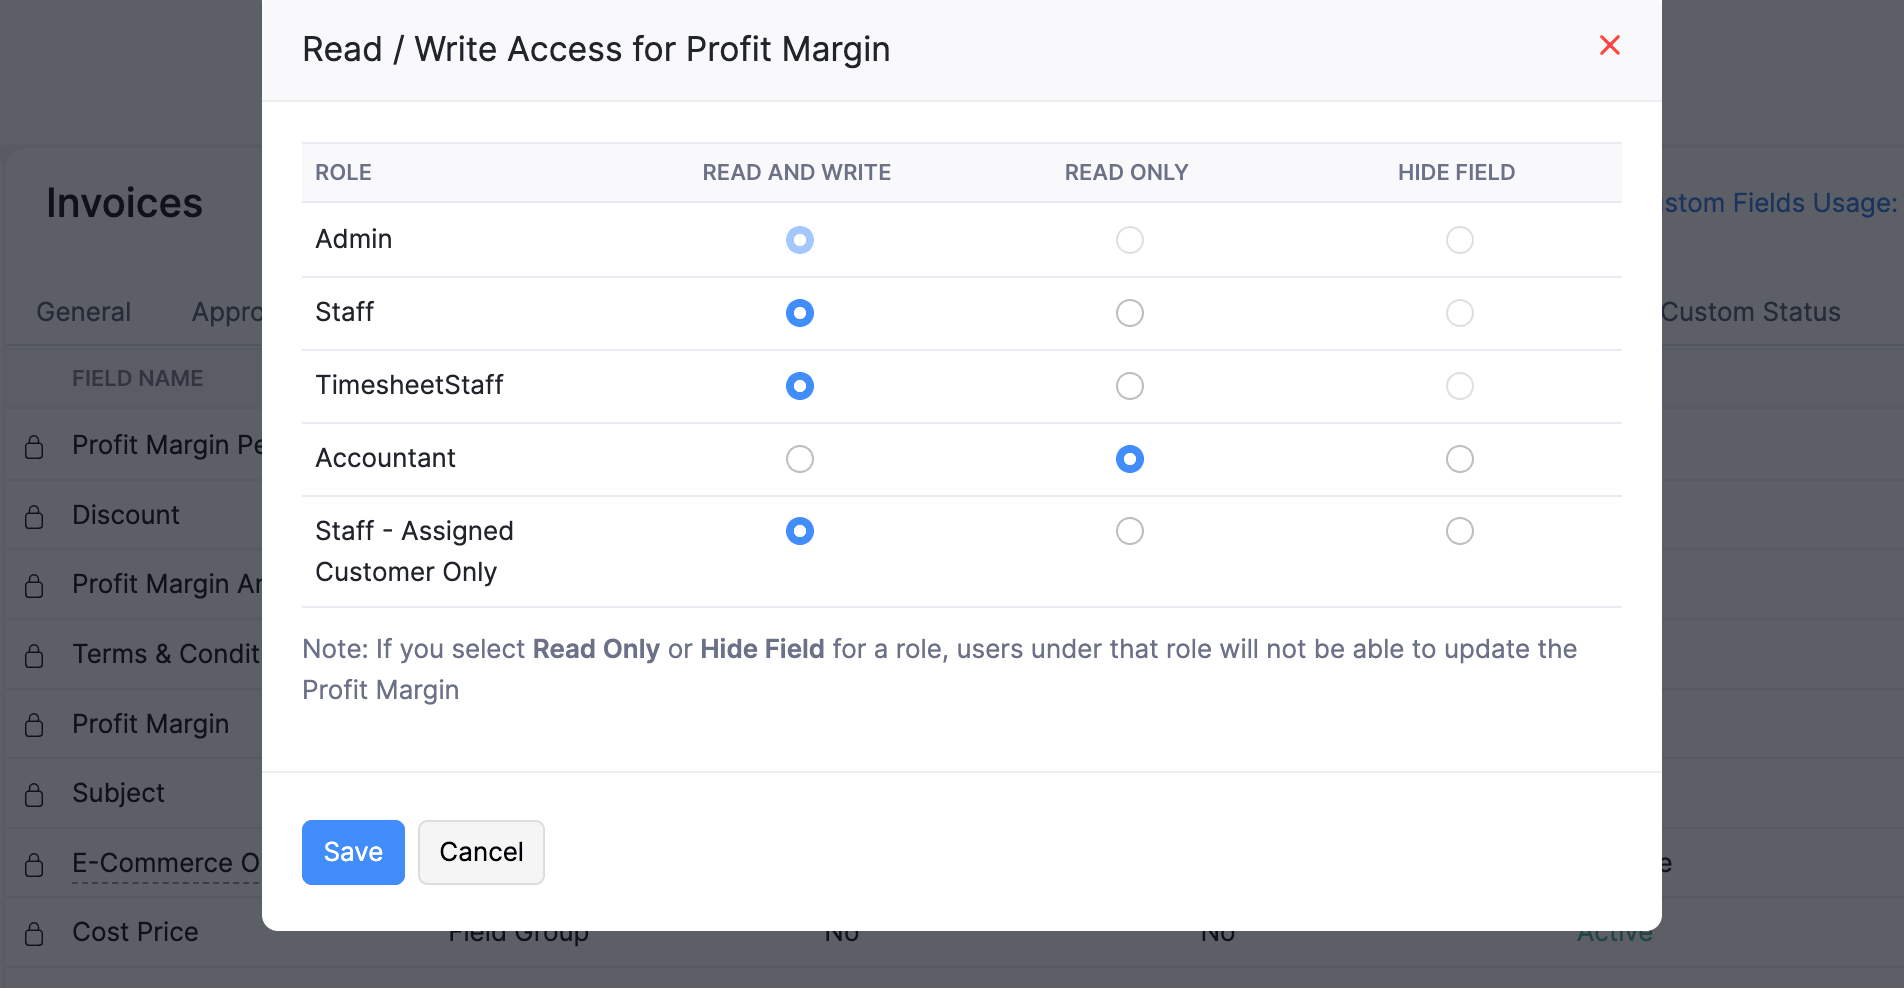
Click Save.
Note:
- All fields related to Profit Margin will be visible to admins by default.
- You can view the Profit Margin in the following reports: Quote Details, Invoice Details and Sales Order Details.
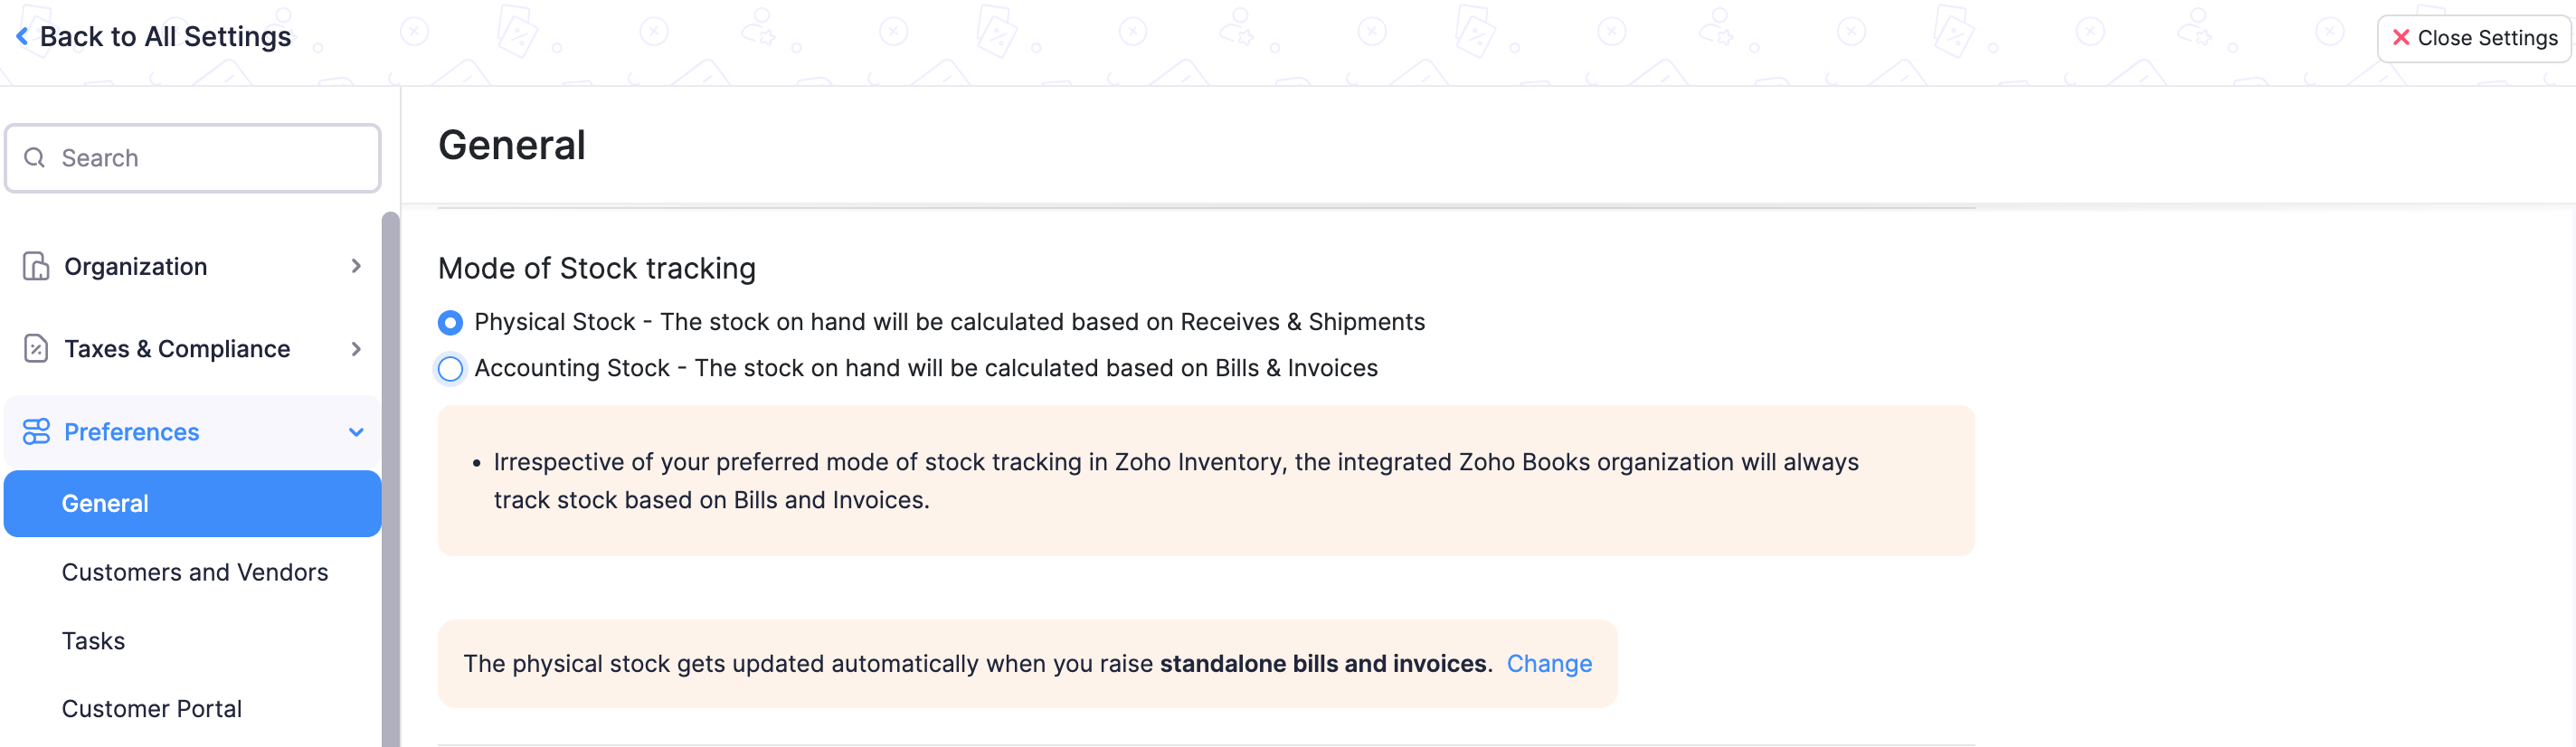
Mode of Stock Tracking
Zoho Inventory provides two methods based on which you can track your stock on hand. Choose an option that will help you control the method of documenting the incoming stock and the outgoing stock.
- Physical Stock: If you want to calculate your stock on hand based on purchase receives shipments. The physical stock of the item increases when you record purchase receives for it and decreases upon creating shipments.
- Accounting Stock: If you want to calculate your stock on hand based on Bills and Invoices. The accounting stock of an item increases when you record bills for it and decreases when you create invoices.
Reconcile Physical Stock for Standalone Invoices & Bills
When you create a standalone invoice or bill (not associated with any order), only the accounting stock of the line items would be affected, leaving the physical stock unchanged. To reconcile the items’ physical stock with its accounting stock, you can mark the standalone invoices or bills as Shipped or Received. Doing so does not actually create a shipment or purchase receive, rather, it indicates that the physical stock of the items have changed as well.
In any mode of stock tracking, you can choose whether you want to reconcile physical stock for standalone invoices and bills manually or automatically.
To switch your preference, click Change. If you choose to reconcile the physical stock automatically, Zoho Inventory will mark the direct invoice or bill as Shipped or Received automatically on creation.
To mark a standalone invoice or bill manually:
Open the standalone invoice or bill.
Click the Horizontal Ellipsis (…) icon on the menu bar.
Select the Mark as Shipped/Mark as Received option from the dropdown.
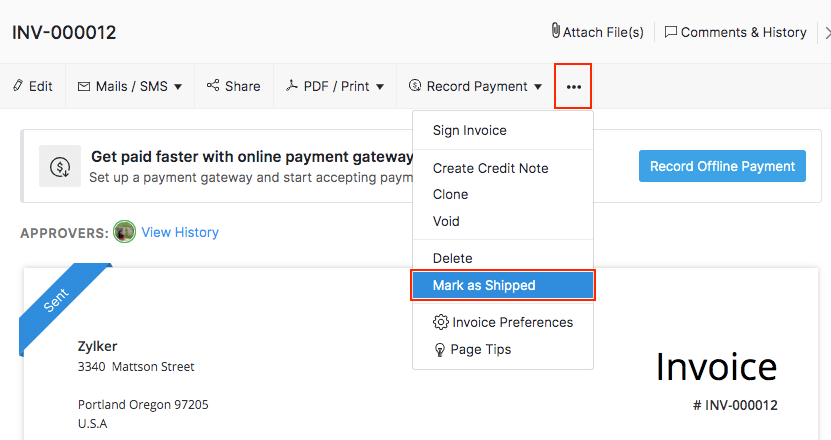
Confirm your action in the pop-up that follows.
To remove the shipping or receive status from the invoice or bill, follow the steps above and select the Undo Shipment/Undo Receive option from the dropdown. The physical stock changes for the items will also be undone.
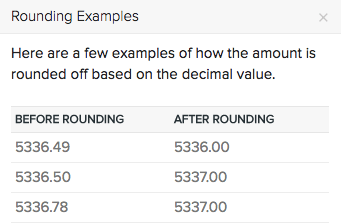
Rounding Off Sales Total
Check this option to round off the total amount in your sales transaction to the nearest whole number.
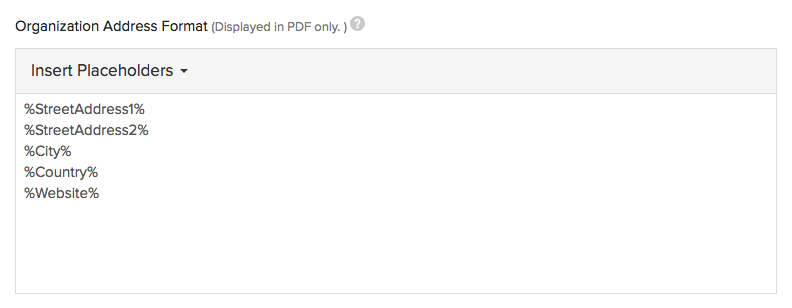
Address Format
Set the address format for your organization from the placeholders provided. To add more placeholders, click the Insert Placeholder dropdown menu and choose the field you’d like to add to the address format.
This address will be displayed in the PDF only.
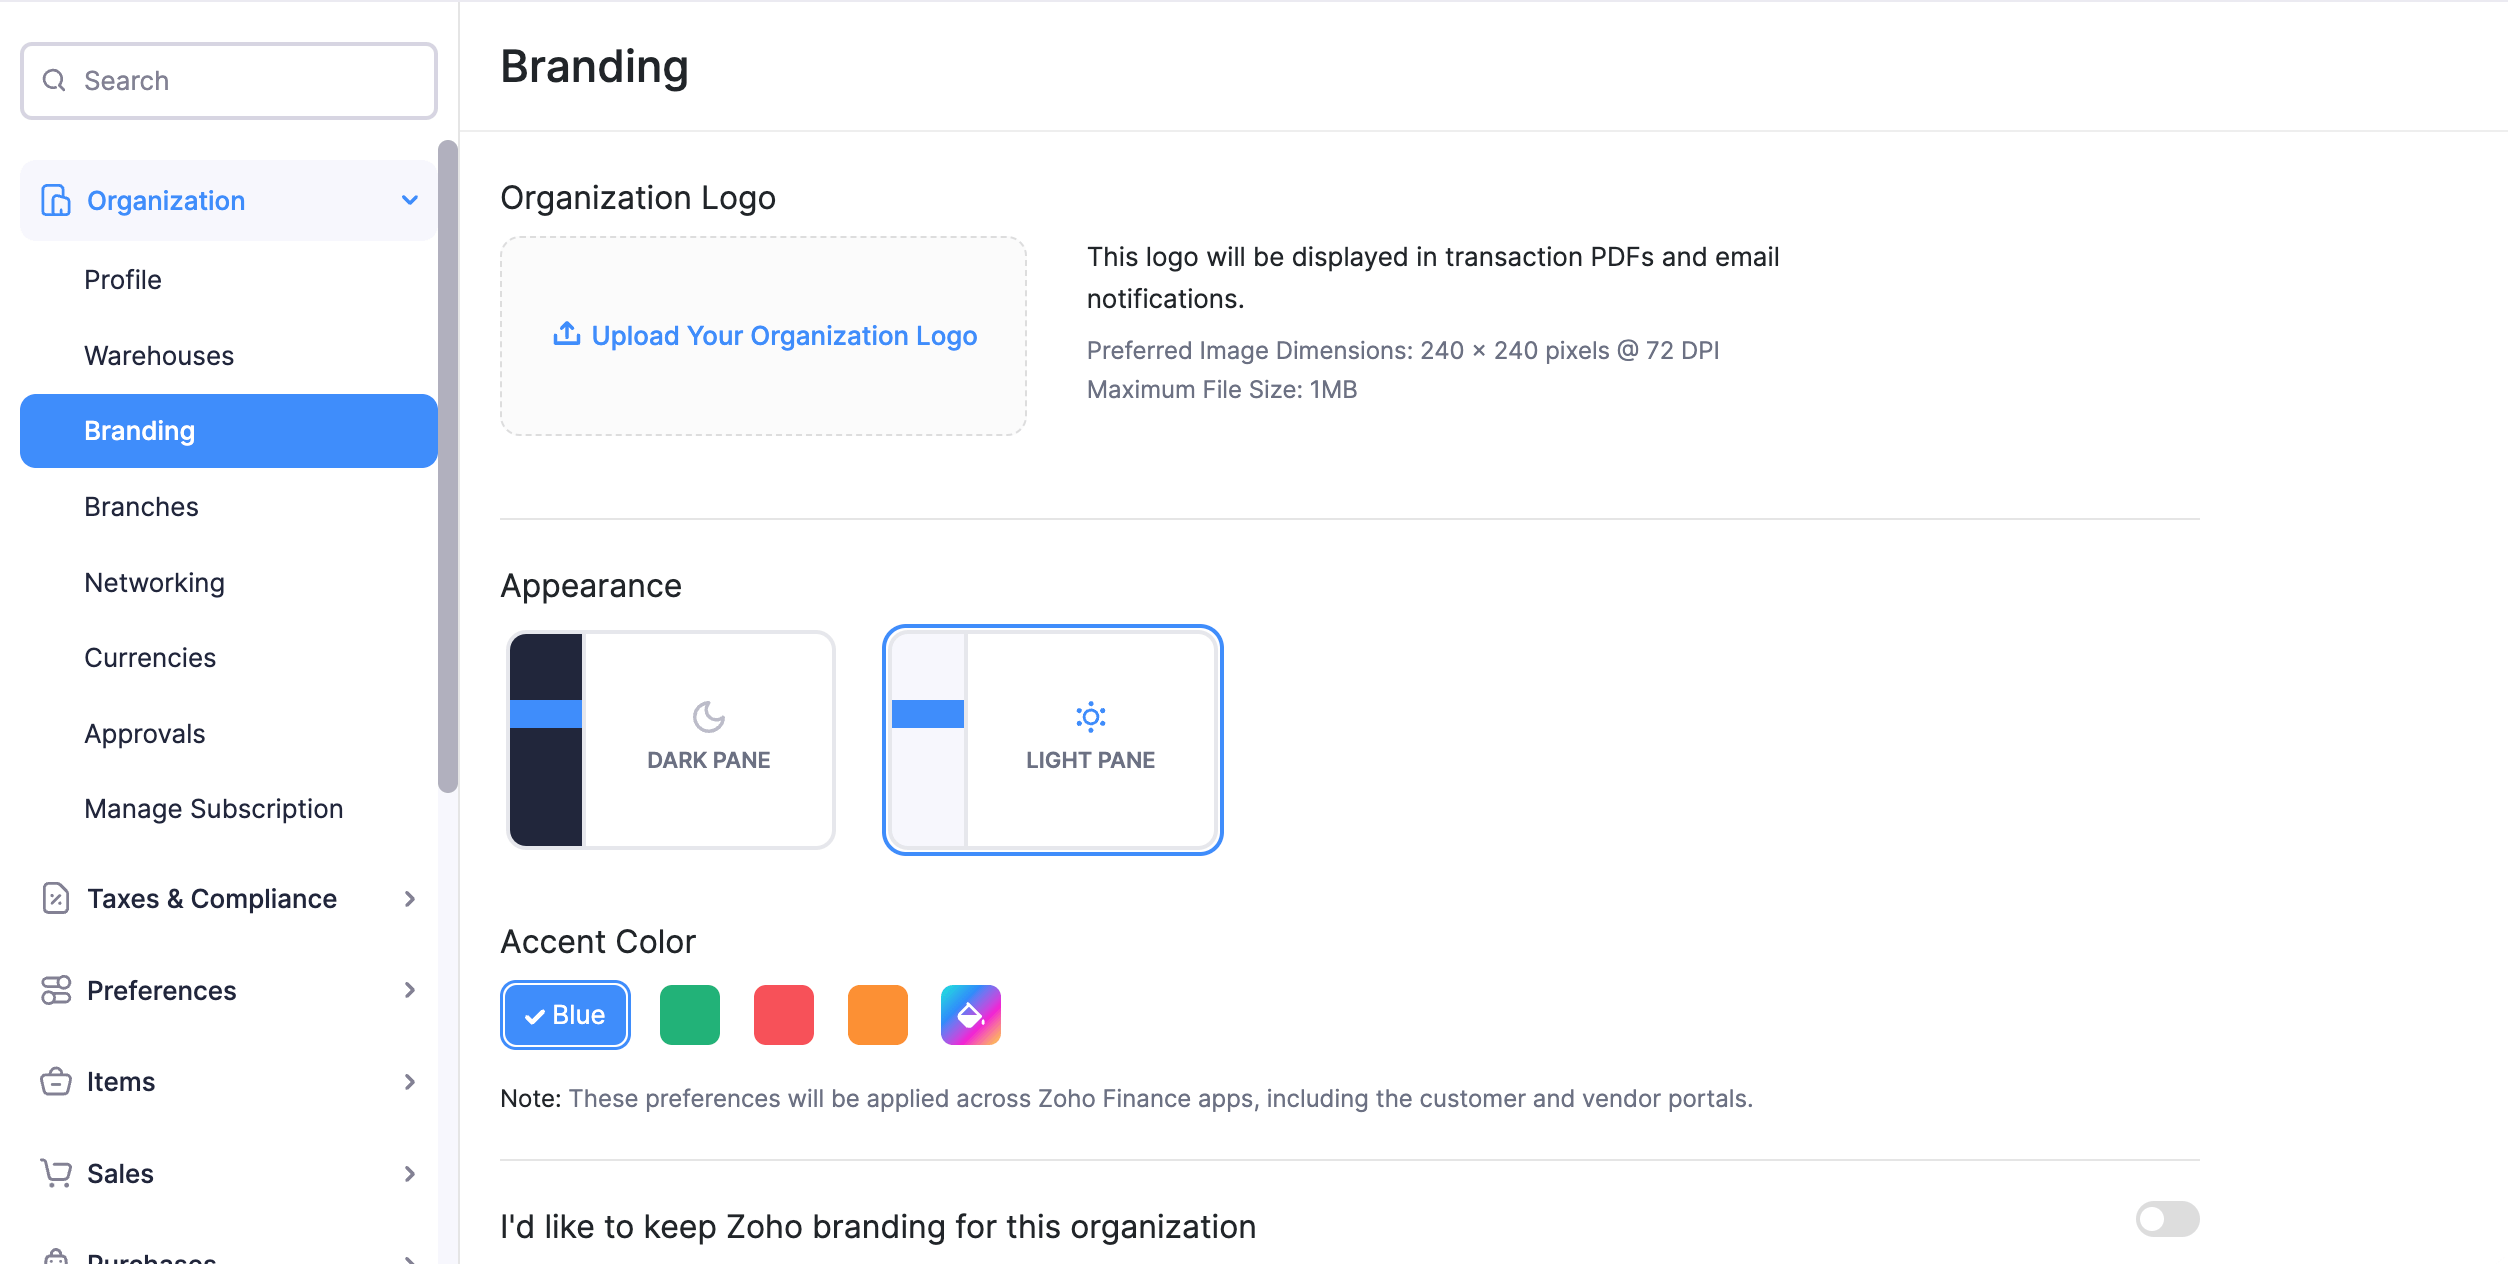
Branding
Logo
If your company has a brand logo, you can upload it under Your Logo. All the transactions that you send out to your customers and vendors from Zoho Inventory will be branded with this logo.
Themes
Personalize the look and feel of your Zoho Inventory organization by choosing from a variety of themes.
Zoho Branding
Enable the Would you like to keep Zoho Branding on your PDFs? option if you want to display the Zoho branding on the footer of your PDF templates.
Customers and Vendors
The following preferences can be configured for the Contacts module:
- Duplicate Contact Names
- Multi-currency Transactions for Each Contact
- Customer Address Format
- Custom Fields
Duplicate Contact Names
The contact display name is generally unique for each contact in Zoho Inventory. If you want to use the same display name for more than one contact, check the Allow duplicates for contact display name option.
This is especially useful when your customer and vendor are one and the same.
Multi-currency Transactions for Each Contact
Note: This feature is available only in specific plans of Zoho Inventory. Visit the pricing page to check if it’s available in your current plan.
Zoho Inventory enables you to create transactions for your customers and vendors in different currencies. Let us understand how this works with the help of a scenario.
Scenario: Mark runs an online store that deals with multiple international clients. One of his clients is Zillum, a multinational conglomerate with numerous branches in different countries. Whenever Mark sells goods to Zillum, he invoices them based on the currency that is used in the country they operate.
Note: Zoho Inventory fetches the exchange rates automatically for the foreign currency in real-time while you create transactions. These exchange rates are fetched from our third-party service provider Open Exchange Rates against the base currency of your organization. However, suppose you want to enter the rates manually, disable exchange rate feeds first, and enter the exchange rates manually.
Enabling Multi-currency Transactions for Each Contact
Before enabling Multi-currency Transactions for Each Contact for customers and vendors, ensure that you update the credit limit in the base currency for all customers.
If you have created custom views, workflows or webhooks using the parameters receivables, payables, or unused credits, ensure that you edit the following for Customers and Vendors:
Custom Views: While updating the criteria, select Receivables BCY, Payables BCY, and Unused Credits BCY as the fields instead of Receivables, Payables, and Unused Credits.
Workflow Rule: While updating the triggers, select Receivables BCY and Payables BCY as the fields instead of Receivables and Payables.
Webhooks: While updating parameter values, select Receivables BCY and Payables BCY as the parameters instead of Receivables and Payables.
You will have to enable Multi-currency Transactions for Each Contact to record transactions for customers and vendors in different currencies.
- Go to Settings in the top right corner.
- Navigate to the Module Settings.
- Click Customers and Vendors under General.
- Slide the toggle next to Multi-currency Transactions for Each Contact.
- Click Save.
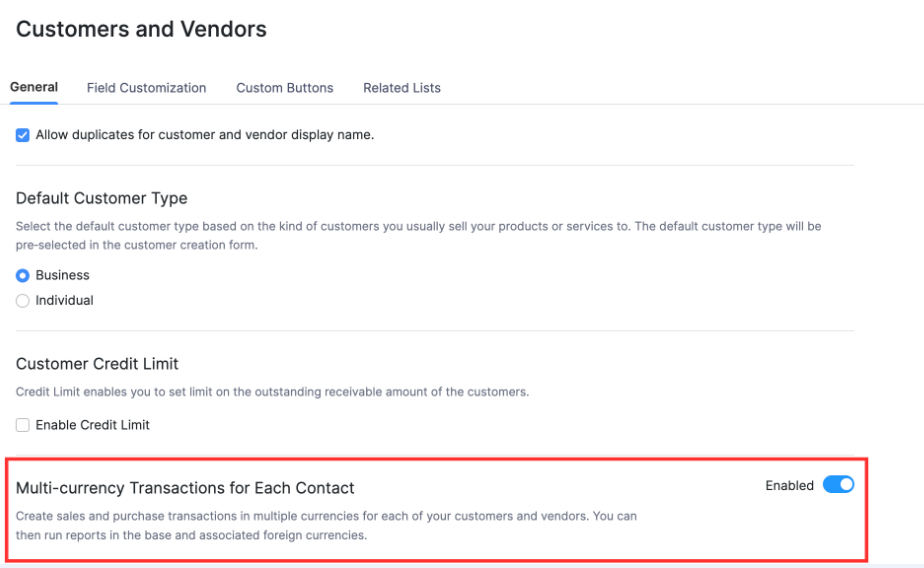
Note: You cannot disable Multi-currency Transactions for Each Contact once you have created transactions in other currencies for your customers or vendors.
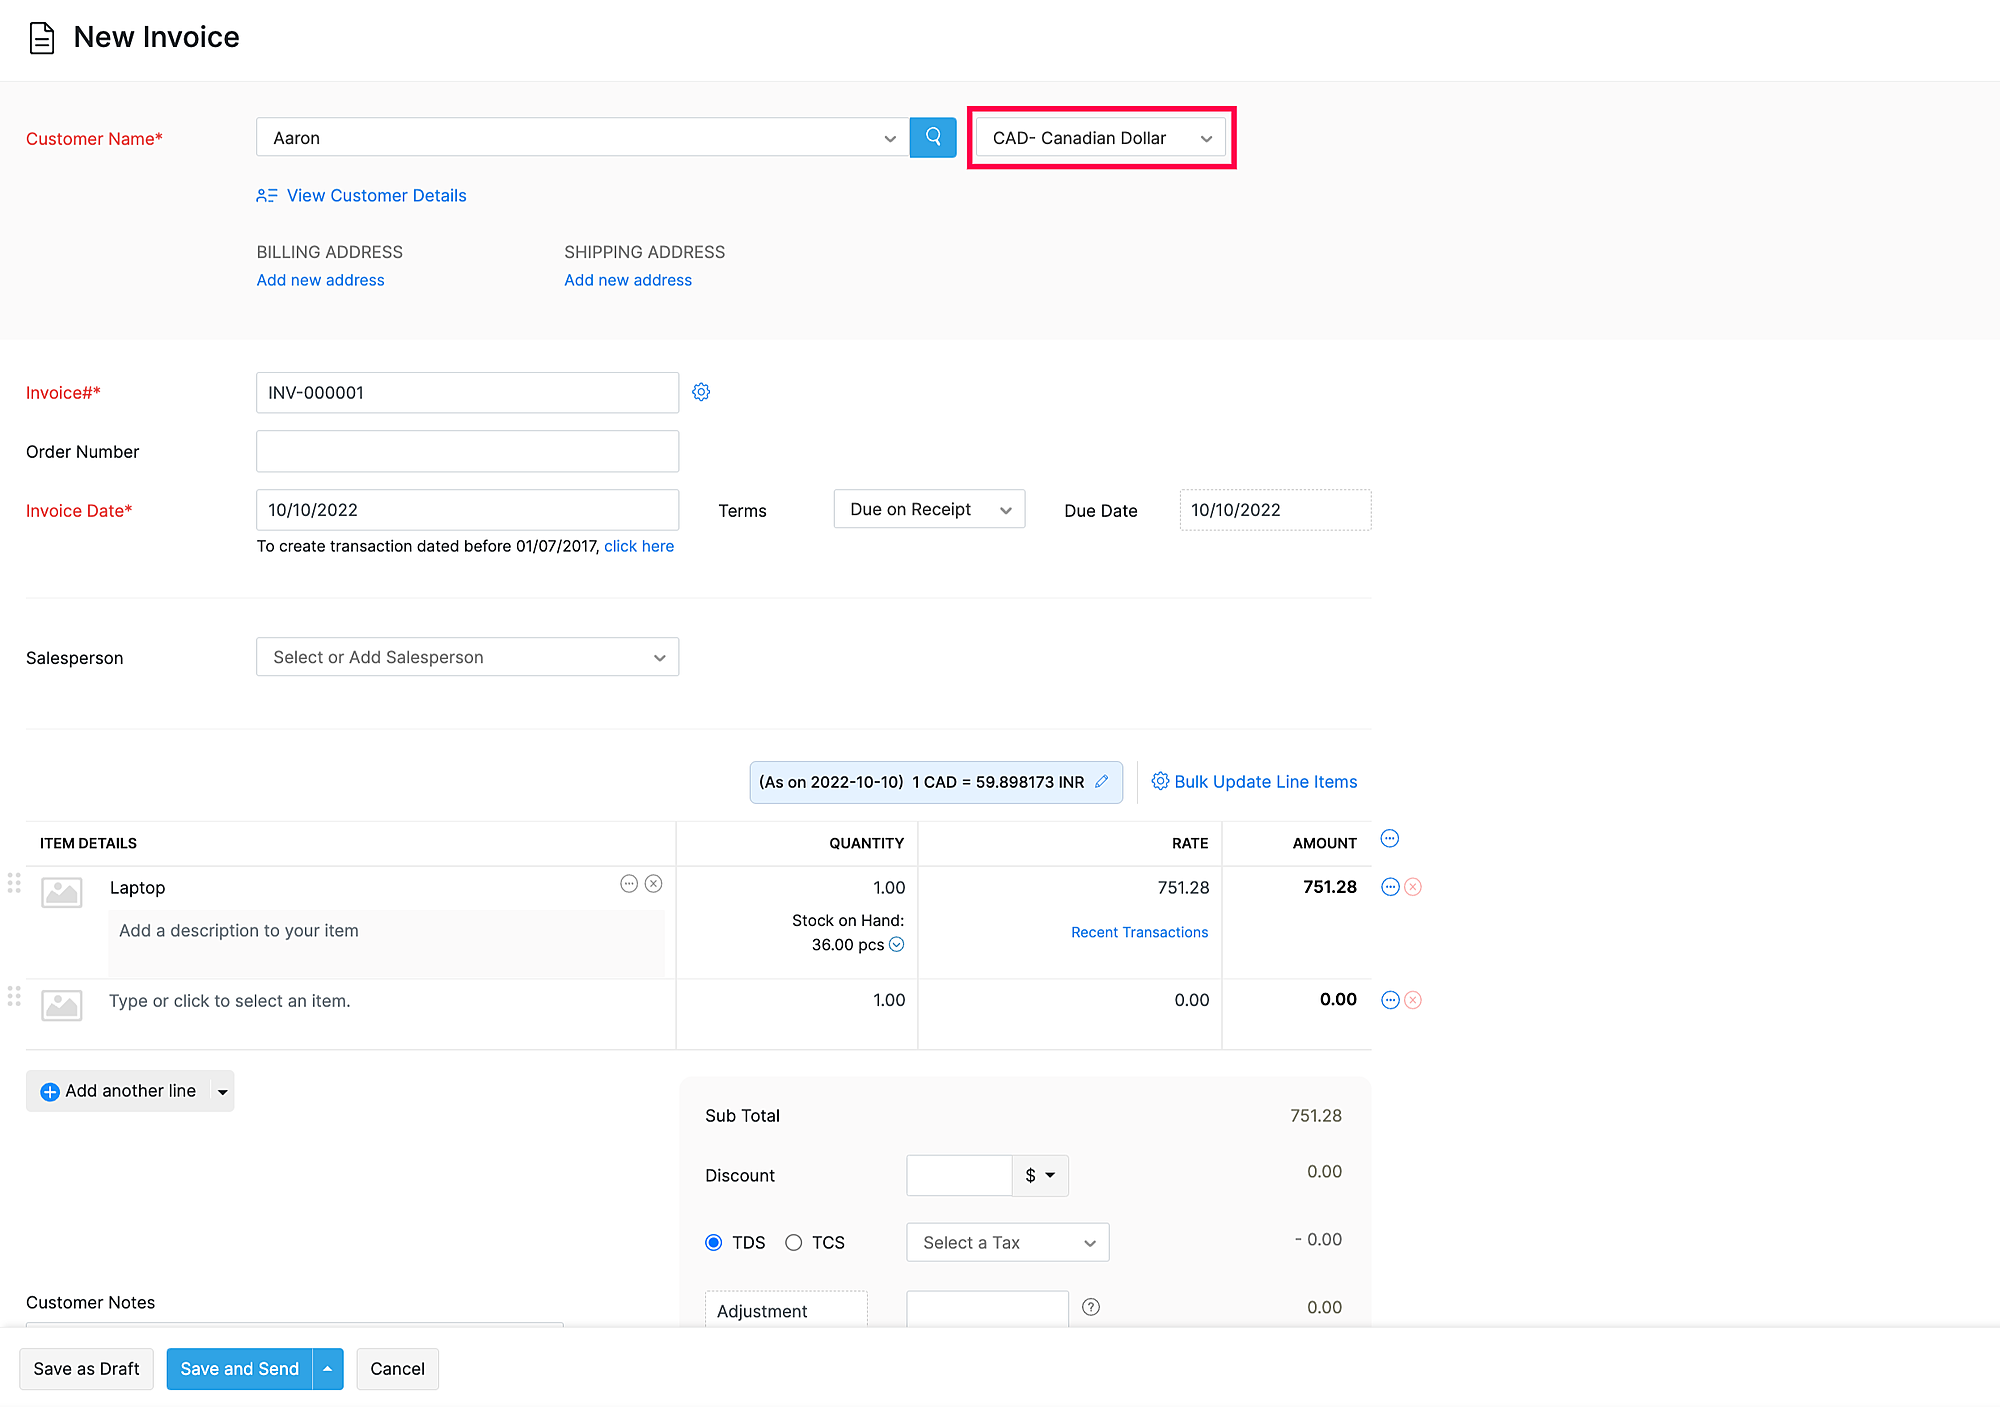
Creating Transactions in Different Currencies
Now that you have enabled Multi-currency Transactions for Each Contact, you can create transactions for your customers or vendors in other currencies.
- Select the Sales or Purchases transaction you want to create.
- Click the + New button in the top right corner of the transaction’s list page.
- Enter the transaction details.
- Click the currency dropdown next to Customer Name and select the currency in which you want to create the transaction.
- Click Save.
View Multi-currency Details of Customers and Vendors
Contact List Page
The receivables, payables and unused credits for different currencies will be listed below the customer’s or vendor’s default currency.

Contact Details Page
Receivables or Payables will be displayed as a table. It contains the outstanding receivables or payables, unused credits, and the currency in which you have recorded transactions for your customers or vendors.
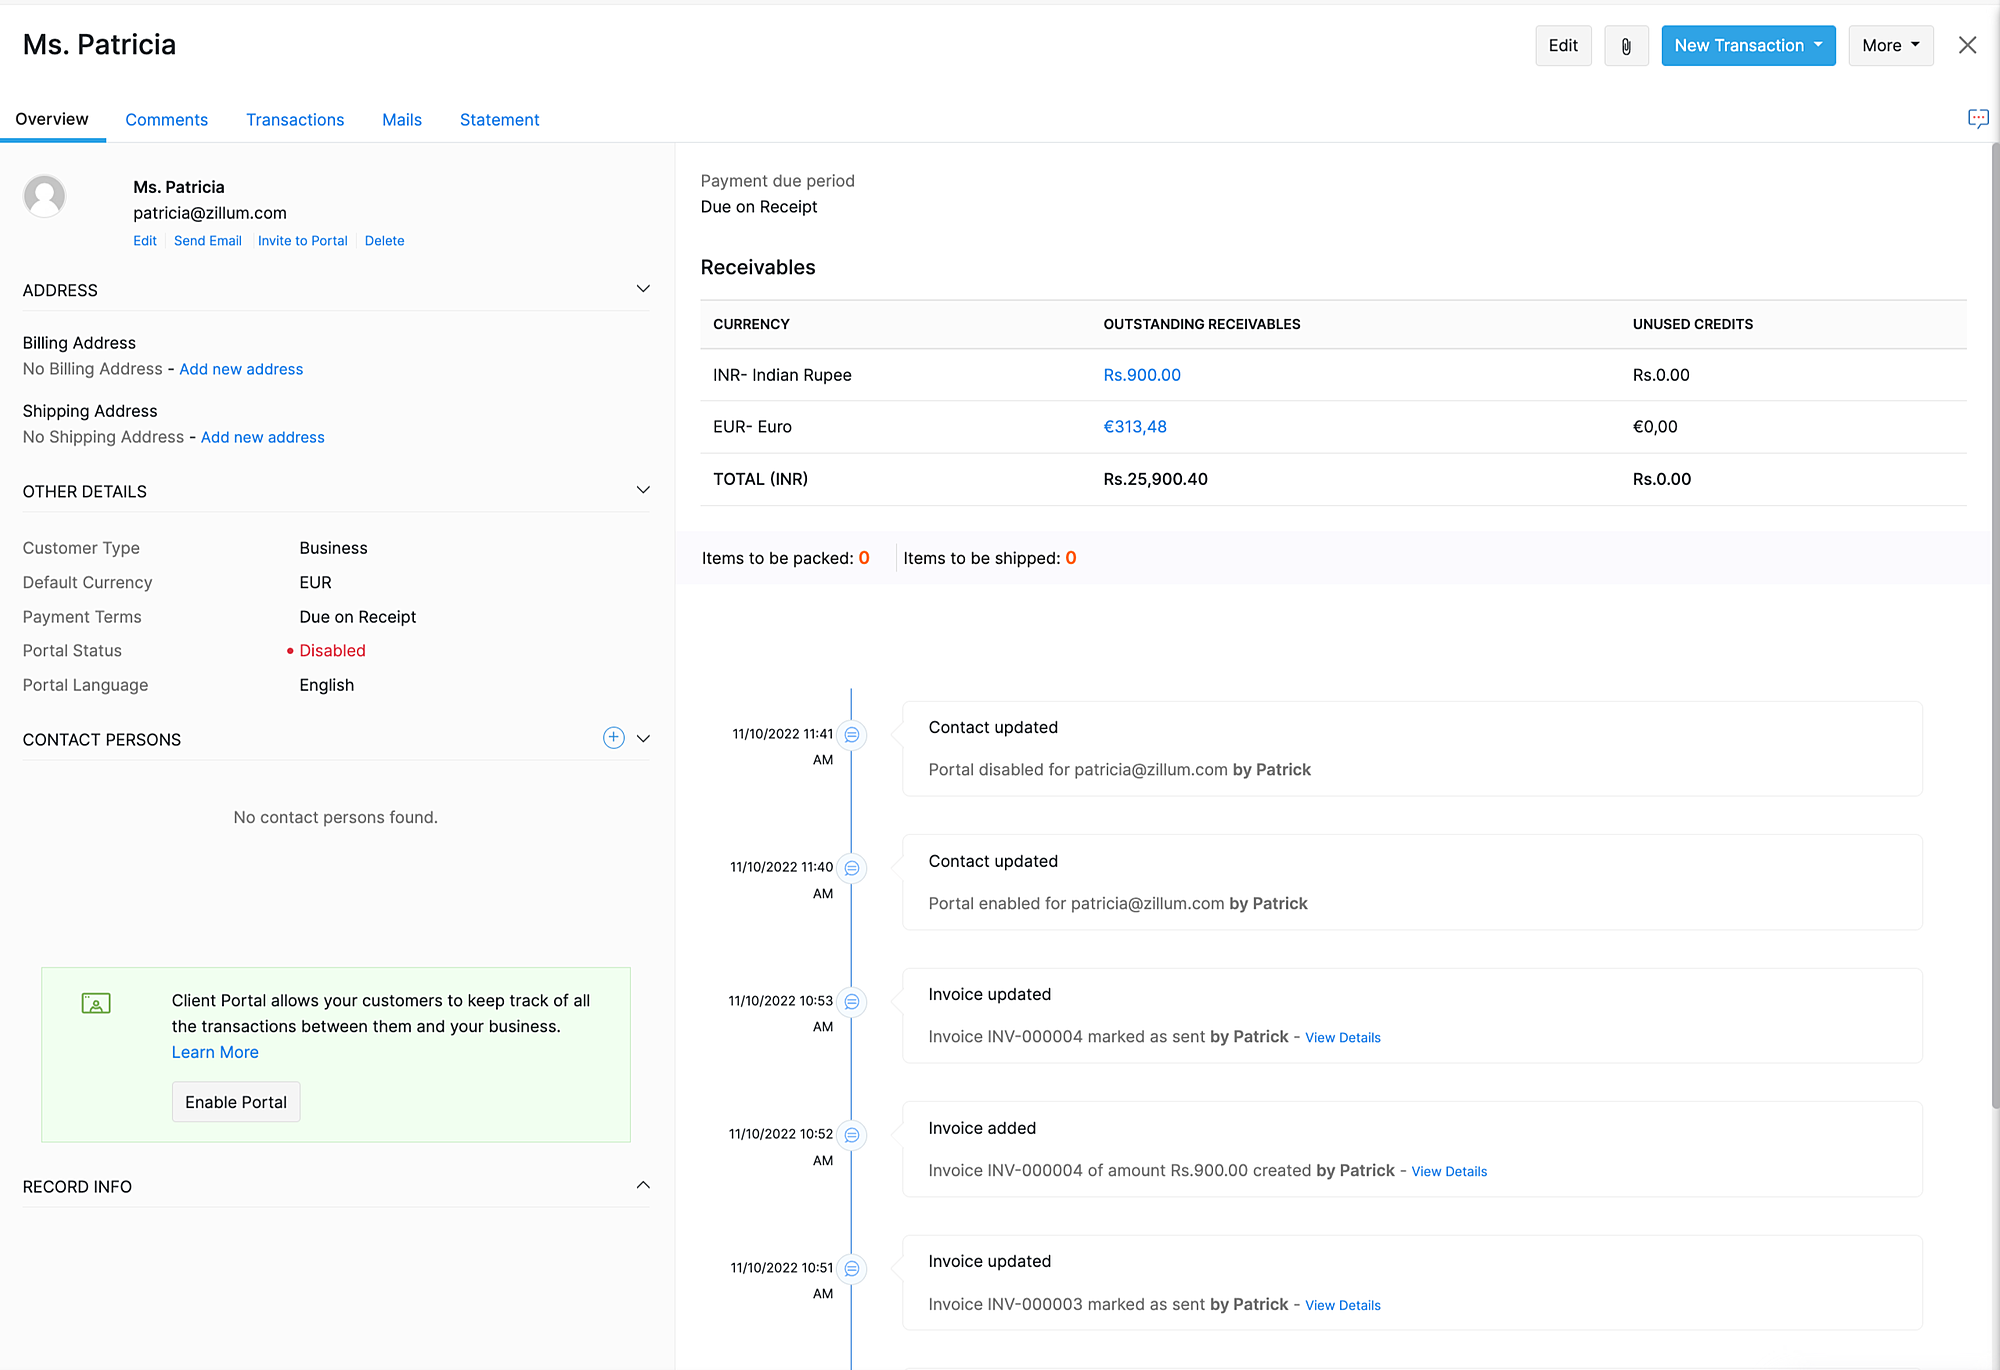
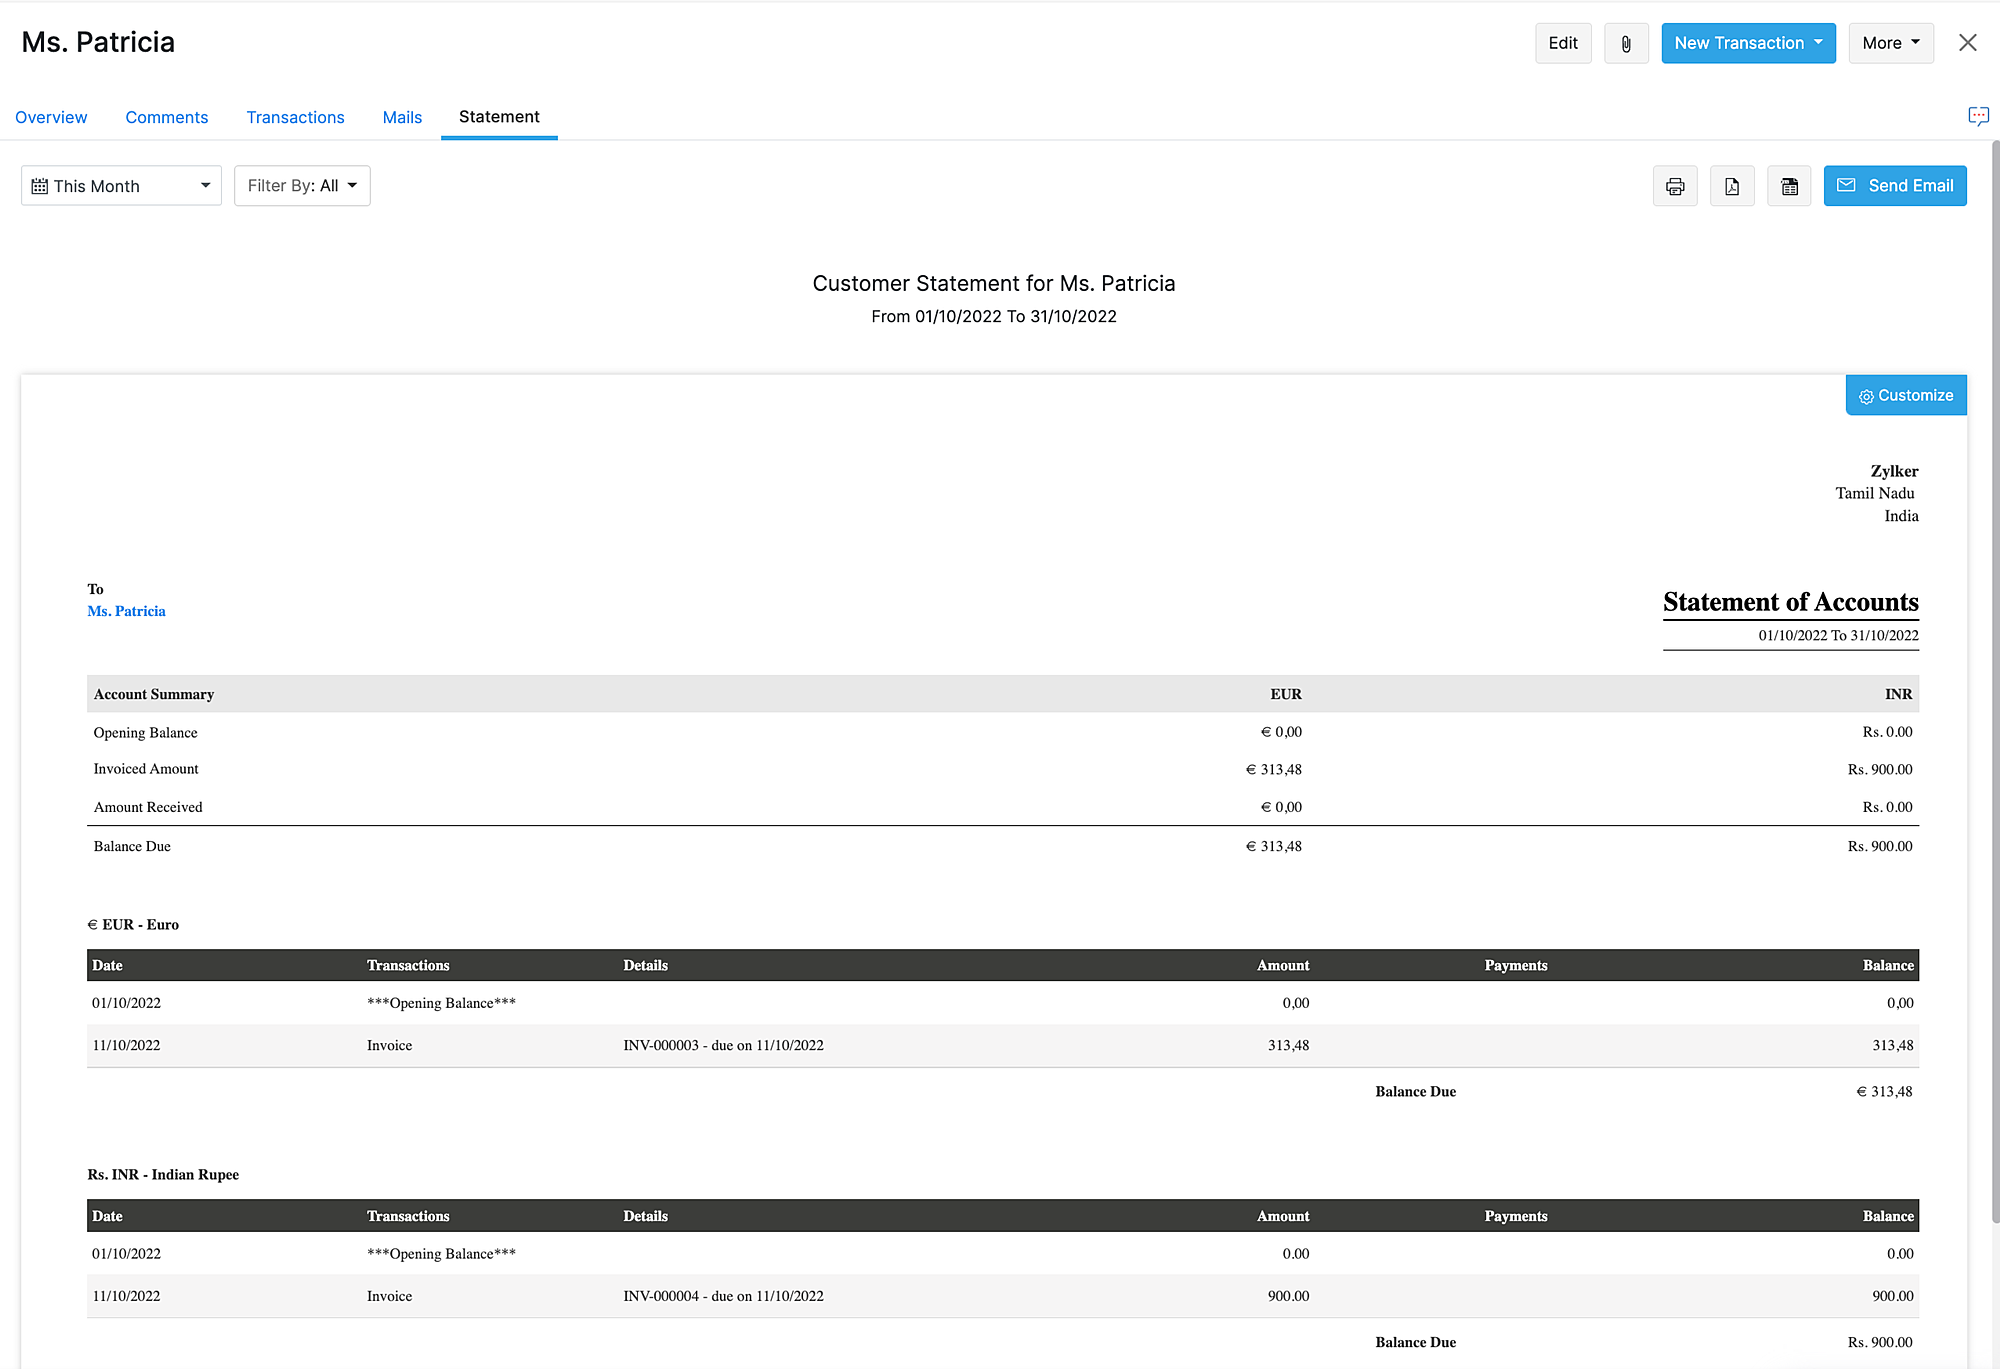
Customer and Vendor Statements
The Statement section contains the breakdown of all the currencies in which you have created transactions.
Recording Payments Received or Made
You can also record payments in currencies you have invoiced your customers or recorded vendor bills.
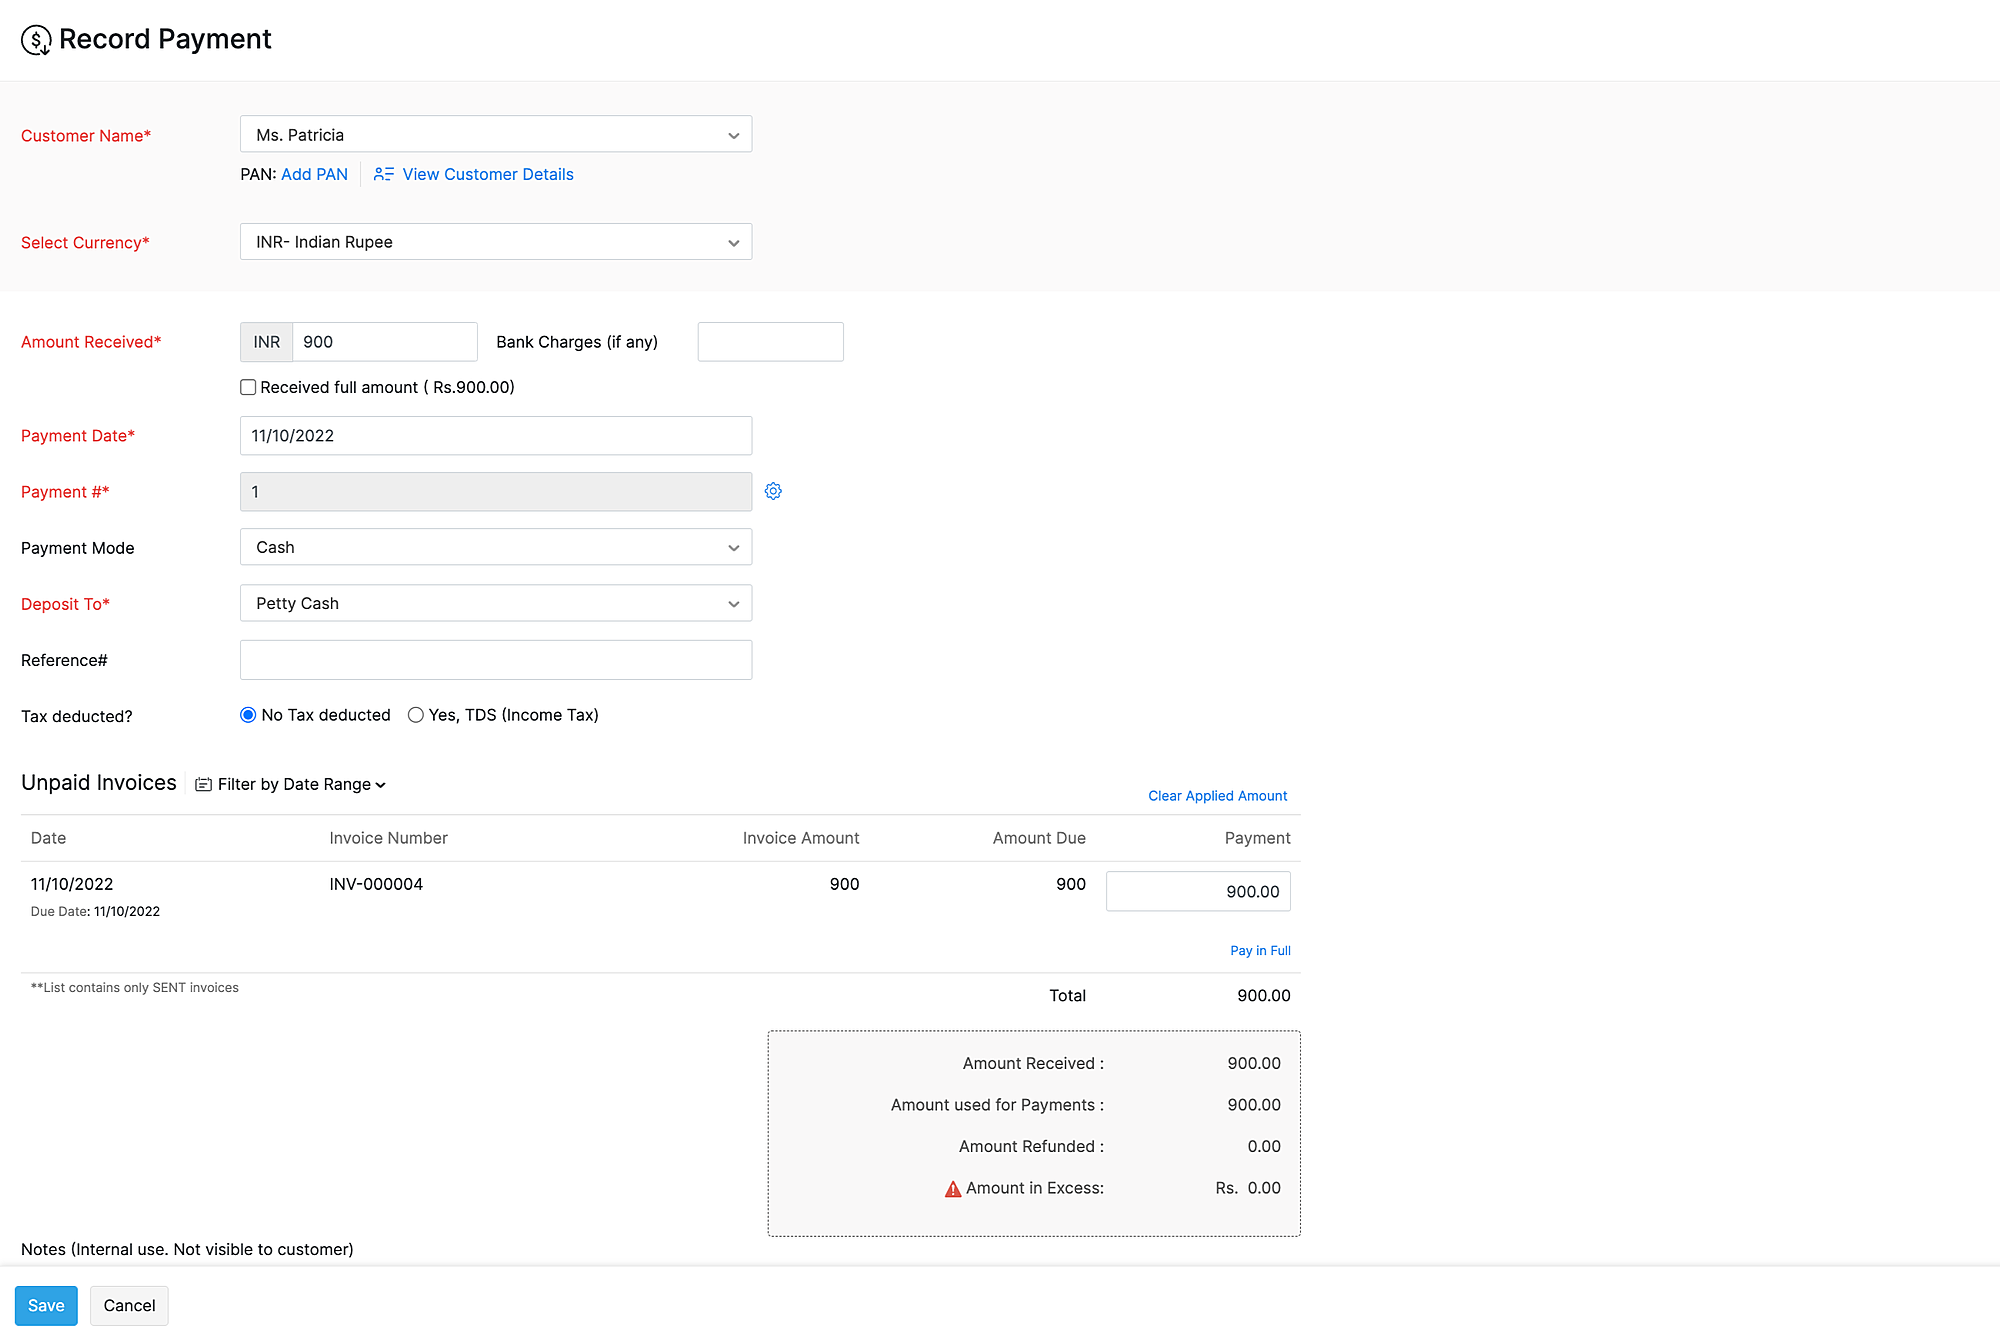
Go to Payments Received to record customer payment or Payments Made to record vendor payment.
Select the currency in which you want to record the payment.
Enter the Amount Received if you are recording customer payment or Payment Made if you are recording vendor payment.
Enter the amount for each unpaid invoice or bill.
Click Save.
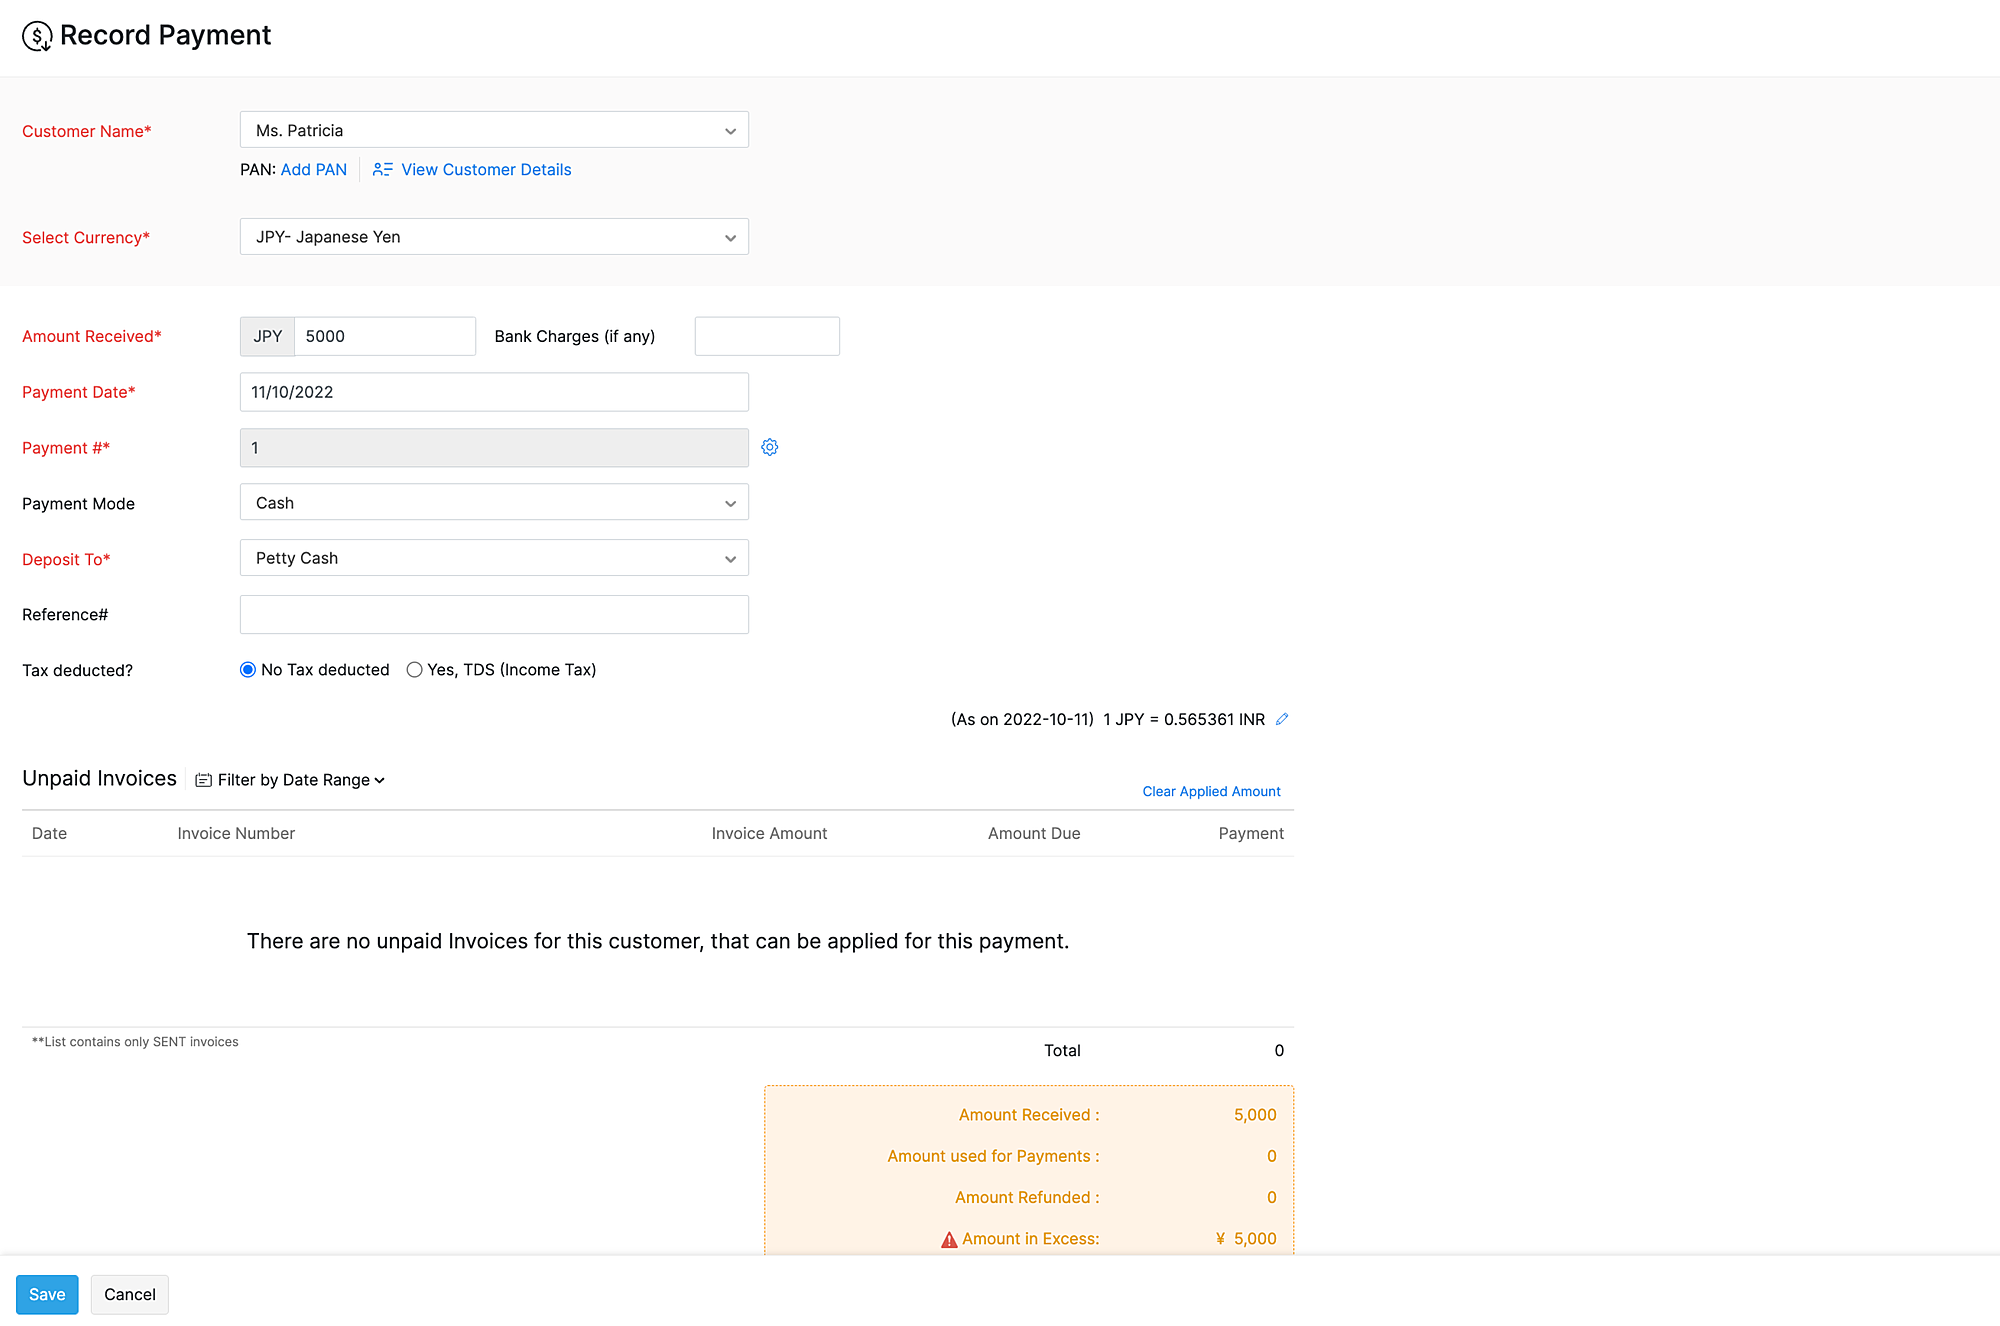
Suppose you record a payment in a currency for which you have no transactions for the customer or vendor. In that case, the payment will be recorded as an excess payment.
Reports
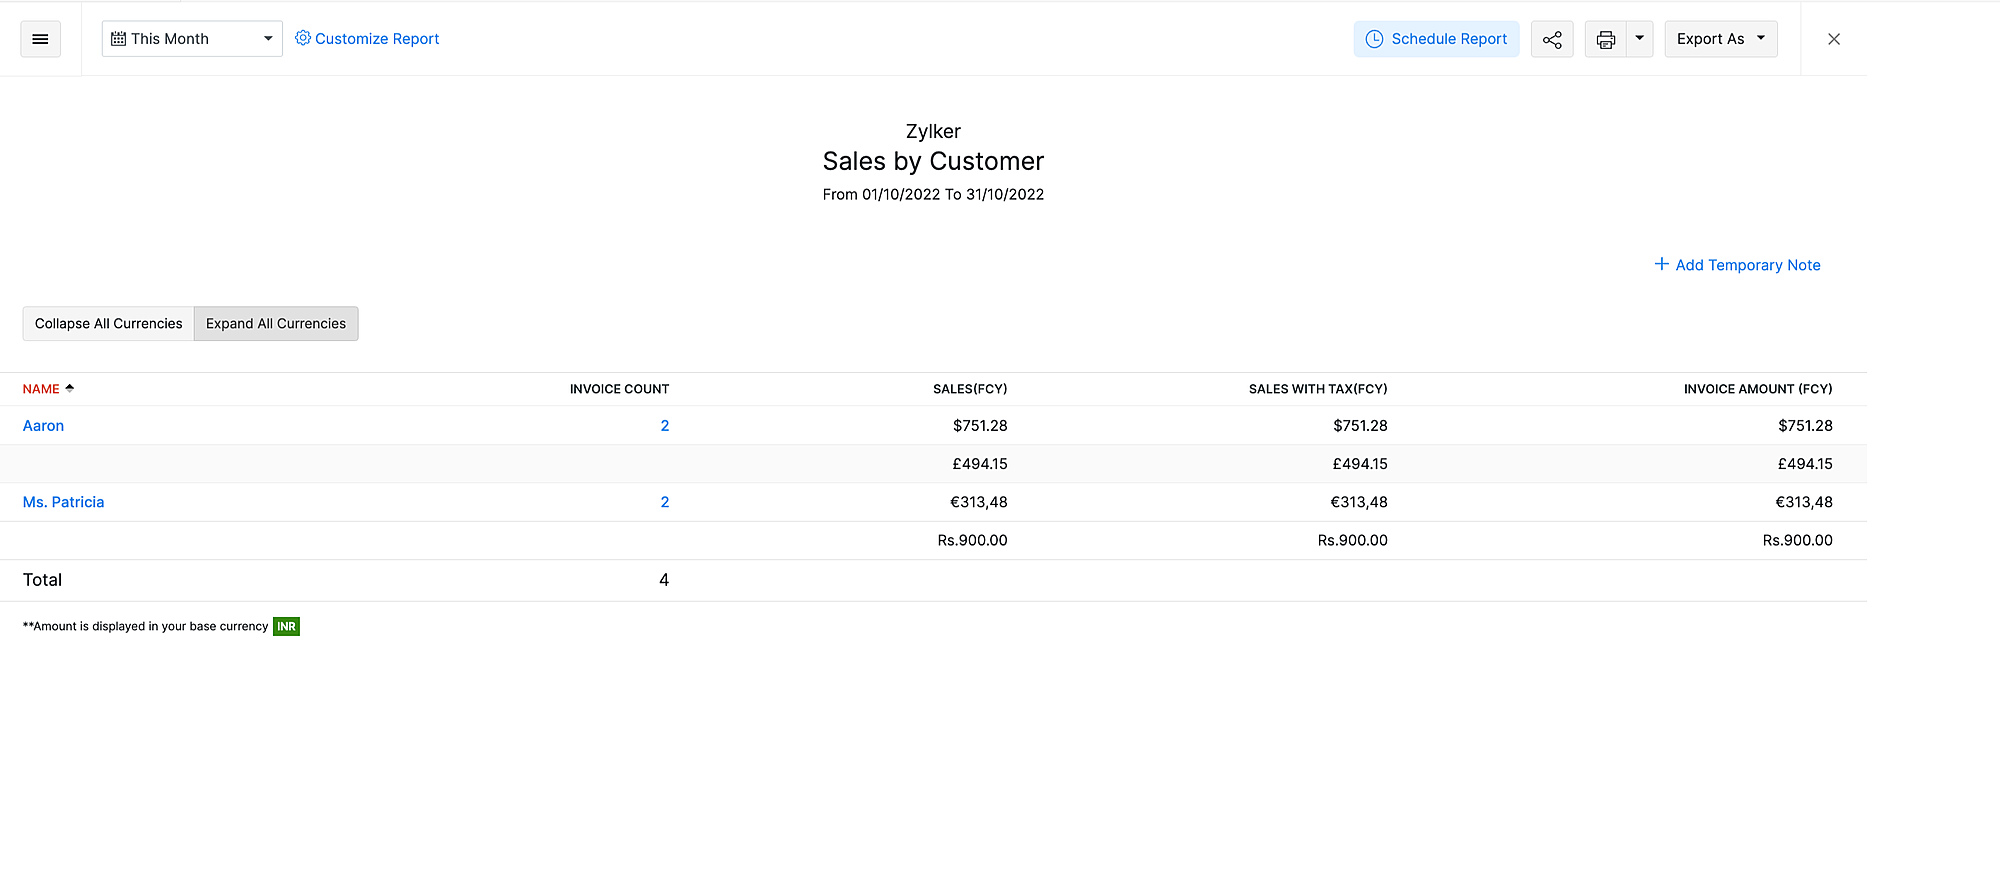
We have added Collapse All Currencies and Expand All Currencies buttons for reports that support Multi-currency Transactions for Each Contact.
Collapse All Currencies displays transactions created in the default currency of the customers or vendors.
Expand All Currencies displays all the transactions created for your customers or vendors.
The following reports support Multi-currency Transaction for Each Contact:
- Sales by Customer
- Customer Balances
- Vendor Balances
- Purchase Orders by Vendor
Advanced Search
When performing an advanced search, you can use the currency field as a filter to search for transactions of a particular currency.
Customer Address Format
Under the Customer Address Format, you can insert placeholders(for additional data) and customize the format of your customer’s address on PDF templates.
You can also create custom fields for contacts and use them as a placeholder in the address.

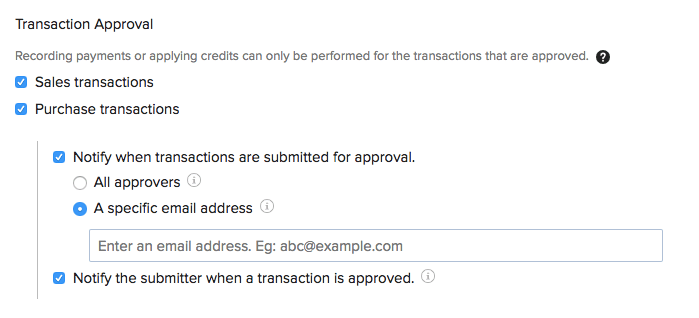
Approvals
If you want the transactions to be verified by you and/or your trusted staff before they are accounted for, you can set up an approval workflow in Zoho Inventory. This helps in catching overlooked mistakes and prevents any unnecessary losses to the company.
Learn more about transaction approval in Zoho Inventory.
Items
- Set Measurement Units
- Composite Items & Price Lists
- Duplicate Item Name
- Advanced Inventory Tracking
- Out of Stock & Reorders
- Additional Information
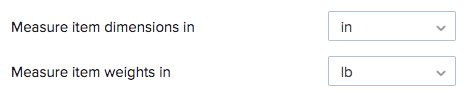
Set Measurement Units
Choose the measurement units with which you’d like to record the dimensions and weight of your items.
Duplicate Item Name
Check the Allow duplicate item names option if you want to use the same name for more than one item in your inventory. But before you do, you must make the SKU field active and mandatory since it will serve as the index field for mapping the appropriate items during import.
Composite Items & Price Lists
- Enable the Composite Items module to create customized kits.
- Enable Price Lists to provide customized item rates for your customers.
Advanced Inventory Tracking
This section lets you enable advanced inventory tracking methods like serial number tracking and batch tracking. Also, you can select the transactions in which serial number or batch details have to be tracked. To do this:
- Check the box near serial number tracking and/or batch tracking to enable one or both options.
- In the section below, click Configure to manage how your inventory is tracked.
In the configuration popup, the first option lets you choose the transactions for which serial numbers and batches can be tracked. The options are:
Invoices, Sales Receipts, Bills, and Credit Notes.
Packages, Purchase Receives, Return Receives.
Based on your choice, serial numbers and batch details will be recorded when you create the transactions in the list.
Mark the Mandate serial number or batch tracking in transactions checkbox if you want to ensure that serial number or batch details are entered when you create an item or a transaction.
Insight: If you’ve not checked this option, transactions or items with missing tracking details will have a banner on their details page where you can update the serial number or batch tracking details. ![]()
Pro Tip: If you have not mandated serial number or batch tracking in transactions, the Missing Advanced Inventory Tracking Details report will help you identify transactions that do not have serial number and batch tracking details.
Low Stock Settings
Select one or more of the following low stock settings you want to apply to your organization:
Prevent stock from going below zero: Prevents an item from going out of stock. This is only applicable for accounting stock. You can still create shipments with low stock items since it only affects the physical stock.
Show an ‘Out of Stock’ warning whenever an item’s stock drops below zero: Presents a warning before committing a sale with insufficient stock. You can however, choose to proceed.
Notify me when an item quantity drops below reorder point:
- Get notified whenever your items reach the reorder point.
- Select an email from the dropdown to which the list of low stock items should be sent.
Track landed cost on items: Check this option if you want to track landed cost on items. Learn more about landed costs.
Additional Information
This section contains the fields related to the items module which you can choose whether to show or not show on your PDF templates.
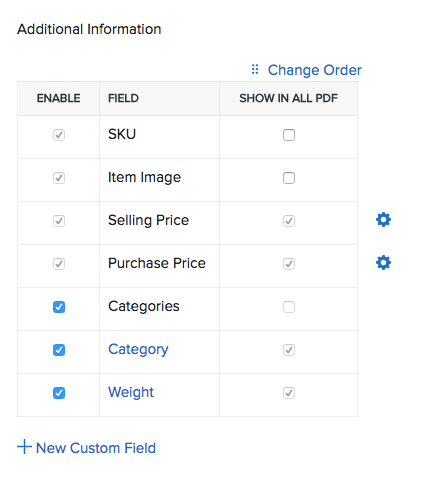
Here, you can also configure the scope of sales and purchase prices for each role in your organization. To do so:
- Click the Gear icon next to the selling price or purchase price field.
- Choose one of the permissions against each role:
- Read and Write The user can view and modify the field value.
- Read Only The user can only view the field value.
- Hide Selling/Purchase Price The user will have no access to the field. against each role.
The Admin will have complete access to all the fields.
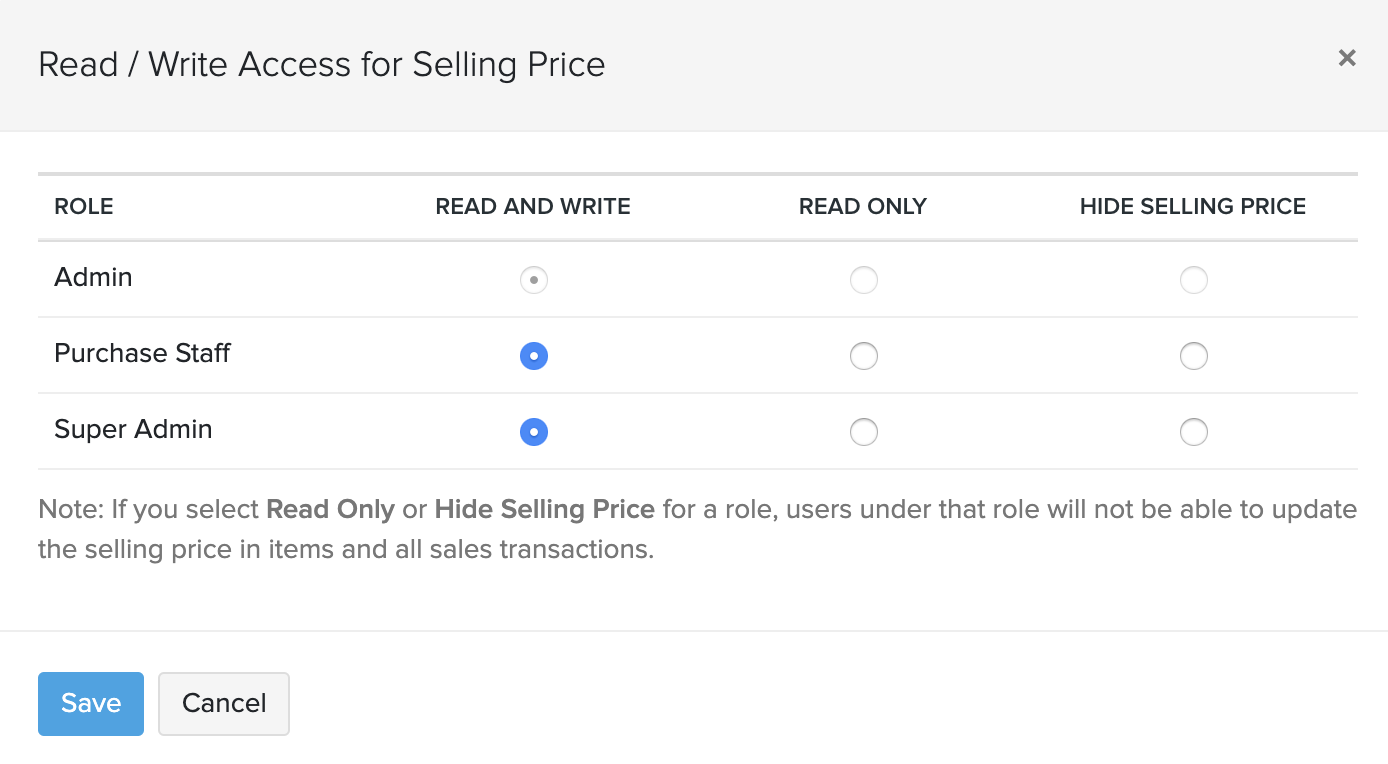
- Click save to apply the changes.
Note: To hide the sales or the purchase price for a role, you must first restrict their access to those modules completely. Learn how you can configure the permissions for a role here.
Unit Conversion
Unit Conversion in Zoho Inventory automatically lets you convert an item’s base unit to another unit while creating transactions. Learn More
Sales Orders
Configure the sales order module to keep up with your sales volume.
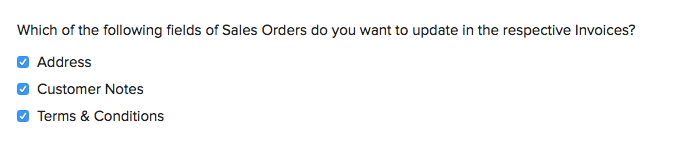
- Select the sales order fields whose values you want to auto-update in the respective invoices.
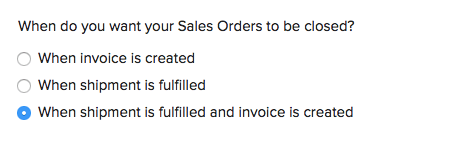
- Choose the action following which you’d want to close a sales order.
- If your team Other than the default statuses, you can create and assign your own statuses to the sales orders. For instance, you can create a status called ‘Committed’ and mark the order as Committed instead of Confirmed.

- You can also enter the terms and conditions of your business and notes to your customer in the respective fields. It will be displayed in all the sales orders created. You can modify the content at the time of creating the sales order.
Package
Here, you can create additional fields for the packages module using custom fields. This will be reflected across all the new packages.
Related: Learn more about creating packages for a sales order in Zoho Inventory.
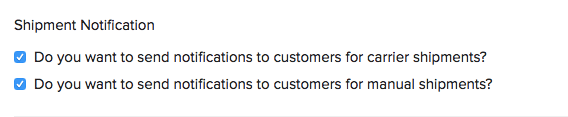
Shipment
Choose whether or not to send notifications to your customers for manual and carrier shipments.
Related: Learn how you can create shipments in Zoho Inventory.
Invoices
You can configure the following preferences for your invoices module.
Edit Sent Invoices
- Allow editing of sent invoice?: Check this option to allow editing invoices which are already sent to your customers.
Payments
Check the options you’d like to automate when your customer makes you an online payment.
- Get notified when customers pay online: You will be notified whenever your customer makes you an online payment.
- Do you want to include the payment receipt along with the thank you note?: The payment receipt will be sent along with the thank you note.
- Automate thank you note to customer on receipt of online payment: A thank you note will be sent to your customer automatically whenever you receive an online payment from them.
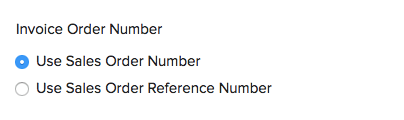
Invoice Order Number
Choose whether you want to display the Sales Order Number or the Sales Order Reference Number as your Invoice Order Number.
Terms & Customer Notes
Here, you can enter your business’ terms and conditions and additional notes. This will be displayed in all the invoices. You can also modify the content at the time of creating the invoice.
Custom Fields
You can also create custom fields to record additional information on your invoices. This will be reflected across all future invoices.
Payments Received
Configure the Payments Received module to express your gratitude.
Here, you can create custom fields to record additional information on your payment receipt. This will be reflected across all your future payment receipts.
Pro Tip: You can autogenerate the payment receipt number using the Auto Generate Number custom field. You can have only one custom field of this type.
Purchase Orders
Closing a Purchase Order
You can choose the action following which you want your purchase order to be closed in Zoho Inventory.
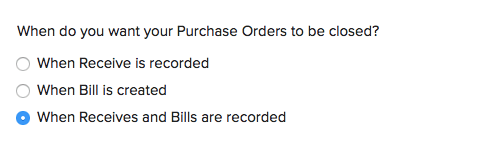
| Field | Description |
|---|---|
| When Receive is recorded | Your purchase order cycle will end once you record the receives of all items specified in it. |
| When Bill is created | Your purchase order cycle will end when you associate a bill with it. |
| When Receives and Bills are recorded | Your purchase order cycle will end when you record receives and associate bill(s) with it. |
Terms & Conditions:
Enter the terms and conditions of your business to be displayed in your purchase order. This will be displayed in all the purchase orders created unless otherwise you change the content at the time of creating the purchase order.
Notes:
You can enter notes for your vendors and suppliers on your purchase orders.
Bills
Here, you can create custom fields to record additional information on your bills. This will be reflected across all your future bills.
Payments Made
Here, you can create custom fields to record additional information on your payments made. This will be reflected across all your future bill payments.
Custom Fields
The custom fields are additional fields that you can introduce to a module to enter more data.
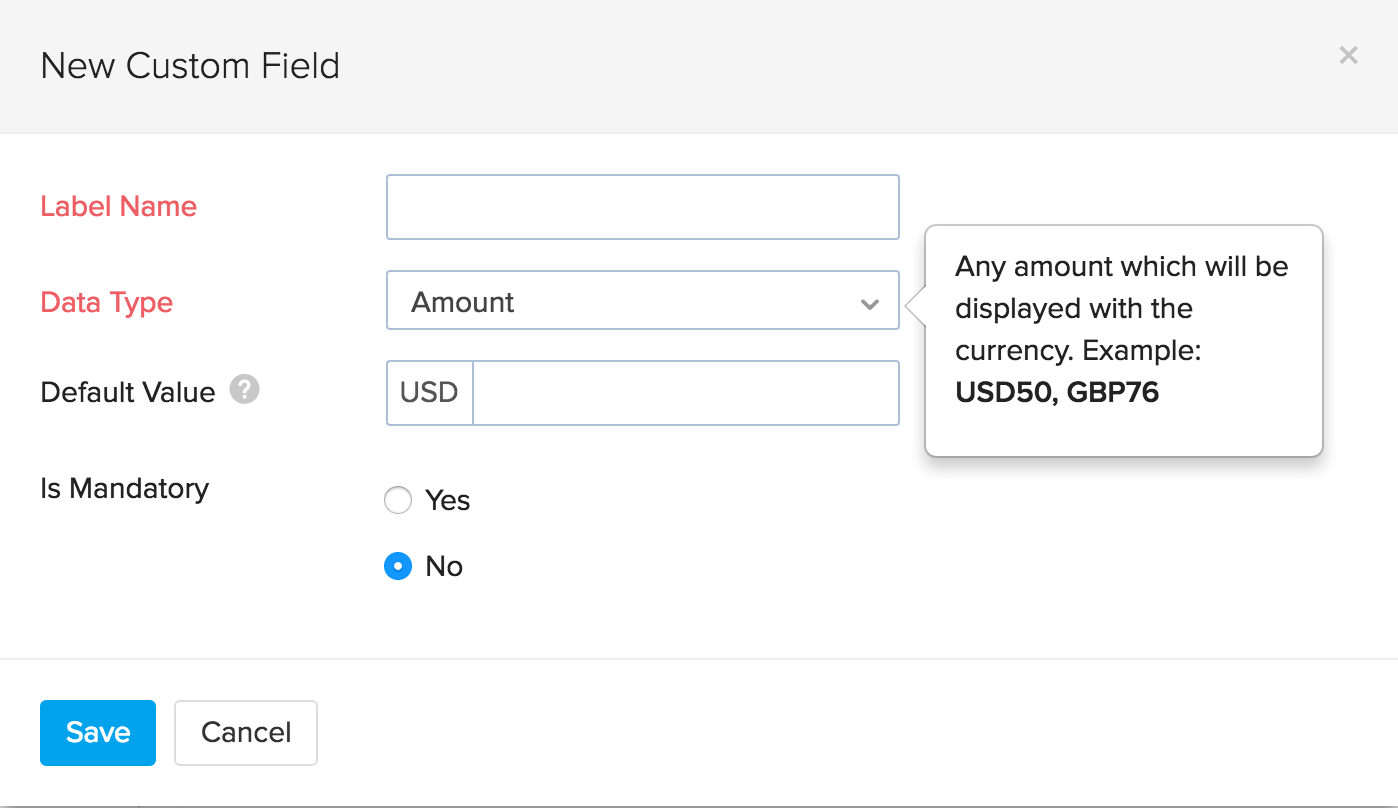
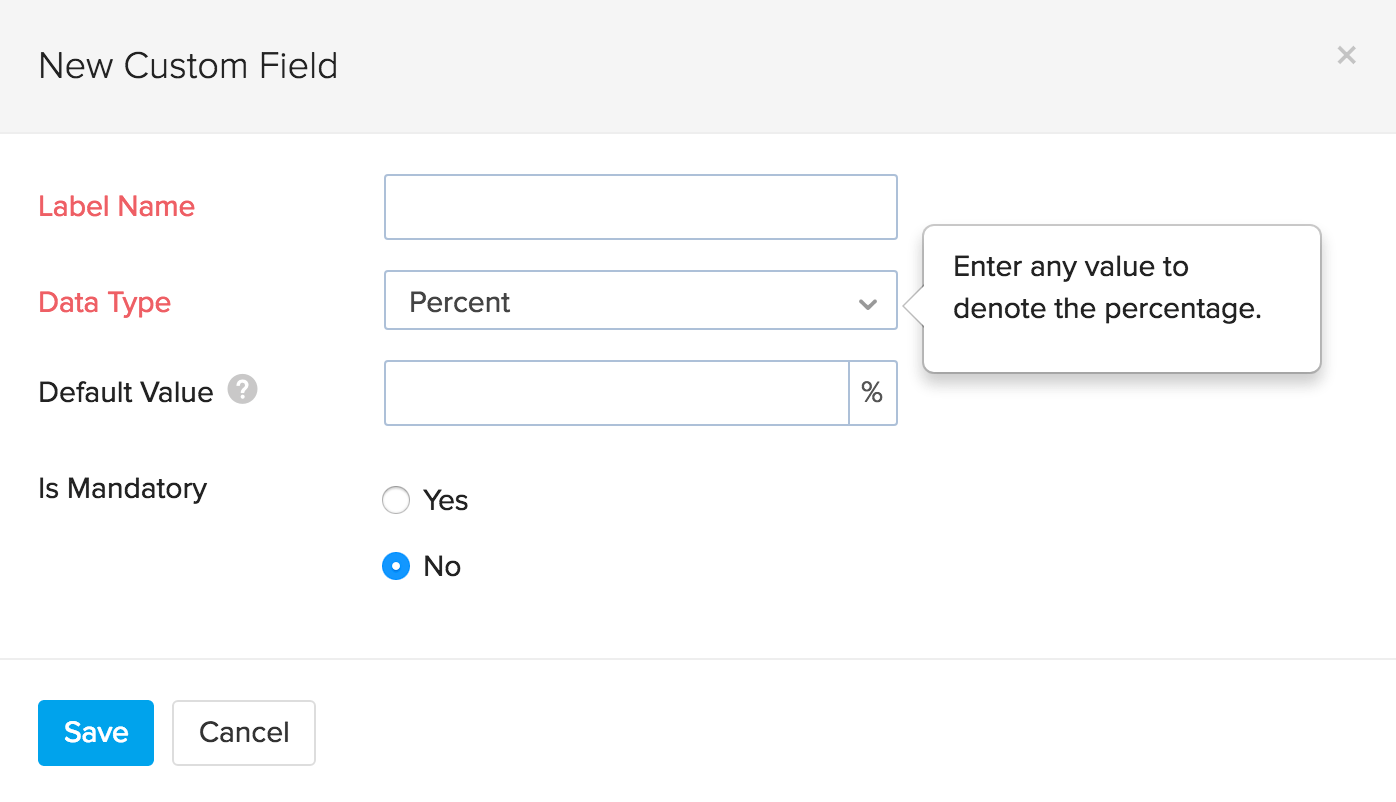
To create a custom field for a module:
- Go to Settings and navigate to the Module Settings.
- Open a module of your choice, say, Invoice.
- Go to the Field Customization tab and click + New on the top right corner of the page.
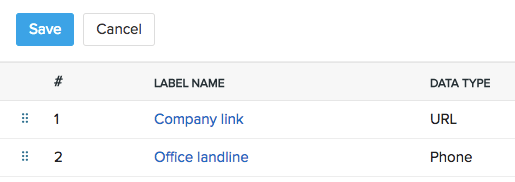
- Enter a label name and select a data type for the custom field.
- Choose an appropriate level of PII sensitivity if applicable. Learn more about the privacy and security in Zoho Inventory.
- If the custom field contains personally identifiable patient information, you can set the custom field as ePHI. This means that all the data entered in that field will be encrypted and only accessible to users who have the required permission.
Note: You can mark custom fields with the folowing data types as ePHI: Text, Email, URL, Phone, and Date.
- Enter a default value to display in the field, if needed.
Insight: If you’ve marked a custom field as PII or ePHI, you won’t be able to provide a default value for it.
- Choose whether the field is mandatory and if you want to display it in all PDFs.
Note: You can have a maximum of 44 custom fields and each data type has its own limits.
Custom field data types
Types of custom fields supported by Zoho Inventory are as follows:
Text
Select the Text datatype to record additional information of your choice. You can enter a short text, numerical value or a combination of both up to 100 characters. Values allowed are A-Z, 0-9 and special characters.
You can record additional email addresses using this field. Eg: fynn@hotmail.com.
URL
You can record and save website URLs using this field. Eg: www.zoho.com
Phone Number
This field allows you to record additional phone numbers of a contact. Eg: (123)-456-7890
Number
This field allows you to store numerical data(as whole numbers). Eg: 18, -18
Decimal
This field allows you to record decimal values. Eg: 2.38, -33.2
Amount
This field allows you to record amount along with the default currency code set for your organization. Eg: USD50, GBP76, AUD30 etc.
Percentage
Here, you can record values in percentages.
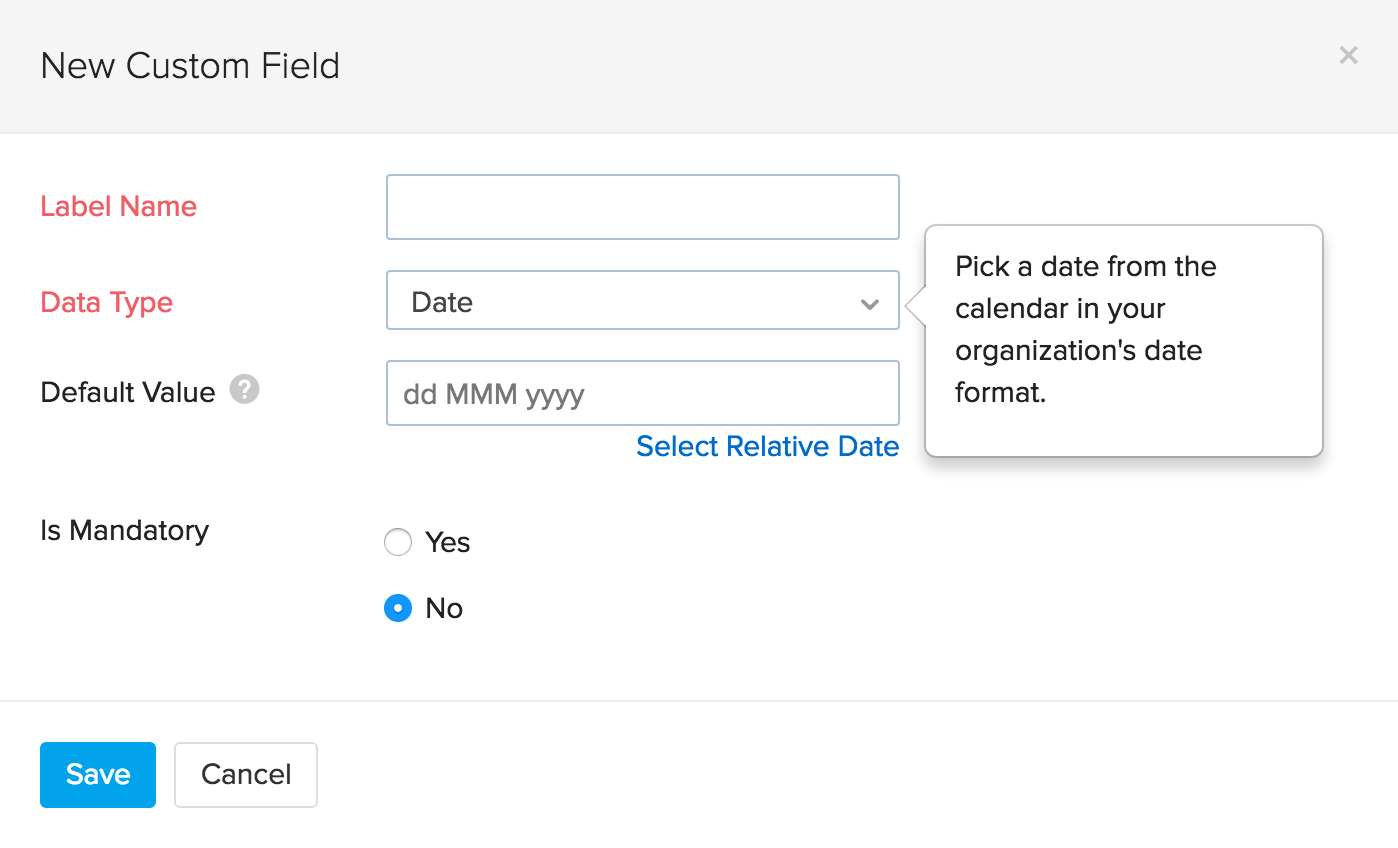
Date
This field allows you to record custom date values. Eg: Custom Date - 30/11/2022, Relative Date - Today, Tomorrow, Starting Date of Month etc.
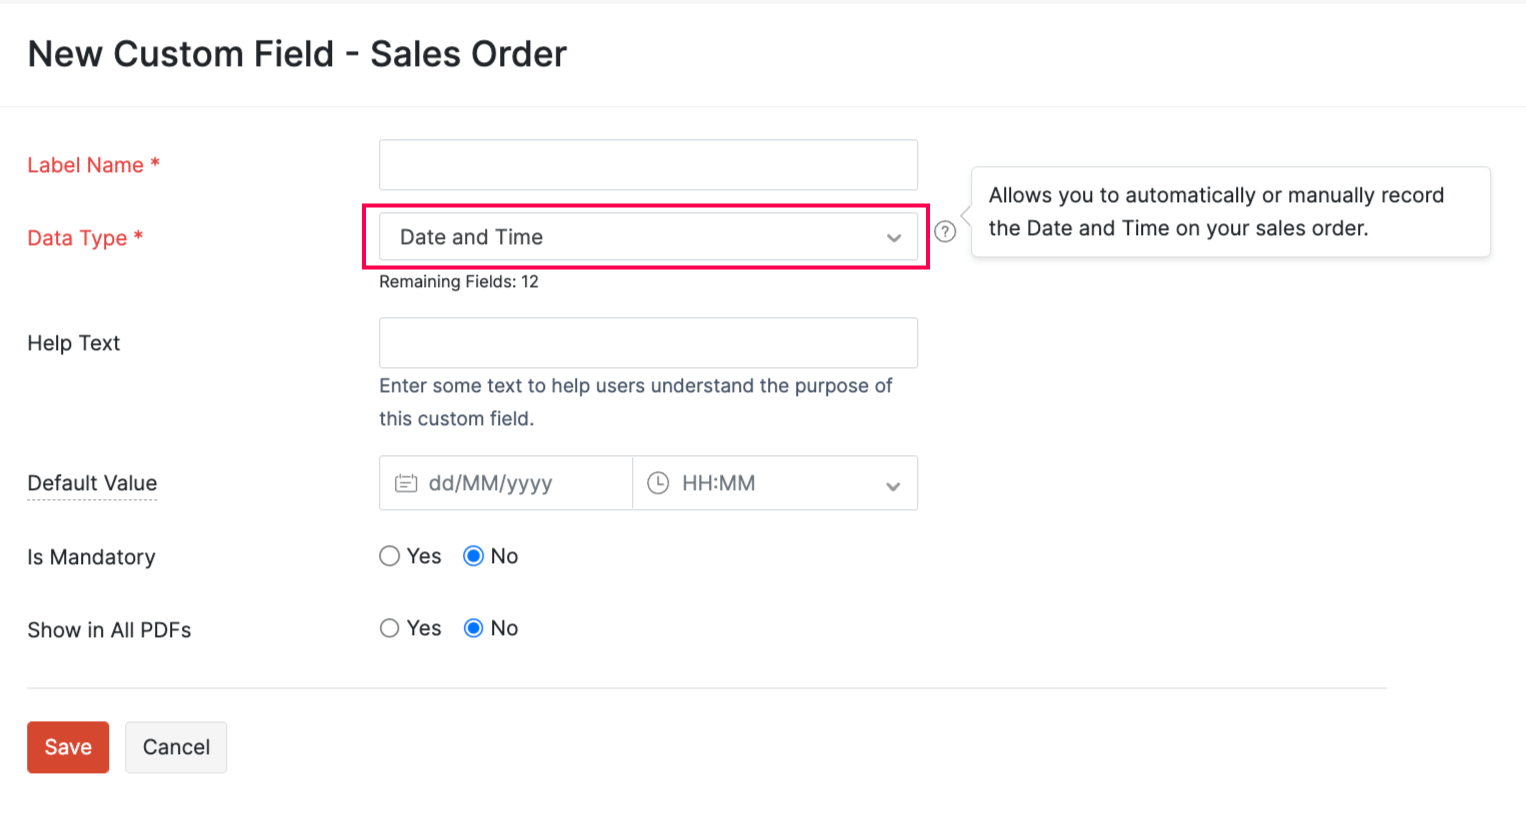
Date and Time
This field allows you to record the date and time in a transaction. Eg: Last Sync: 30/11/2022, 10:10.
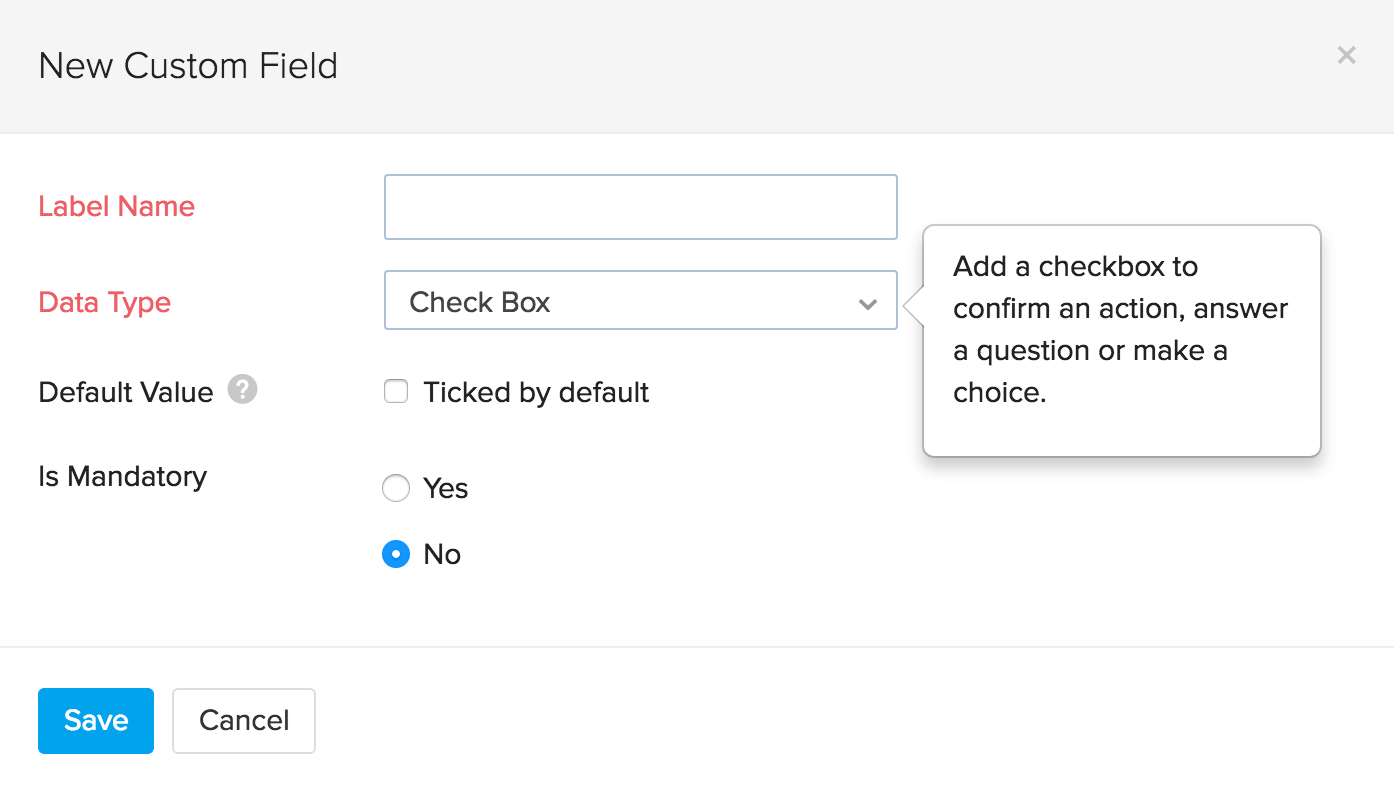
Checkbox
Using the checkbox field you can confirm an action, answer a question or make a choice. Here, you can also choose to have the checkbox ticked by default or leave it unticked.
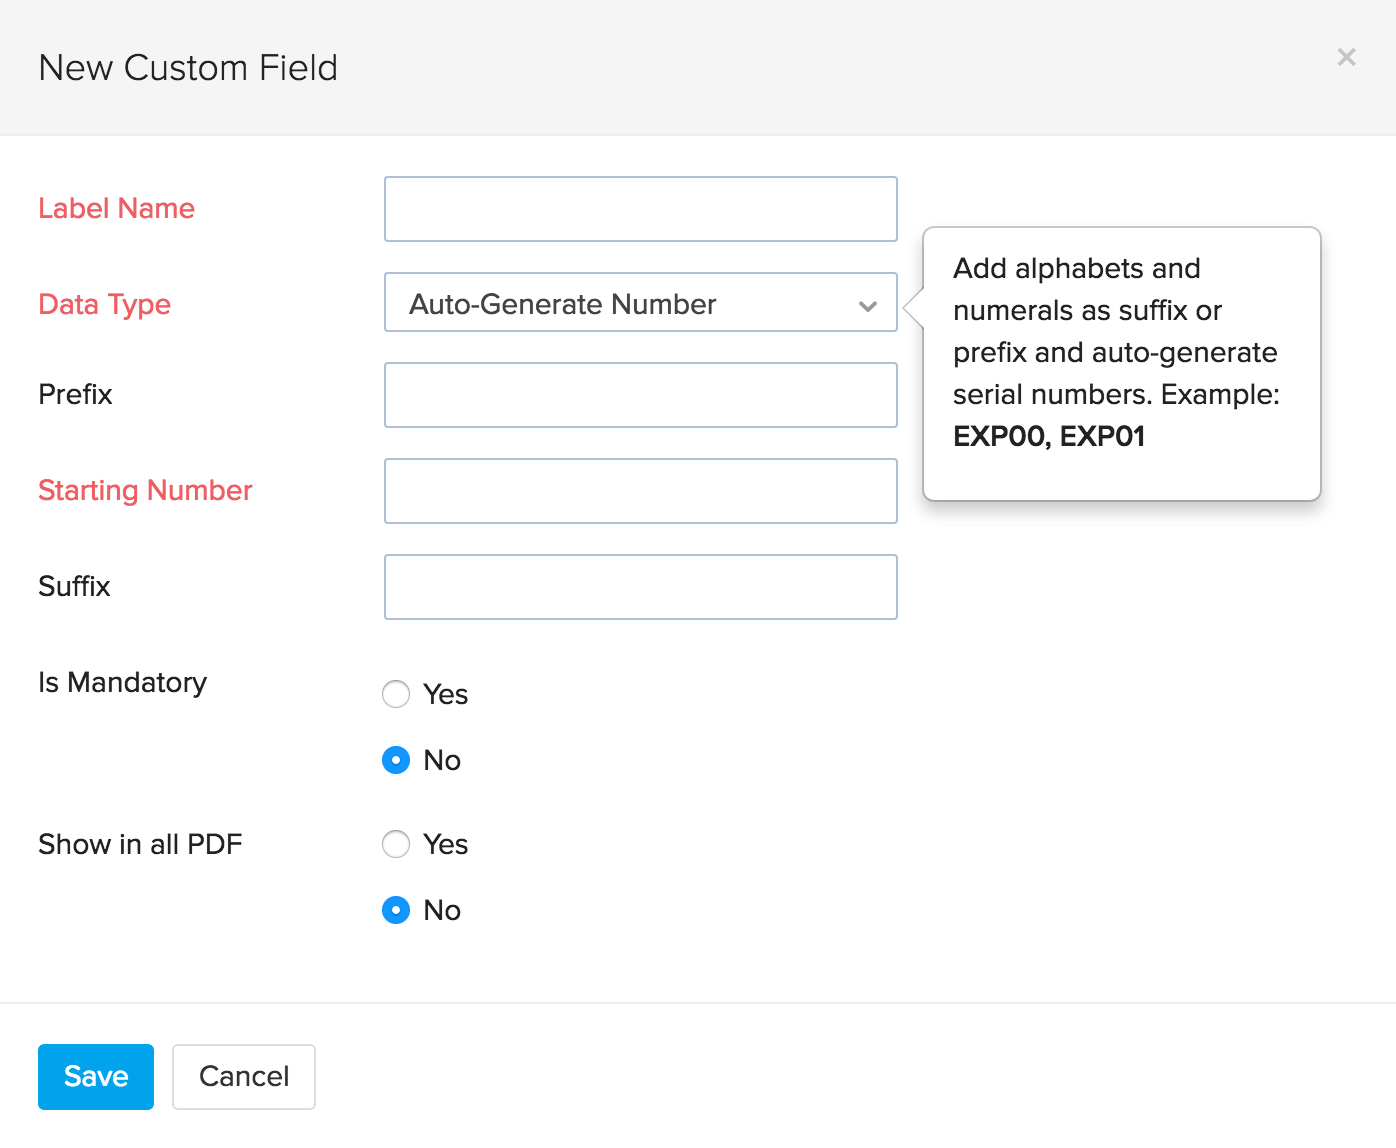
Auto-generate Number
Using this field you can autogenerate values with prefixes of your choice. You can have only one custom field of this type.
dropdown
Useful for creating a dropdown type custom field where you can input standard choices and make a selection.
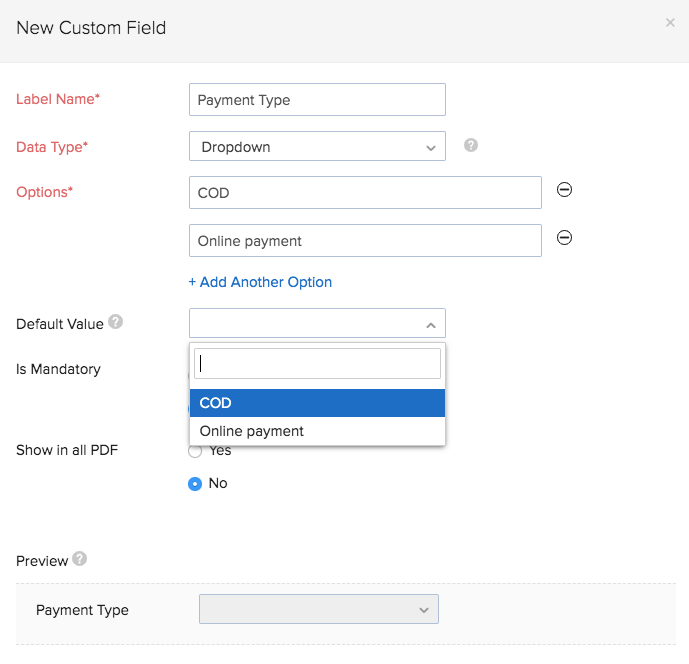
Note: You can only have one custom field of this type.
Multi-select
This custom field is similar to the dropdown field where you can input standard choices and select multiple options.
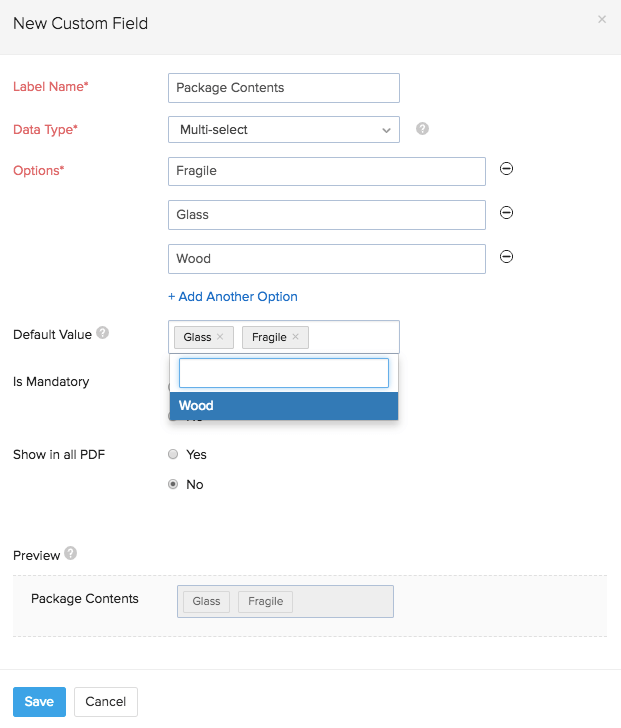
Note:
- You can only have two custom fields of this type per module.
- You can provide up to 500 values but select only up to five options in this field.
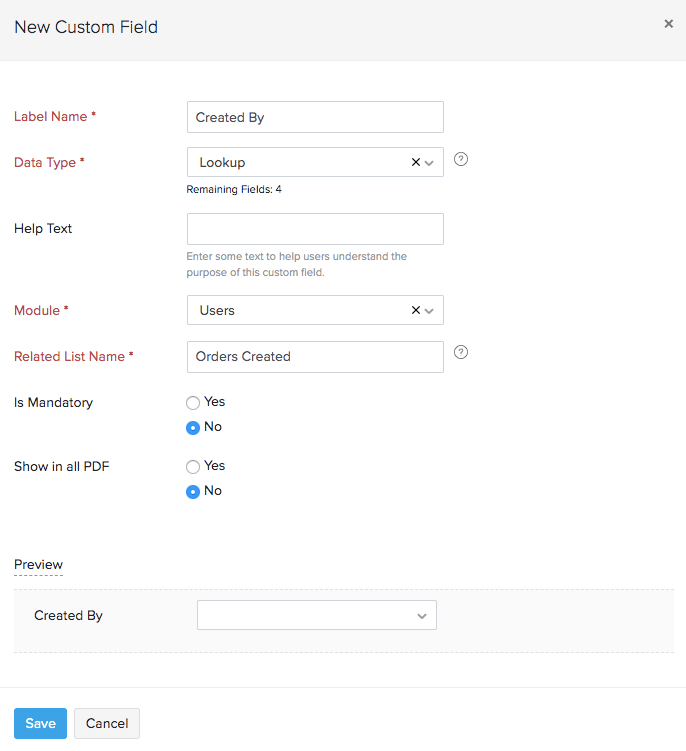
Lookup
The Lookup data type in custom fields allows you to pull and display data from one module inside another.
Scenario: Patricia wants to track the efficiency of the users in her organization. So, she decides to track the sales orders they create for customers. For this, she creates a Lookup custom field in the Sales Orders module and selects the module whose data she wants to access (in this case, Users) and specifes a list name which tracks the associations.
To create a lookup custom field:
- Go to Settings in the top right corner.
- Navigate to the Module Settings.
- Select the desired module from any sections (General, Inventory, Sales or Purchases)
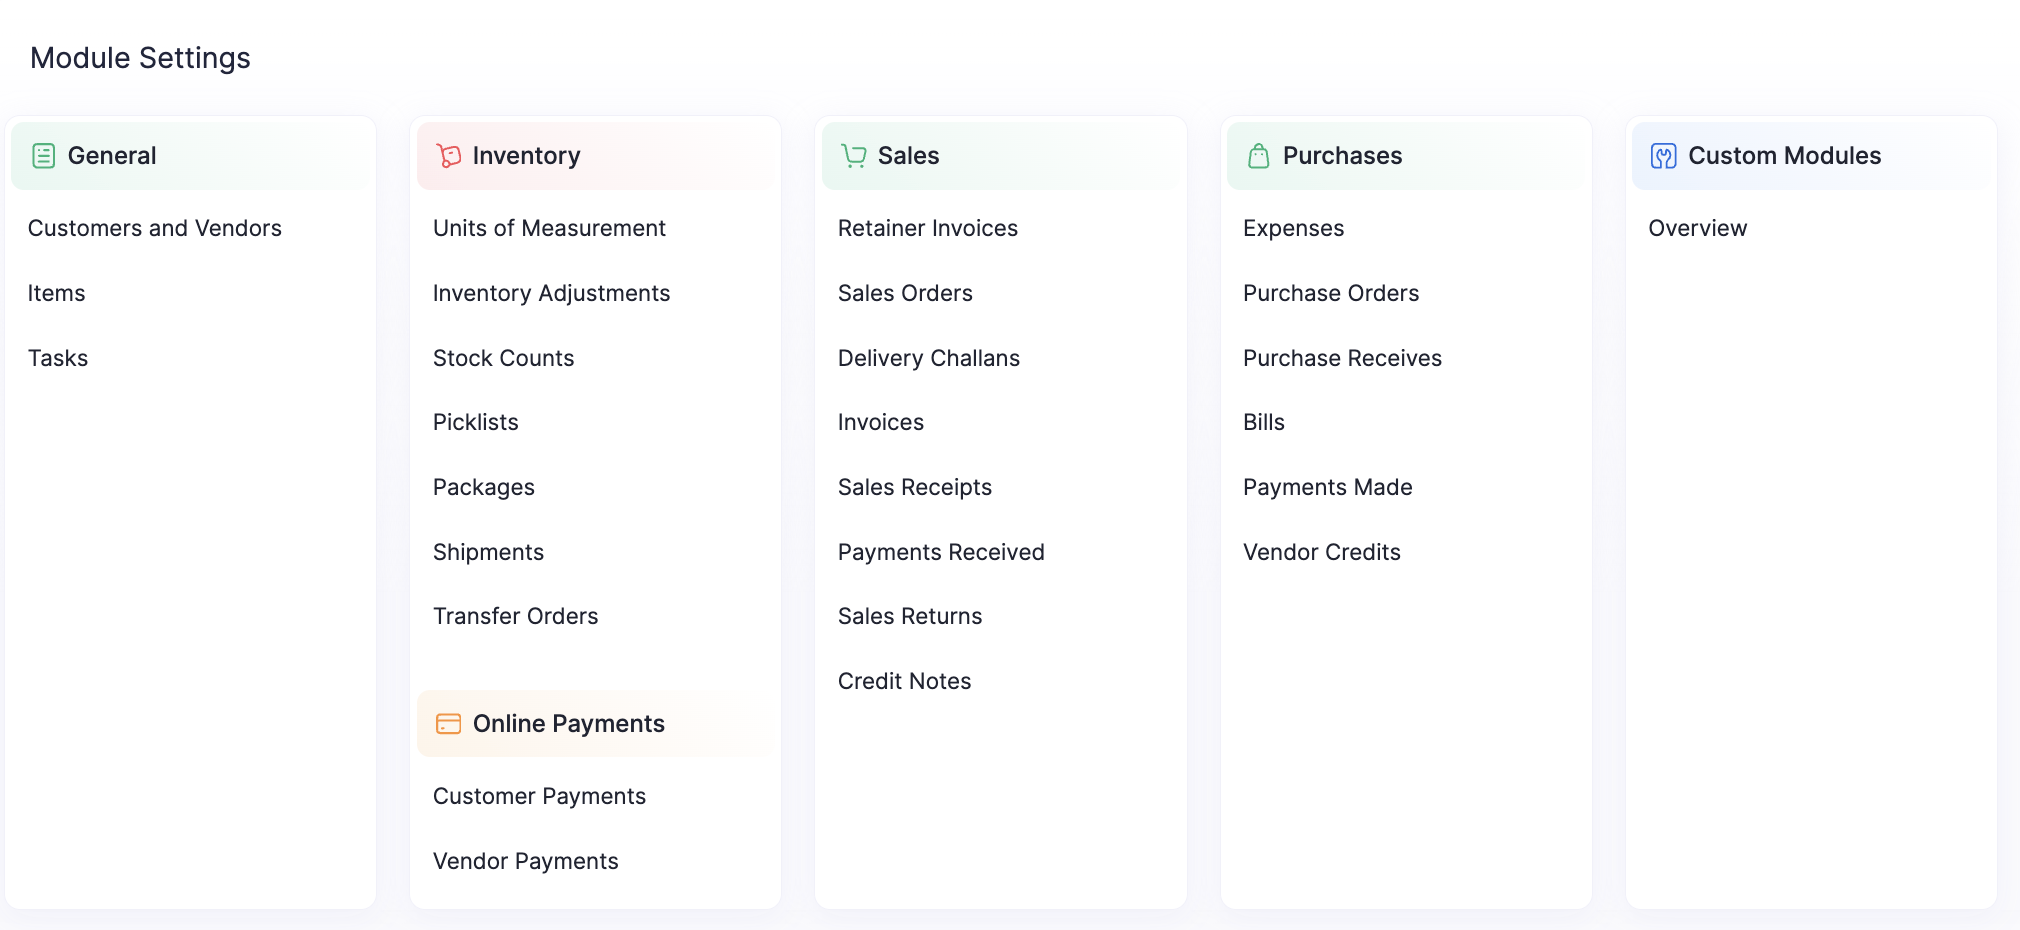 Taking the above scenario as an example, choose Sales Orders.
 - Navigate to the Field Customization tab.
- Click the + New Custom Field button.
- Enter the Label Name for the custom field and select the Lookup datatype.
- Choose the module whose data you wish to look up. In this case, select Users.
- Provide a suitable Related List Name. This will be the name of the list within the looked-up module.
To view the related list in the looked up module:
- Go to the looked-up module (in this case Users & Roles).
- Click a user name to view their details.
- Navigate to the Related Lists tab.
- Expand a related list to view its details.

Multiline
The multiline or multiple line custom field is a textbox that allows you to enter descriptive text of up to 36000 characters.
You can only have a maximum of five custom fields of this type.
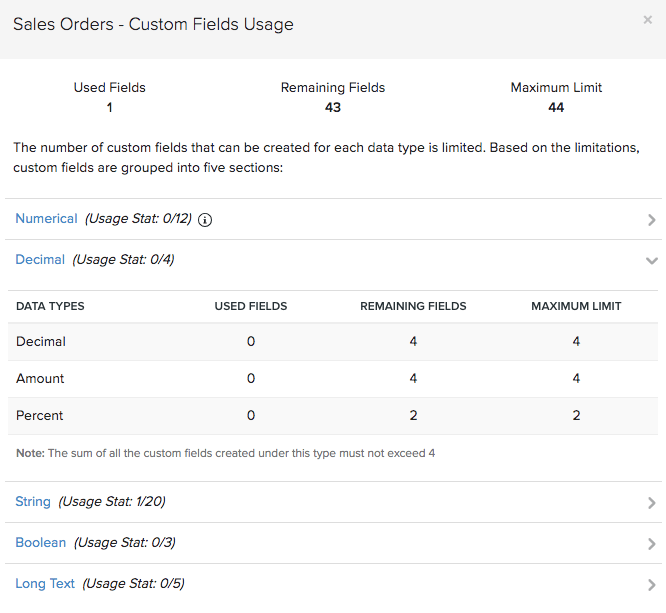
Custom Field Limitations
There are limitations to the number of custom fields you can have for each data type.
For easy understanding, let’s split the datatypes into four sections:
Section 1
- String(Text) - max 20 fields
- Auto generate number - max 1 field
- Email - max 2 fields
- URL - max 2 fields
- Phone - max 2 fields
- Dropdown - max 5 fields
- Multi-select - 2
Note: Sum of the custom fields created for the above mentioned datatypes should not exceed 20.
Section 2
- Number - max 8 fields
- Date - max 4 fields
- Lookup - 5
- Attachment - 4
Note: Sum of the custom fields created for the above mentioned datatypes should not exceed 12.
Section 3
- Amount - max 4 fields
- Decimal - max 4 fields
- Percent - max 2 fields
Note: Sum of the custom fields created for the above mentioned datatypes should not exceed 4.
Section 4
- Checkbox - max 3 fields.
Section 5
- Multiline - max 5 fields.
Hence, when combined, you can have a maximum of 44 custom fields in a module.
More Actions for Custom Fields
Edit, Delete or Mark Custom Field Inactive
If the custom field is no longer of use then you can mark it as Inactive.
- Go to Settings in the top right corner.
- Navigate to the Module Settings.
- Open the module with the unwanted custom field.
- Go to the Field Customization section.
- Place your cursor over the custom field and you can choose the Edit, Mark as Inactive option or the Trash icon to delete it.

Note: The Mark as Inactive option will be visible only for the custom fields of the following modules: Contacts, Sales Orders, and Purchase Order. For the Items module, you need to deselect the custom field and it will become inactive.
Re-arrange Custom Fields
You can change the order in which the custom fields appear in your PDFs. To do so:
- Go to Settings in the top right corner.
- Navigate to the Module Settings.
- Open any module with custom fields.
- Go to the Field Customization section.
- Click the Change Order button in the top right corner.

- Click and drag the custom field to place it in the desired position.
- Click Save to apply the changes.
Custom Field Access
You can restrict certain users in your organization from accessing a custom field capturing sensitive information. To do so:
- Go to Settings in the top right corner
Navigate to the Module Settings.
Open the module with the custom field and go to the Field Customization tab.
Click the down arrow next to the custom field and click the Configure Access option.
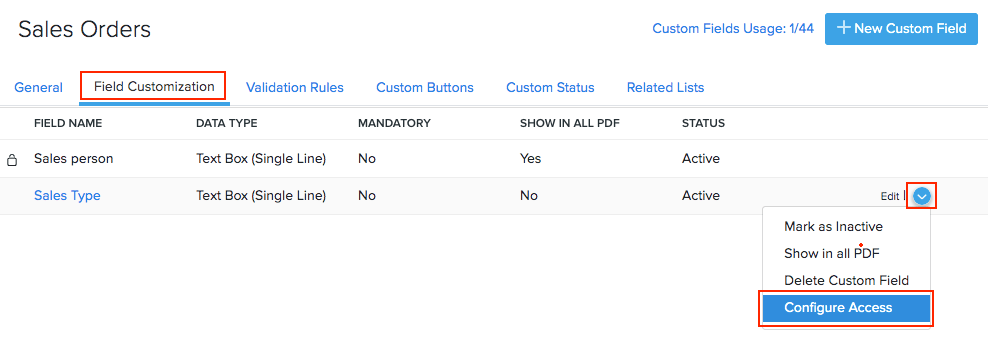
Choose the access level for each role and click Save.
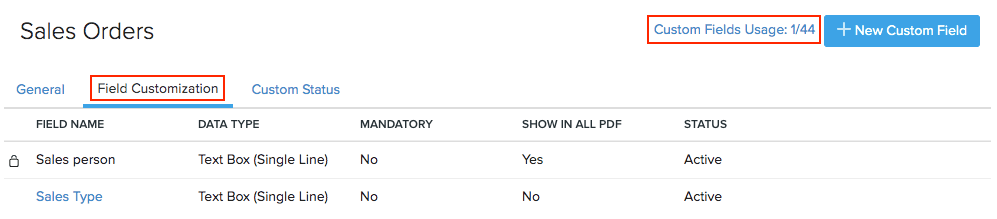
Custom Field Usage Stats
The Custom Field Usage stats option allows you to keep track of the number of custom fields you’ve created and the fields remaining for the particular module. This helps you to use the custom fields wisely based on the availability.
- Go to Settings in the top right corner.
- Navigate to the Module Settings.
- Open any module with custom fields.
- Go to the Field Customization section.
- Click the Custom Field Usage option at the top.
Custom Status{custom-status}
In Zoho Inventory, a sales order can have a standard set of statuses like Draft, Open, Void and Closed. However, you can add a status of your own. When you do so, you need to select a ‘parent’ status from the set of default statuses present in Zoho Inventory.
Whenever the sales order is in the parent status, you can changes it to your custom status.
For example, let’s say you create a custom status named To be shipped with the parent status being Open. Now, a sales order in the Open status can be marked as To be shipped.
To create a custom status in Zoho Inventory:
- Go to Settings in the top right corner of the page.
- Navigate to the Module Settings.
- Select Sales Orders under Sales.
- Switch to the Custom Status tab.
- Click + New Custom Status.
- Choose the parent status and enter the name of your custom status.
- Click Save.
Custom Buttons
In Zoho Inventory, you can create additional buttons within a module to perform customized actions. You can create these buttons by writing a Deluge script for the functions you want them to execute.
Note: This feature is available only for selective pricing plans.
In this section:
Scenarios
Scenario 1: Peter sells goods on credit to selected customers. At the end of every month, he emails the invoices to his customers whose payment is due. To do this, he creates a custom button that, when clicked on, sends the statement, rather than him having to apply multiple filters.
Scenario 2: Peter decides to charge a 2% late fee on overdue invoices. To make this simple, he creates a custom button and executes it on the invoices when they are overdue.
Scenario 3: Peter wants to provide a 5% discount for his regular customers who pre-order goods. To do this, he creates a custom button and applies them on the invoice when he creates one.
Create Custom Buttons
You can create custom buttons for the following modules:
- Items
- Customers and Vendors
- Sales - Invoices, Sales Orders, and Credit Notes
- Purchases - Bills and Purchase Orders
Note: You can create a maximum of 10 buttons for each module.
To create a custom button:
Go to Settings in the top right corner of the page.
Navigate to the Module Settings.
Select the module that you want to create a custom button for.
Go to the Custom Buttons tab.
Click + New in the top right corner.
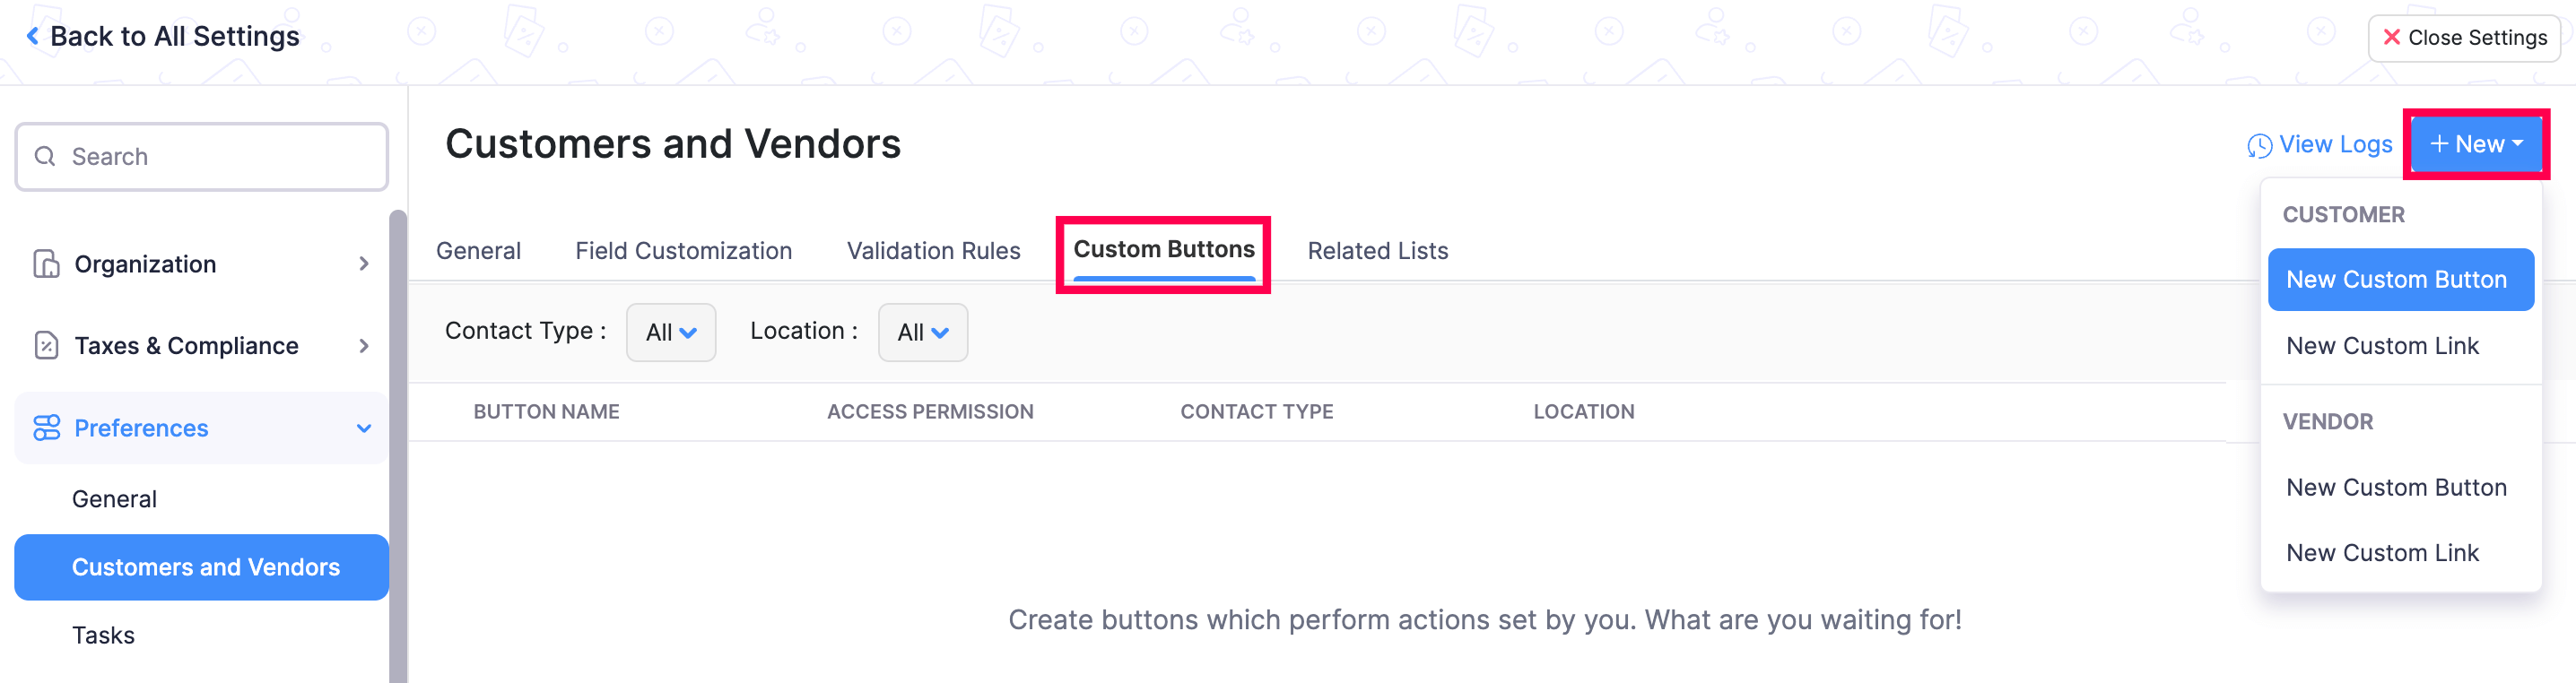
Provide a short and suitable name for the button.
Warning: The button name cannot exceed 25 characters.
- Select who can view the Custom Button: Only Me or Everyone.
- Drag and drop the required Deluge functions from the left side bar, and describe the action to execute upon clicking the button.
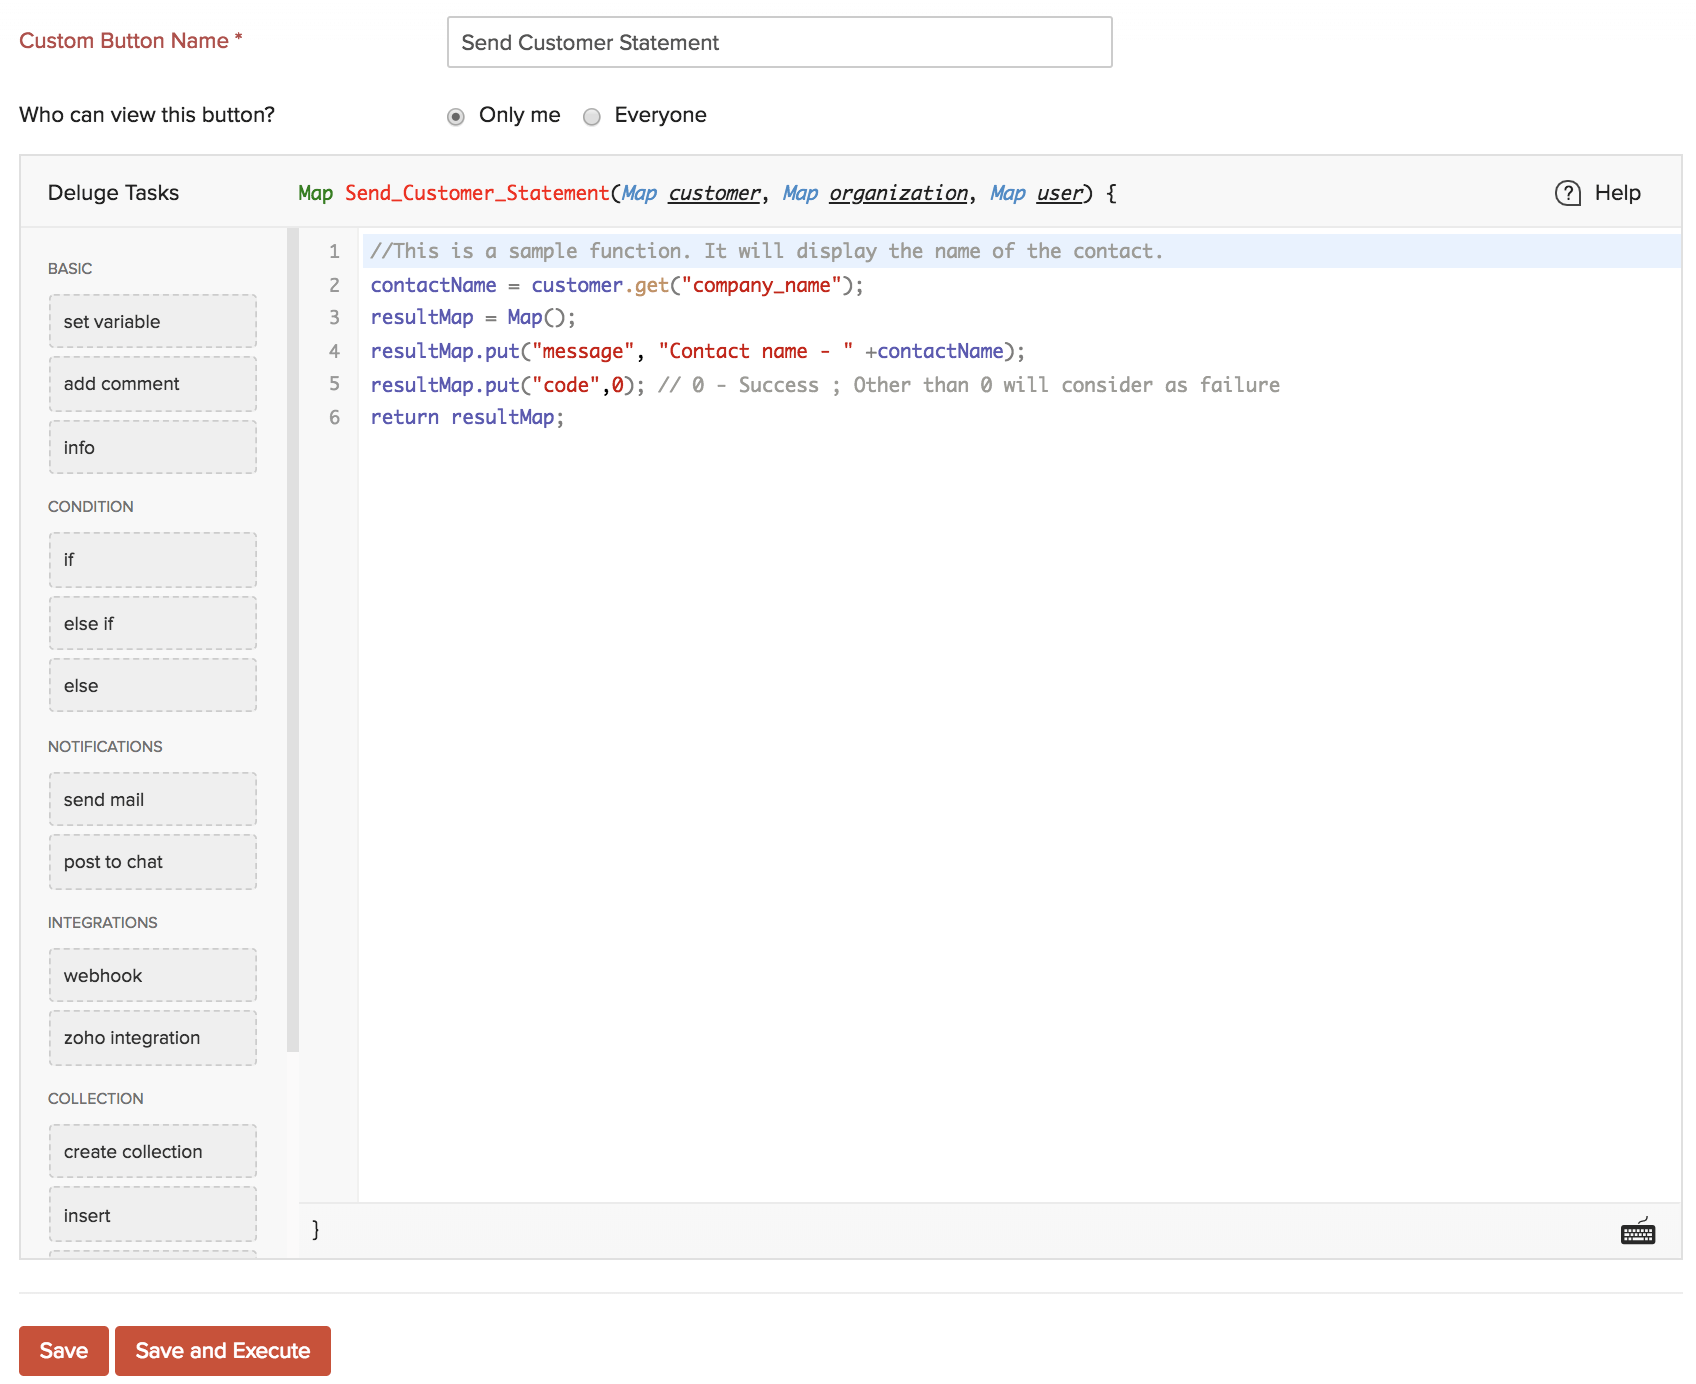
Insight: Deluge is an online scripting language integrated with Zoho Services. It allows you to write your own functions in the application to suit your needs, incrementally, making it a powerful tool.
- Either click Save to create the custom button, or click Save and Execute to save the button and execute the action immediately.
- In the pop-up, depending on the module, enter the Transaction ID, Contact ID or Item ID and click Execute.
Note: The ID is a combination of numbers in the URL of a particular transaction, contact or item.
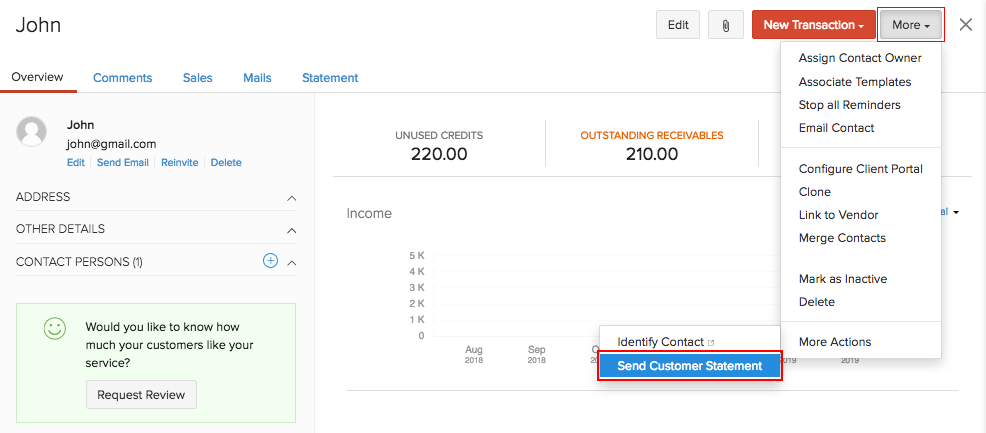
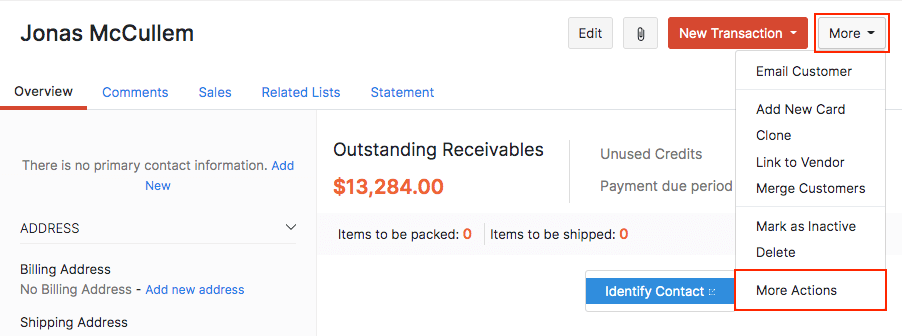
Execute Custom Actions
To view and execute the custom button:
Go to the module with the custom button.
Open a transaction, contact, or item.
Click More, then More Actions.
Click the custom button to execute it.
Custom Links
Zoho Inventory allows you to open external links from your application by attaching links to the button you create. You can also insert placeholders in the links and drill down to the details.
Scenario 1: Peter sells his goods on an e-commerce website. He would like to link the e-commerce website’s URL with his items in Zoho Inventory. He immediately adds the custom button for the Items module with a link to the e-commerce site and views them.
Scenario 2: Peter has an external software with all the details of his customers. When customers request for his services, he refers his data base for details about all the previous services. Looking up for such data and identifying a customer can be pretty tedious. He creates a custom button with the Customer ID as a placeholder to his external application’s link. He clicks the button in his contact details page to open an external link with the specific contact’s details.
Create Custom Link
To create a custom link:
Go to Settings in the top right corner of the page.
Navigate to the Module Settings.
Select the module for which you want to create a custom link.
Go to the Custom Buttons tab.
Click the drop down near the + New button in the top right.
Select the Custom Link option.
Enter the Custom Link Name.
Select who can view and execute the Custom Button - Only Me or Everyone.
Enter the URL of the external website and insert placeholders if you want to look up specific details in the page.
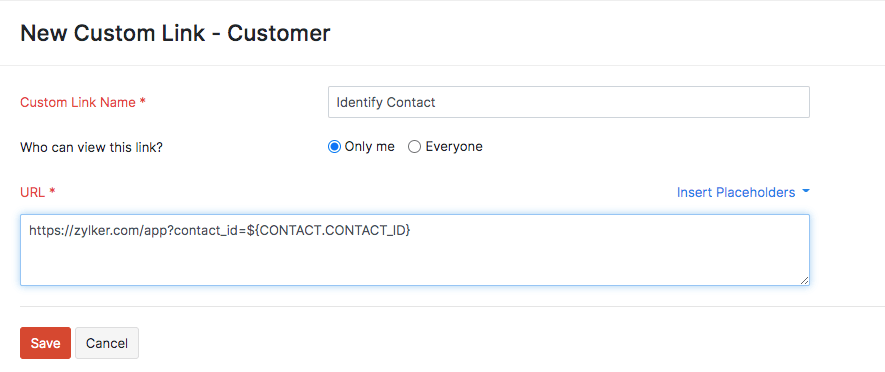
Click Save.
Insight: Links can be differentiated from buttons with a link icon displayed near the button name.
Open Custom Link
To open a custom link:
Go to the module for which you created a custom link.
Open the transaction, contact or item from which you want to open the link.
Click More > More Actions and click the custom link to open it.
Edit or Delete Custom Buttons and Links
To edit or delete a custom button or link:
Go to Settings in the top right corner of the page and Navigate to the Module Settings.
Select the module for which you had created a custom button or link.
Go to the Custom Buttons tab and all the buttons and links created previously will be listed there.
Place your cursor over the buttons.
Click the Edit button or the Trash icon to edit or delete it.
