DNS Record Configuration for Network Solutions
Zoho Mail provides multiple options to verify your domain ownership and configure email delivery in Network Solutions.
Network Solutions - Add TXT records for verification
If the DNS Manager for your domain is hosted with Network Solutions follow the below steps to add a TXT record and verify the domain.
- Login to your Network Solutions account manager
- Under My Domain Names, click EDIT DNS and select the domain you want to verify with Zoho Mail.
- Click Manage and then click Change Where Domain Points.
- And then click Advanced DNS.
- Scroll down to Text (TXT Records) and click Edit TXT Records.
- Enter the details for your TXT record.
- In the Host field, enter @
- In the TXT Value field, enter the TXT value generated in the Zoho Mail Admin Console
- In the TTL field, enter 3600 seconds
- Scroll down and click Continue.
- Click Save Changes.
- Now come back to mailadmin.zoho.com page and click 'Verify by TXT'.
- If the DNS information is correctly propagated, the domain will be verified. You can proceed with the next steps to create user accounts.
Network Solutions - Add CNAME Records for Verification
If the DNS Manager for your domain is hosted with Network Solutions follow the below steps to add a CNAME and verify the domain.
- Login to your Network Solutions account manager
- Under My Domain Names, click the domain you want to verify with Zoho Mail
- Click Manage and then click Change Where Domain Points.
- And then click Advanced DNS.
- Navigate to CNAME and then click the Edit CNAME Records button.
- Specify the Alias as the code generated in your Zoho domain verification page (Example: zb12345678).
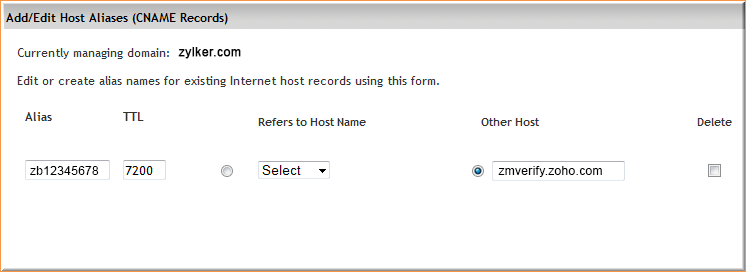
- Select 'Other Host' radio button option.
- In the 'Other Host' field, enter the value from the CNAME Value/ Points To/ Destination field of your Zoho Mail Admin Console.
- Specify TTL to 7200.
- Select Continue and then click Save Changes.

You have now added the CNAME successfully. You may have to wait for at least an hour for the changes to take effect in the DNS Servers. After an hour or two, log in to your Zoho Mail control panel and click Verify. Once your domain is verified, you can start adding users and creating mail accounts.
Update MX Records to receive emails - Network Solutions
If your DNS is hosted with Network Solutions, follow the instructions below to change the MX Records of your domain and receive emails.
- Login to your Network Solutions account manager
- Under My Domain Names, click the domain you want to verify with Zoho Mail
- Click Manage and then click Change Where Domain Points.
- And then click Advanced DNS.
- Navigate to MX and then click the Edit MX Records button.
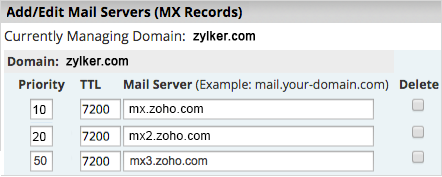
- Provide '10' in the Priority field.
- Specify mx.zoho.com in the Mail Server field.
- Add another MX record with the Mail server as mx2.zoho.com and set Priority as 20.
- Similarly, add the last third MX Record with Mail server as mx3.zoho.com and set Priority as 50.
- Select Continue and then click Save Changes.
Note:
- We recommend you to go through your DNS providers support documentation for the exact method to add the MX entries.
- The MX values given above are based on the generic configuration information. For more specific configuration particular for your domain refer this section in the Admin Control Panel.
- Ensure that only the above 2 records are in the results to ensure correct email delivery. In case you have the other MX records, you may not be able to receive emails in Zoho Mail.

You have successfully added MX records for your Network Solutions hosted domain. You can check the MX records from Zoho's MX record checking tool.