
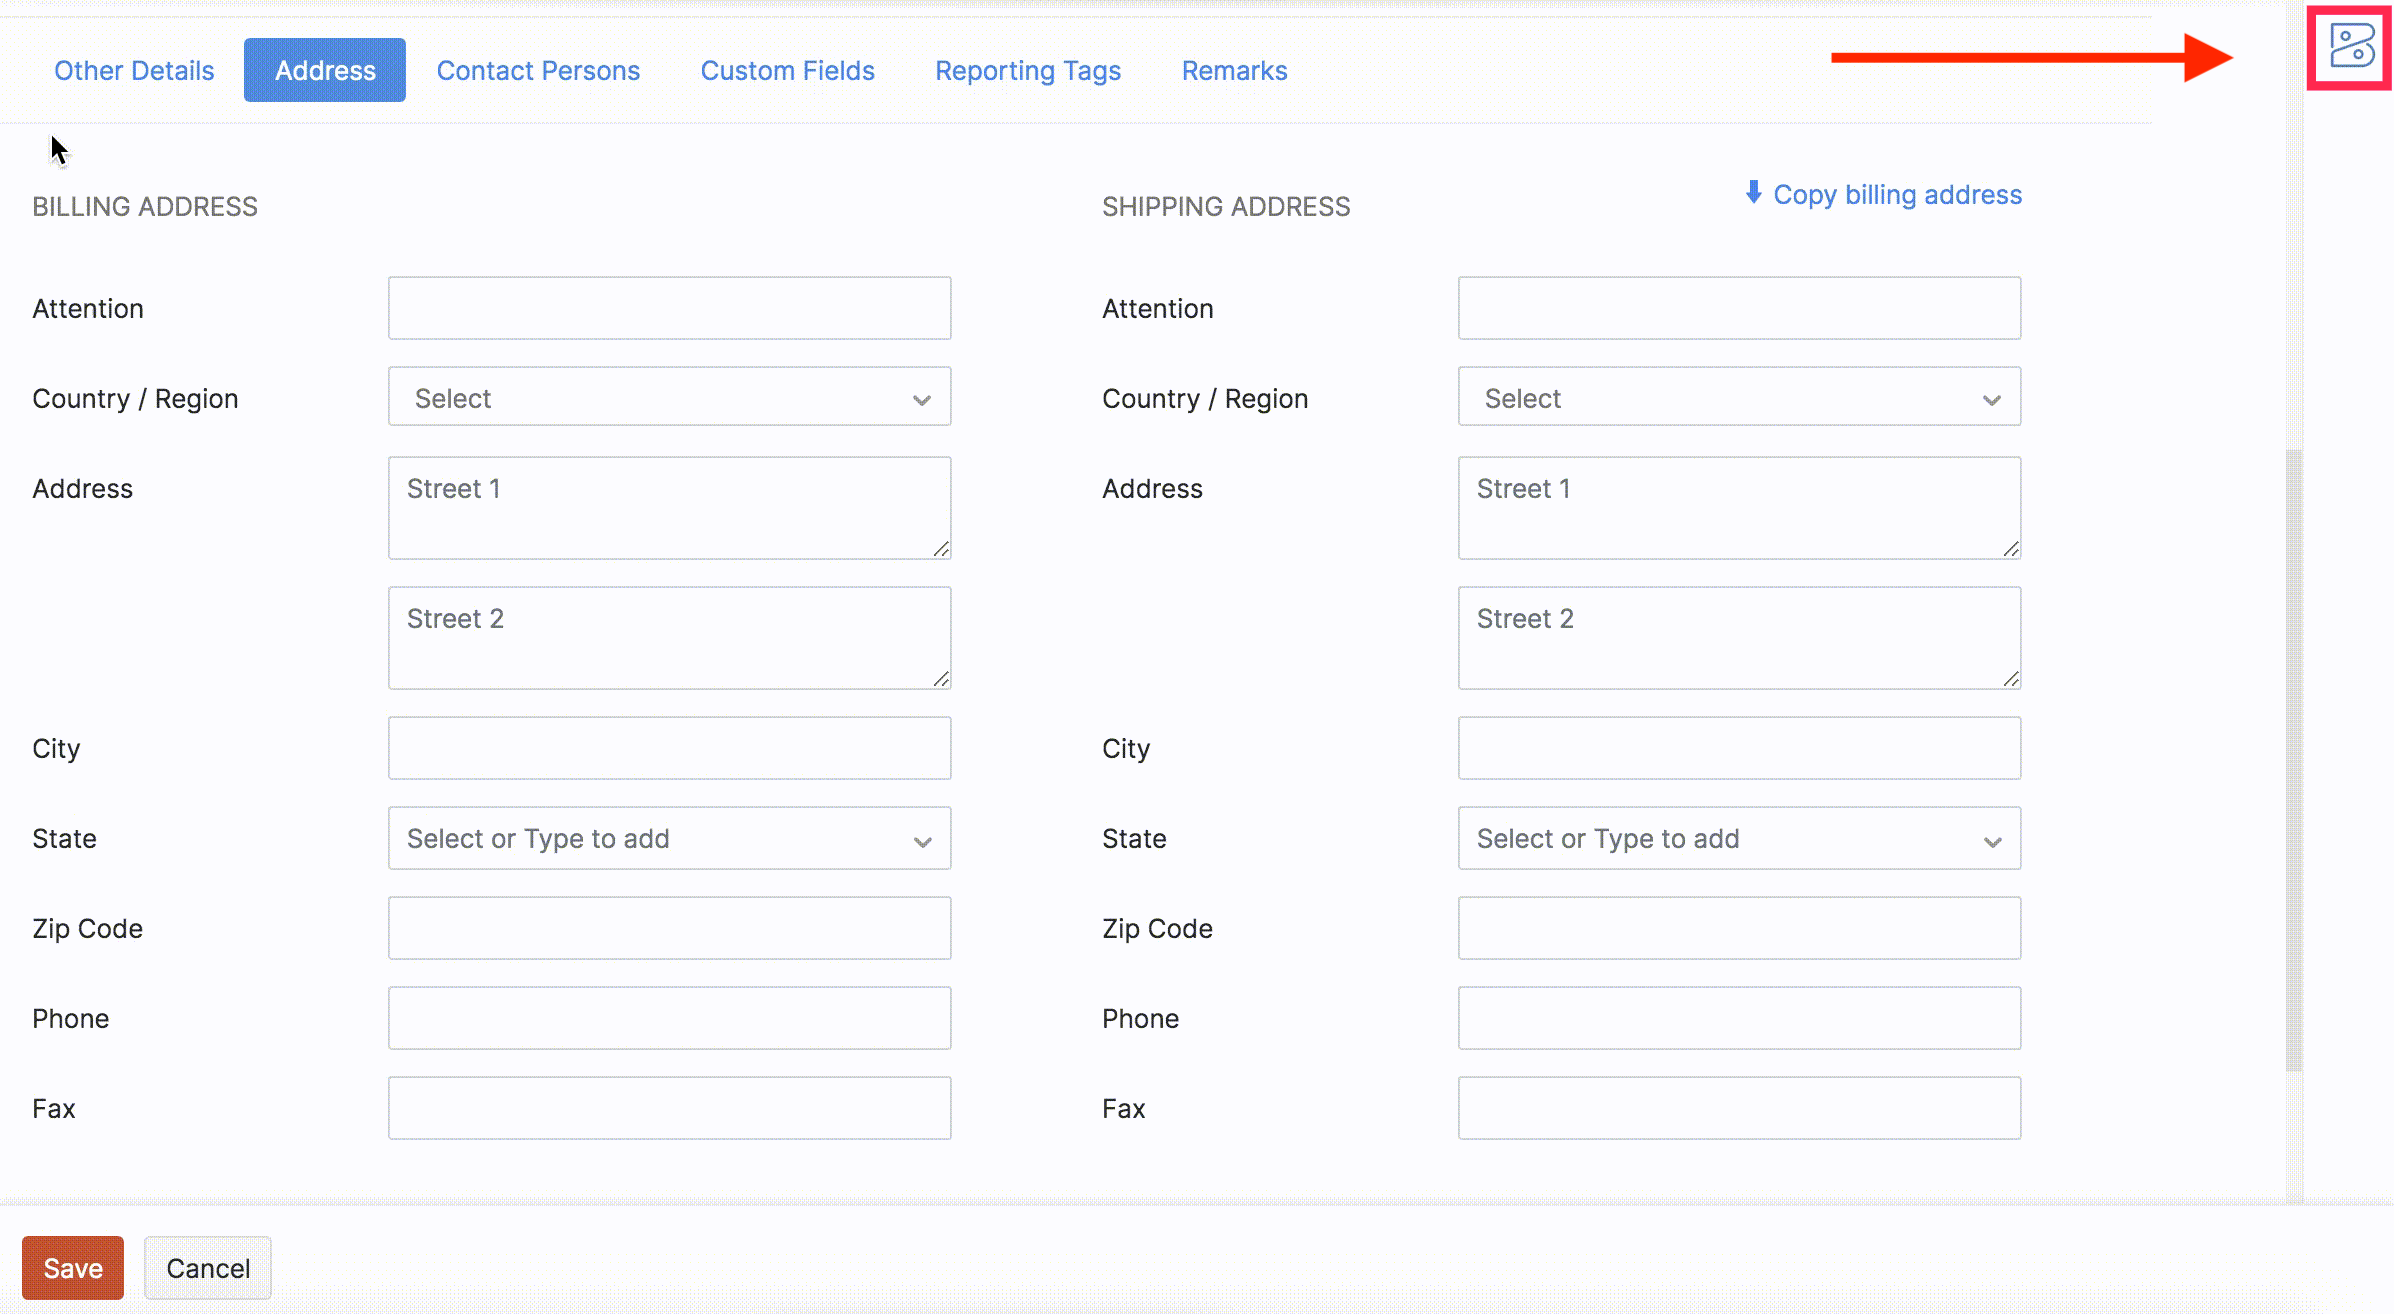
Sample Widget
Let’s see how to create a widget from scratch and configure it in Zoho Books. To help understand better, lets create a sample Google Map widget. This widget will help the user to fill in the billing address and shipping address by pointing it on the map.
First off, you’ll have to install the Zoho Extension Toolkit. It’s a command line interface which helps in creating the required files for the widget, validate, and pack it.
CREATE WIDGET
To create a widget, you’ll have to do the following;
Install Node.js. If you’ve already installed it, you can go to the next step.
Install the toolkit globally by running this command:
npm install -g zoho-extension-toolkitRun zet init and choose Zoho Books to create the widget.
zet init
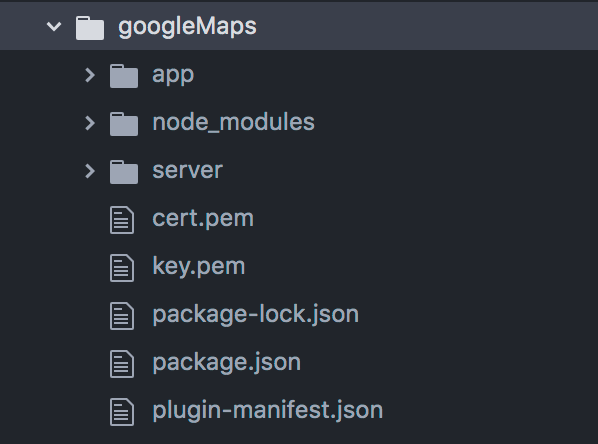
The created widget file structure would look something like this:
You’ve now successfully created the widget. Next let’s see how to configure the widget with the necessary changes for Google Maps.
Lets create the Google Map widget for a sidebar in the customer creation page.
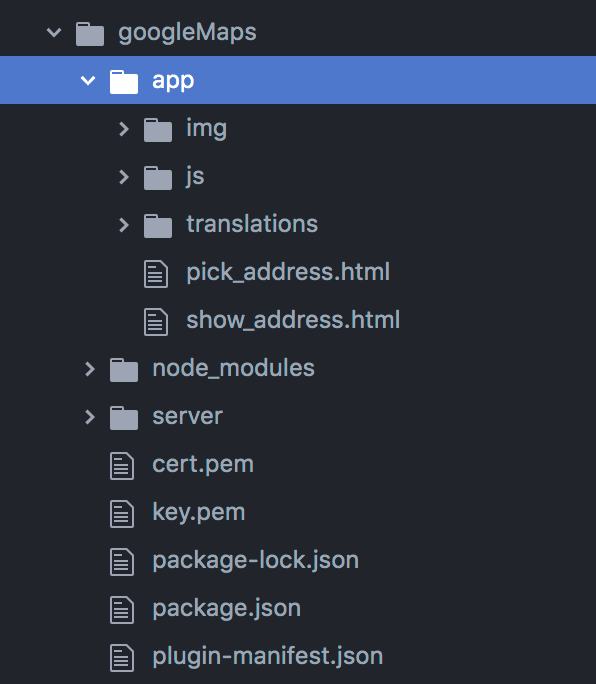
1: Create a new html file named pick_address.html under the app directory.
2: Edit the plugin-manifest.json with the above created file path and location as required.
 {
 "locale": [
   "en"
 ],
 "service": "FINANCE",
 "modules": {
   "widgets": [
      {
        "location": "customer.creation.sidebar",
        "widget_type": "modal",
        "name": "Pick the Address",
        "url": "/app/pick_address.html",
        "logo": "/app/img/logo.png"
      }
    ]
},
 "config": [],
 "usedConnectors": []
}
Here, the location indicates, where the widget will be displayed. In this case, it’ll be in the customer creation page. So the location is specified as customer.creation.sidebar.
Here, the url will be the html file path. Earlier, the pick_address.html was created for the creation page. So, the url here would be /app/pick_address.html.
The logo will also be a file path of the image. Lets use the sample Zoho Books’ logo file path which is already available in zet init.
3: Now, the the plugin-mainfest.json configuration is complet. Next, you’ll have to write a html and javascript for pick address widget.
Developing Pick-up Address Widget
3.1. In the pick_address.html file, you’ll have to add Zoho Finance SDK and initialize the SDK.
 <!DOCTYPE html>
<html>
<head>
<meta charset="UTF-8">
<title>Pick Your Customer Address</title>
     <script src="https://js.zohostatic.com/zohofinance/v1/zf_sdk.js"></script>
</head>
<body>
<script>
 window.onload = function () {
   ZFAPPS.extension.init().then(function (App) {
     // Initializing SDK.
     ZFAPPS.invoke('RESIZE', { height: "600px", width: "1000px" }).then(() => {
      });
       });
      };
    </script>
</body>
</html>
3.2. Create an API key for your Google account to access your Google Map’s APIs.
Learn how to create an API key in Google.
You must include the following Google Map services for this API key to use it in the pick address file:
- Google Maps API
- Google Geocoding API
3.3. Once the API is generated, add the following script in your pick_address.html. Replace your_API_key with the generated API key.
<script async defer src="https://maps.googleapis.com/maps/api/js?key=YOUR_API_KEY&callback=initMap" type="text/javascript"></script>3.4. Create a new javascript file and CSS file respectively as /app/js/pick_address.js and /app/css/pick_address.css. Then link it in the pick_address.html file.
Let’s use the bootstrap class for our widget application. You can link the bootstrap CDN as well under the head element.
 ...
<head>
...
<link rel="stylesheet" href="css/pick_address.css" />
<link rel="stylesheet" href="https://cdn.jsdelivr.net/npm/bootstrap@4.6.0/dist/css/bootstrap.min.css" integrity="sha384-B0vP5xmATw1+K9KRQjQERJvTumQW0nPEzvF6L/Z6nronJ3oUOFUFpCjEUQouq2+l" crossorigin="anonymous">
 <script src="js/pick_address.js"></script>
</head>
...
/* pick_address.css */
html, body {
height: 100%;
margin: 0;
padding: 0;
}
.map-section, #map {
height: 100%;
}3.5. Add the following html snippet in the body tag of the pick_address.html file.
 <body>
 <div class="row map-section">
   <div class="col-sm-5">
   <!-- App interaction will be placed here -->
 </div>
 <div class="col-sm-7">
  <!-- Map will be embed here -->
   <div id="map"></div>
 </div>
</div>
    ....
</body>
Here, the div element has been created with ID as map which will hold the maps.
The classes row, col-sm-* are bootstrap classes.
3.6. In step 3, the Google Map SDK was added. You can now mention the callback action as initMap. So once the SDK loads, it’ll automatically call the function initMap.
Below is a simple snippet for the same:
 // pick_address.js
let map;
let geocoder;

function initMap() {
 let location = { lat: -34.397, lng: 150.644 };

 map = new google.maps.Map(document.getElementById("map"), {
   center: location,
   zoom: 8,
 });

 geocoder = new google.maps.Geocoder();
}
Here, you can lookup the map element and pass it to create Google Map instance.The map level in the above snippet shows a zoom level of 8 and the latitude and longitude are mentioned as well.
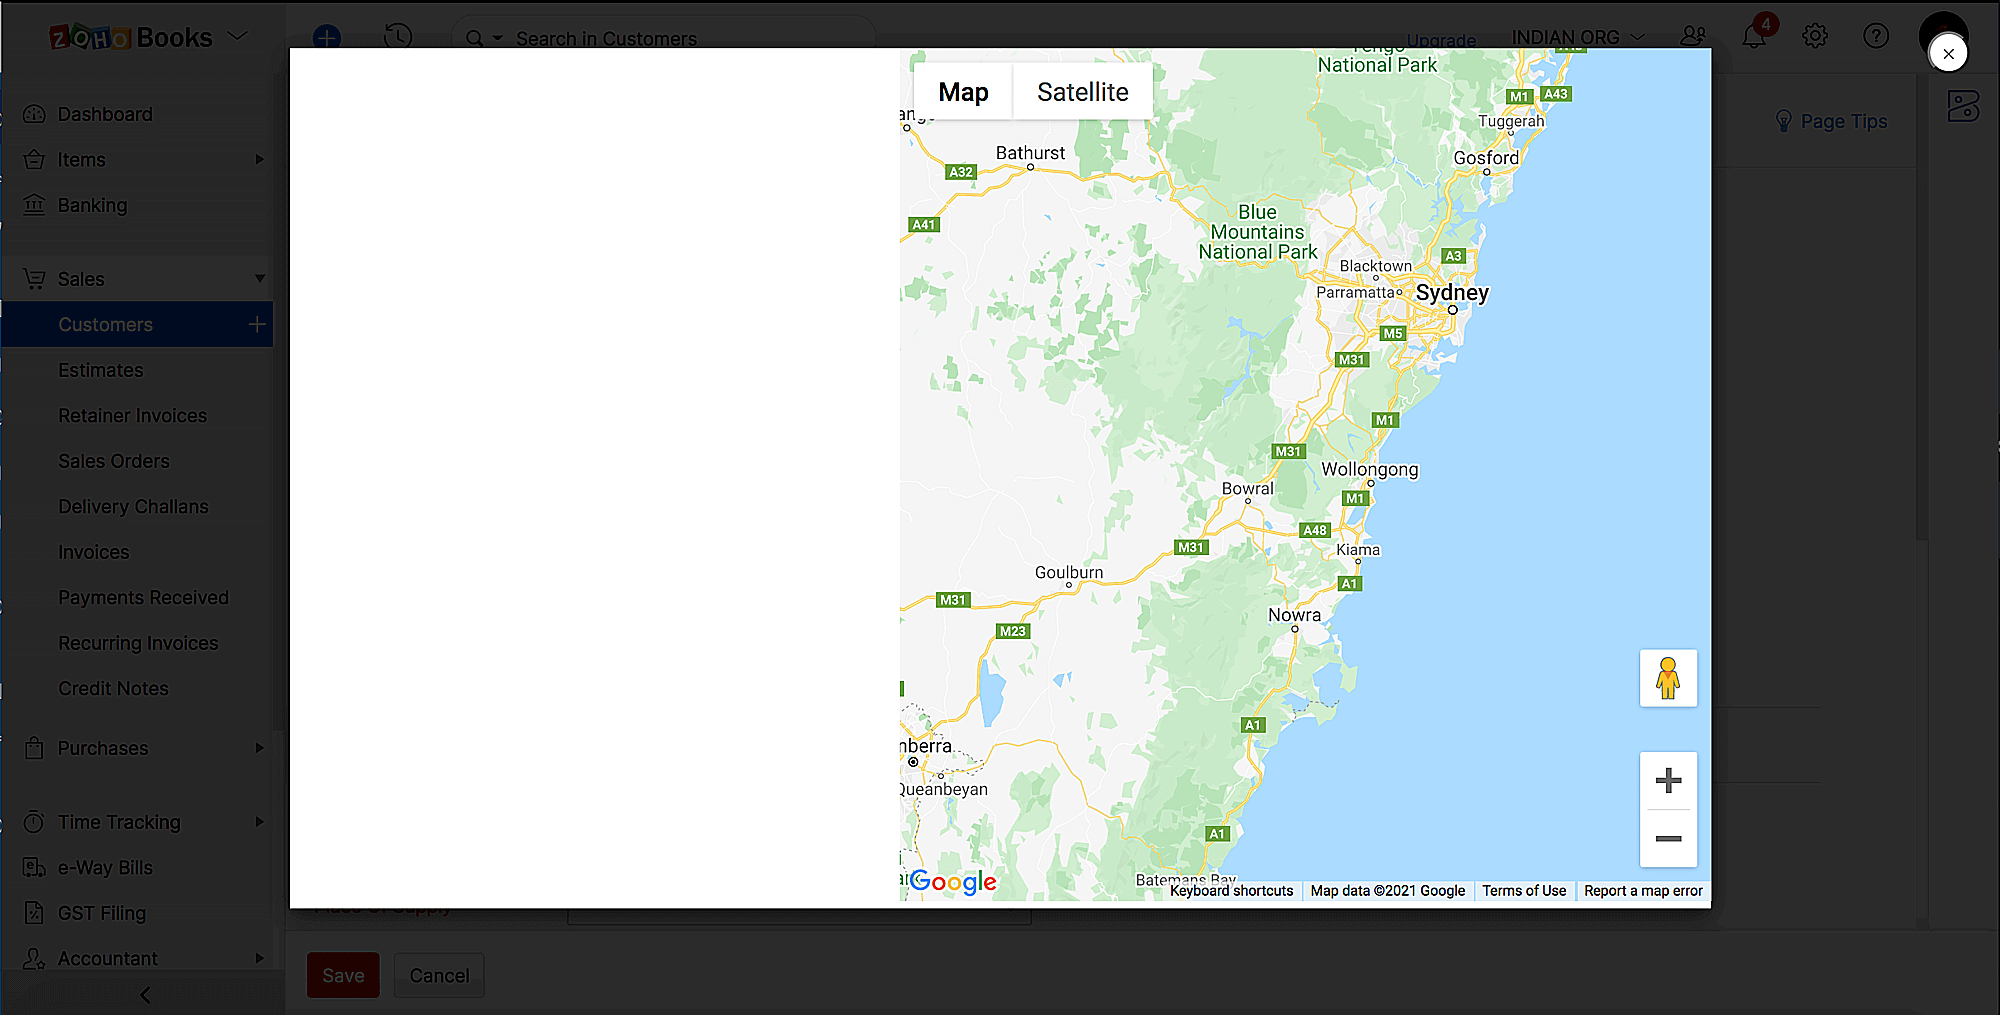
3.7. Now that you have created the map, lets see how to make it visible. You’ll have to run the zet run command under the working directory.
zet run - Open https://127.0.0.1:5000 in your browser and authorize the connection.
- Go to your Zoho Books organisation and navigate to Settings then click Developer Space and select Widgets.
- Click the Developer Mode toggle button.
- Go to the customer creation page.
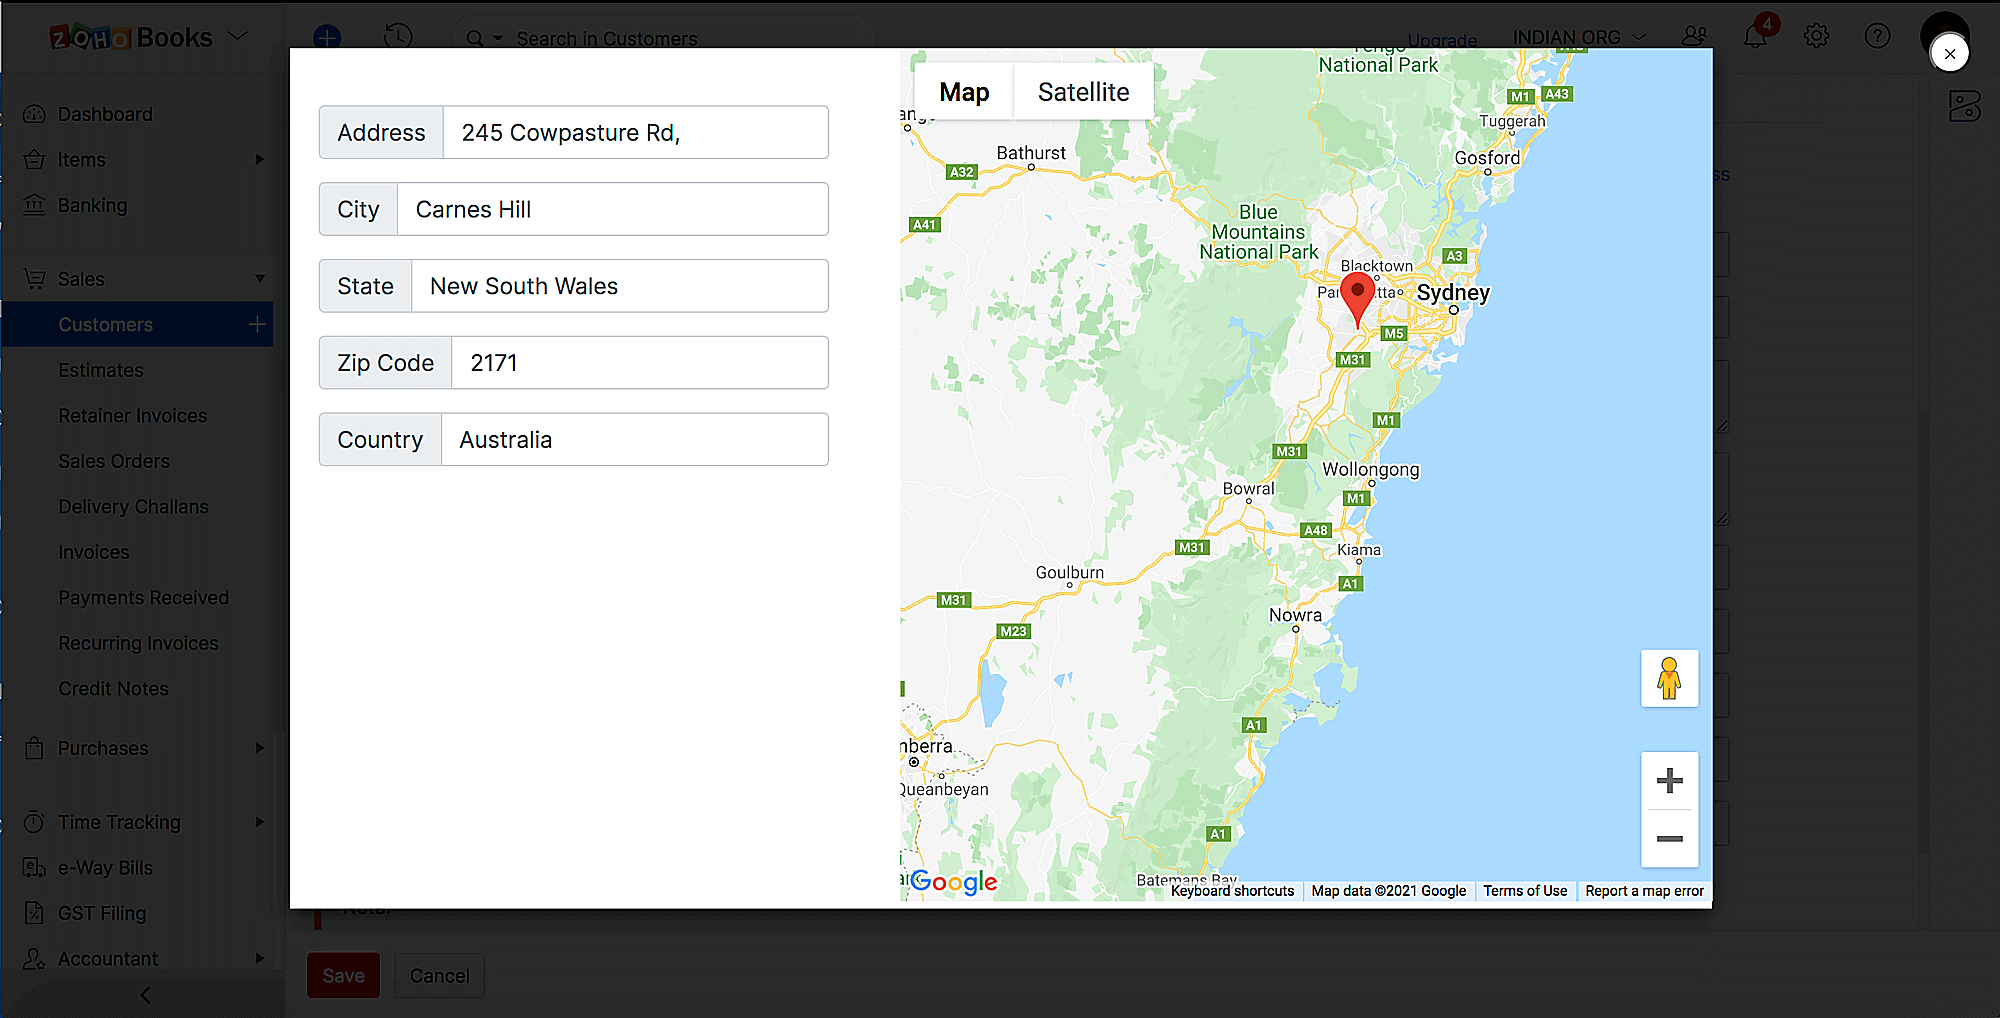
Now, you can see the widget in the sidebar. Click the widget to view the current changes. The screen would look something like this.
3.8. Next, show the marker for the current latitude and longitude. Also, whenever the user clicks on the map or drags the marker, you’ll have the reset the marker position.
// pick_address.js
let map;
let geocoder;
let marker;
function initMap() {
let location = { lat: -34.397, lng: 150.644 };
map = new google.maps.Map(document.getElementById("map"), {
center: location,
zoom: 15,
});
geocoder = new google.maps.Geocoder();
// Creates the marker for current location
createMarker(location);
// Watches click event on map. whenever user clicks, // it reset the marker position.
map.addListener("click", (mapsMouseEvent) => {
marker.setMap(null);
createMarker(mapsMouseEvent.latLng);
loadWithPostion(mapsMouseEvent.latLng);
});
}
function createMarker(location) {
marker = new google.maps.Marker({ position: location, map: map, draggable: true });
marker.addListener("dragend", (mapMarker) => {
this.loadWithPostion(mapMarker.latLng);
});
}
// Results of clicked location address info.
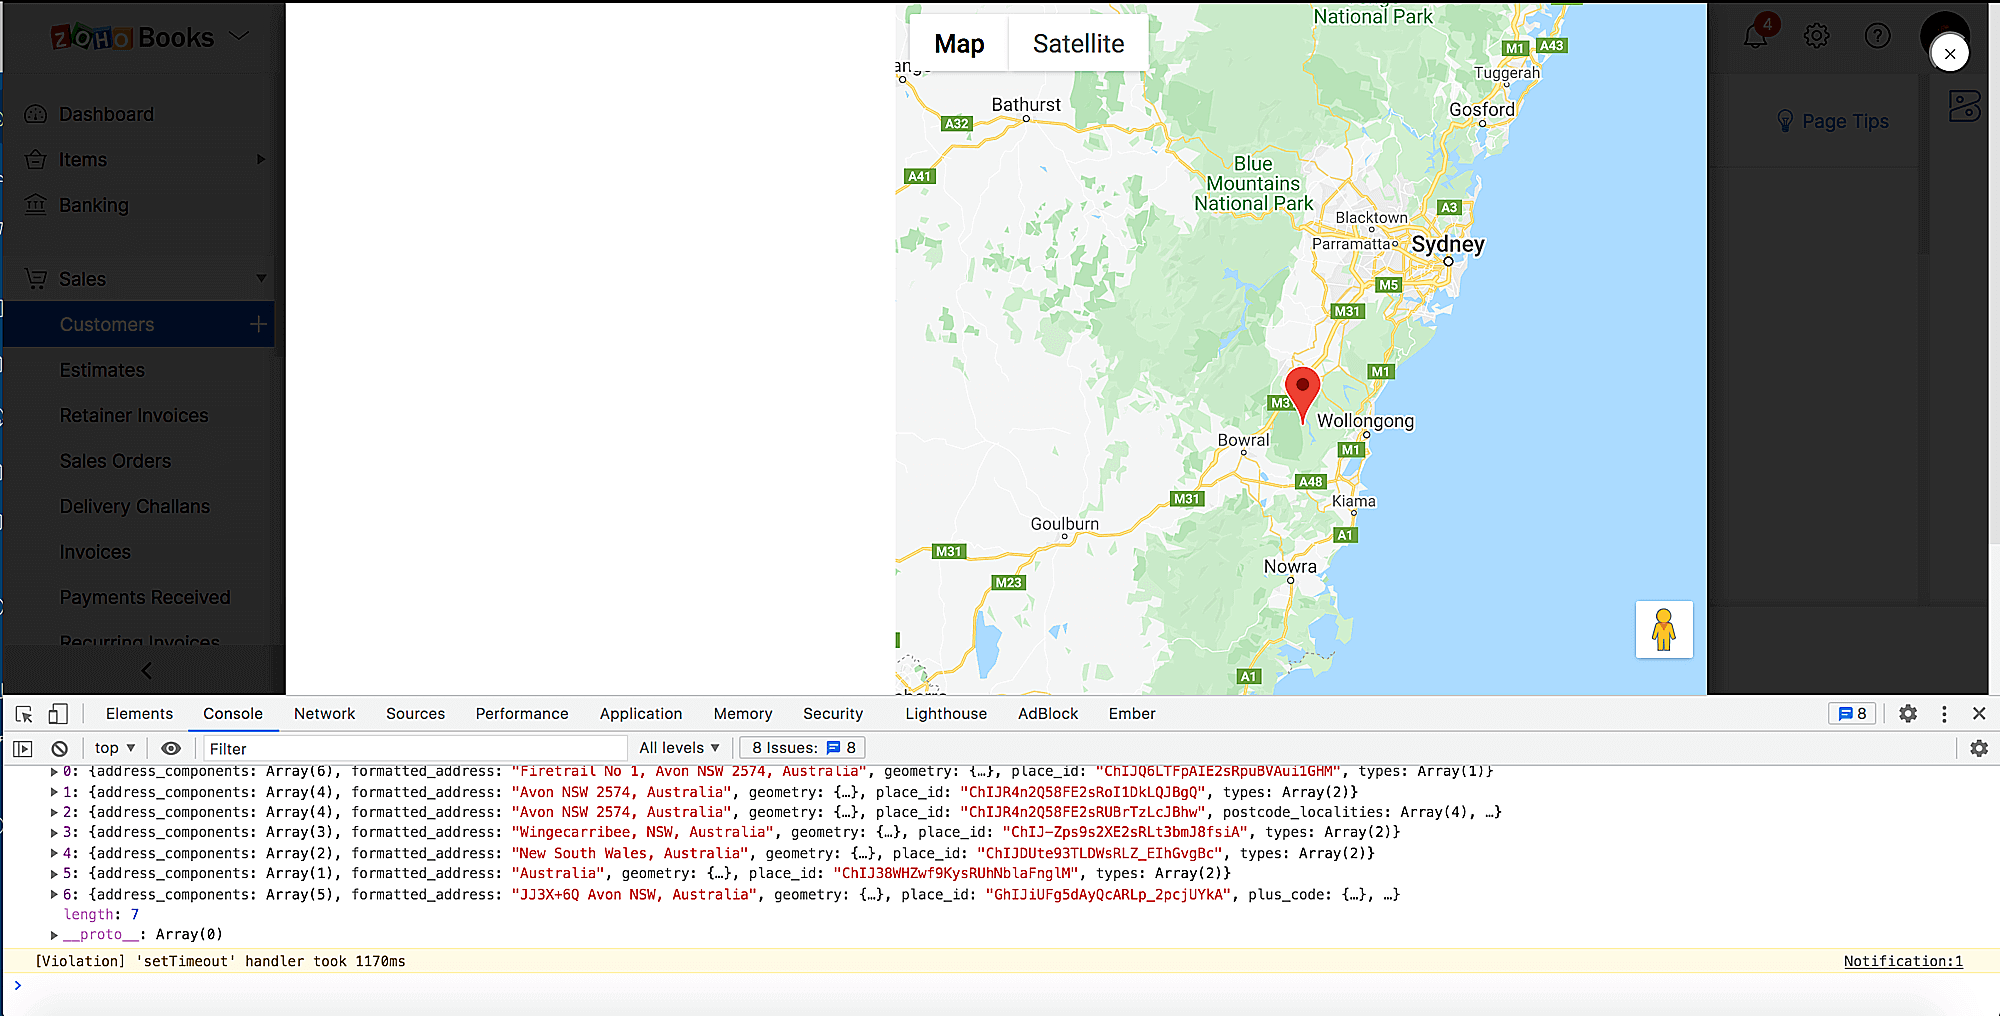
function loadWithPostion(location) {
geocoder.geocode({ location: location }, (results, status) => {
console.log(results);
});
};Now, wherever you click on the map, the loadWithPostion function will log the address info into the console
3.9. Show the details of the location clicked on the pick address widget.
 ...
<body>
 <div class="row map-section">
 <div class="col-sm-5">
   <div class="address">
   <div class="input-group mb-3">
    <div class="input-group-prepend">
     <span class="input-group-text">Address</span>
    </div>
    <input
     id="street"
     type="text"
     class="form-control"
     placeholder="Street"
    />
   </div>
<div class="input-group mb-3">
    <div class="input-group-prepend">
     <span class="input-group-text">City</span>
    </div>
    <input
     id="locality"
     type="text"
     class="form-control"
     placeholder="City"
    />
   </div>
<div class="input-group mb-3">
    <div class="input-group-prepend">
     <span class="input-group-text">State</span>
    </div>
    <input
     id="administrative_area_level_1"
     type="text"
     class="form-control"
     placeholder="State"
    />
   </div>
<div class="input-group mb-3">
    <div class="input-group-prepend">
     <span class="input-group-text">Zip Code</span>
    </div>
    <input
     id="postal_code"
     type="text"
     class="form-control"
     placeholder="ZIP"
    />
   </div>
<div class="input-group mb-3">
    <div class="input-group-prepend">
     <span class="input-group-text">Country</span>
    </div>
    <input
     id="country"
     type="text"
     class="form-control"
     placeholder="Country"
    />
   </div>
  </div>
 </div>
 <div class="col-sm-7">
  <!-- Map will be embed here -->
  <div id="map"></div>
 </div>
</div>
</body>
...
You’ll then have to add the html snippet to show the address on the user interface. It has multiple input elements to show the respective params like, address, city, state, country, and postal code. Now lets populate the data in the fields.
 // js/pick_address.js
let addressParams = ['locality', 'administrative_area_level_1', 'country', 'postal_code', 'street'];
let addressObject = {};

// Results of clicked location.
function loadWithPostion(location) {
 geocoder.geocode({ location: location }, (results, status) => {
   console.log(results);
   fillInAddress(results[0]);
 });
};

// Function will reset the all address params for every marker position changes
function resetParams() {
 addressParams.forEach((param) => {
   addressObject[param] = "";
   document.getElementById(param).value = "";
 })
}

function fillInAddress(place) {
resetParams();
for (var i = 0; i < place.address_components.length; i++) {
   let addressType = place.address_components[i].types[0];
   if (addressParams.includes(addressType)) {
     let result = place.address_components[i].long_name || "";
     addressObject[addressType] = result;
     document.getElementById(addressType).value = result;
   }
 }

let address = place.formatted_address;
let locality = addressObject.locality;
let result =  locality ? address.split(locality)[0] : address;
addressObject.street = result;

document.getElementById('street').value = result;
};
Here the loadWithPostion function will trigger the fillInAddress method. In that method, you’ll read the address_components details, construct the address params, and insert the data into the respective input element.
Now, wherever you click on the map, the pick address widget will show the respective address details.
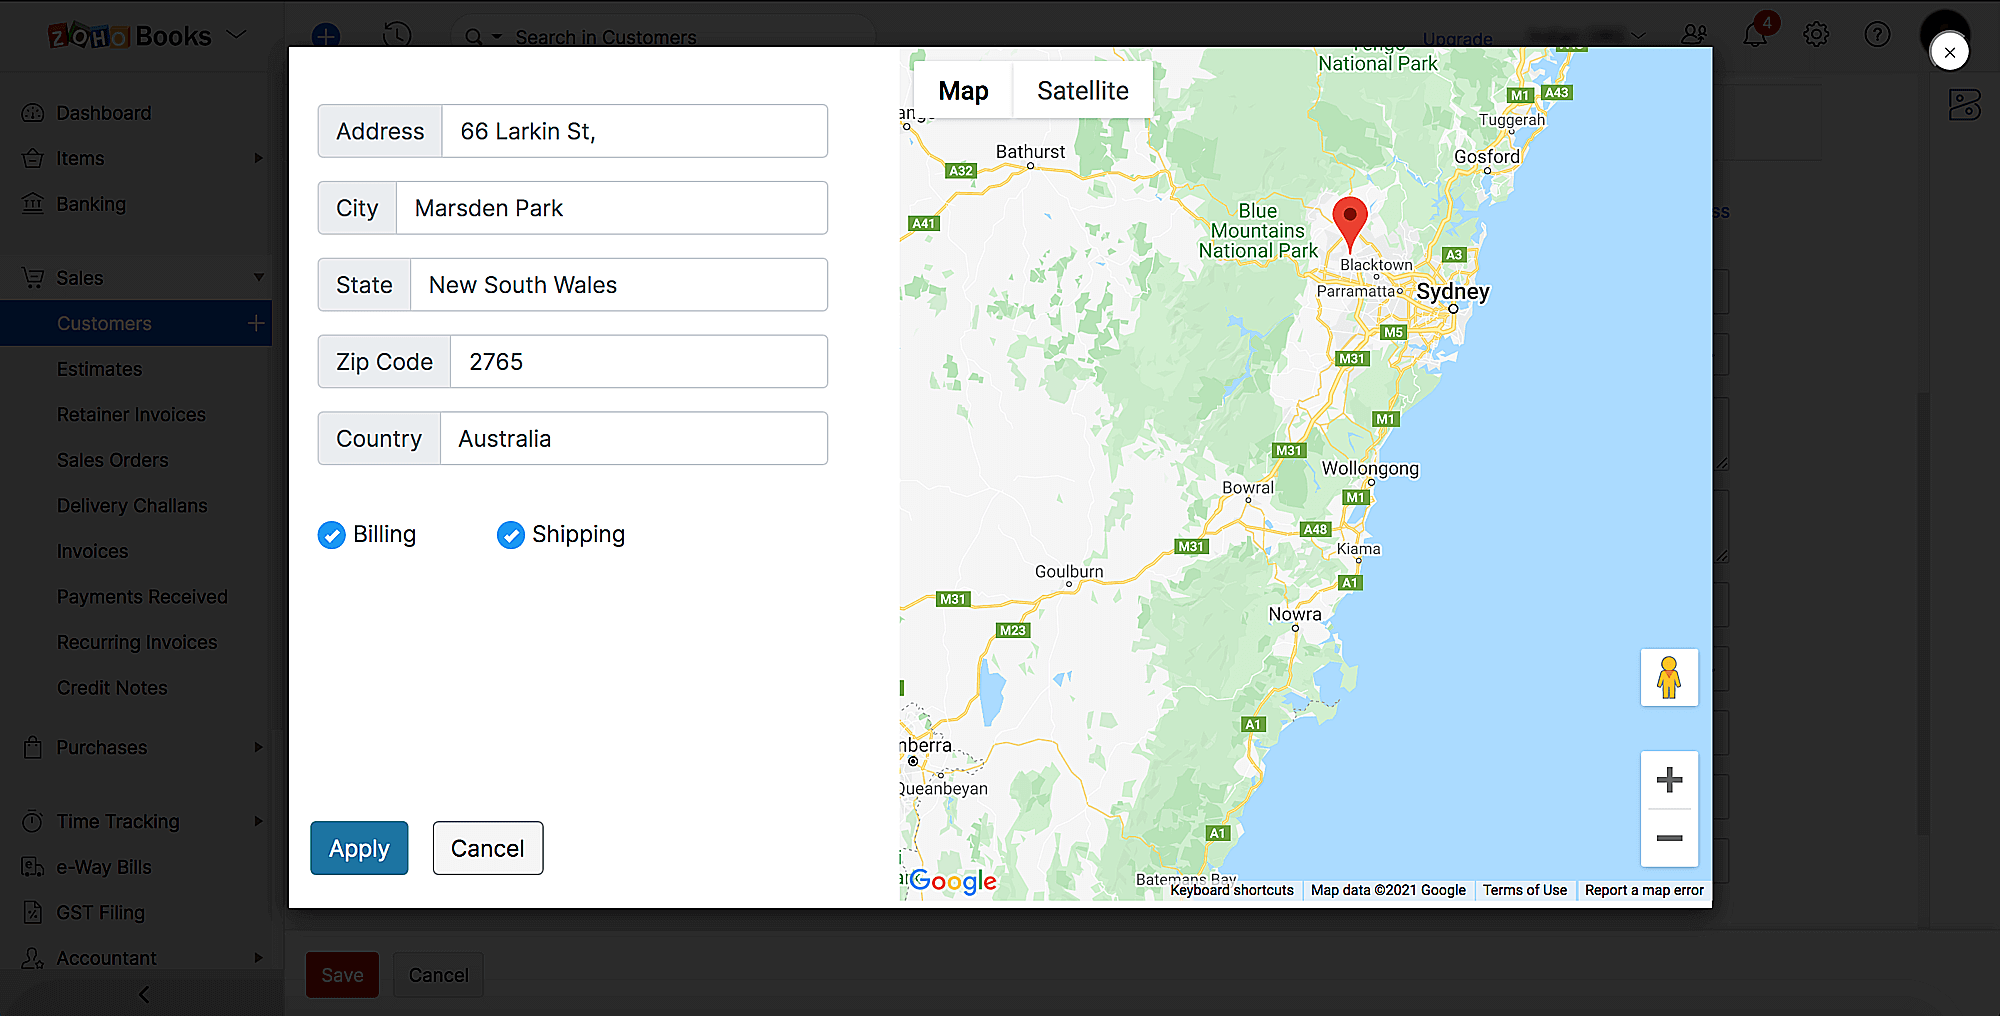
3.10. Display the button to apply the address details to the contact.
To do this, add the below html snippet inside the <div class="address"> element.
 <div class="address">
 ...
<div class="address-checkbox">
 <label class="container">
   Billing
  <input id="billing" type="checkbox"></input>
  <span class="checkmark"></span>
 </label>
 <label class="container">
  Shipping
  <input id="shipping" type="checkbox"></input>
  <span class="checkmark"></span>
 </label>
</div>
<div class="button-container">
 <button type="button" class="btn btn-info" onClick="applyAddress()">
   Apply
 </button>
 <button type="button" class="btn btn-secondary" onClick="closeModal()">
  Cancel
 </button>
</div>
Here, there are two options; select and apply the address details by shipping address or billing address or both.
 // js/pick_address.js
...
function setAddressInZBooks(param) {
 return window.ZFAPPS.set(param, {
   address: addressObject.street,
   city: addressObject.locality,
   state: addressObject.administrative_area_level_1,
   country: addressObject.country,
   zip: addressObject.postal_code
 });
};

async function applyAddress() {
 let isBillingEnabled = document.querySelector("#billing").checked;
 let isShippingEnabled = document.querySelector("#shipping").checked

if (isBillingEnabled) {
   await setAddressInZBooks('contact.billing_address');
 }
if (isShippingEnabled) {
   await setAddressInZBooks('contact.shipping_address');
 }
closeModal();
}

function closeModal() {
 window.ZFAPPS.closeModal();
}
Here, the ZFAPPS SDK API has been used to communicate with the Zoho Books application. This ZFAPPS.set API will apply the respective changes which has been provided for the contact.
You can use the ZFAPPS.set(‘contact.billing_address’, { … }); to apply billing address and ZFAPPS.set(‘contact.shipping_address’, { … }) to apply the shipping address.
The pick address widget is now ready to use.
Here is the css style data:
/* CSS Properties */
html, body {
 height: 100%;
 margin: 0;
 padding: 0;
}
.map-section, #map {
 height: 100%;
}
.address {
 margin: 10% 5% 5% 5%;
}
.button-container{
 width: 100%;
 position: absolute;
 bottom: 3%;
 left: 7%;
}
.button-container .btn-info {
 background-color:#2fa3e6;
 color:white;
}
.button-container .btn-info:hover {
 background-color:#2373a1;
}
.button-container .btn-secondary{
 background-color:whitesmoke;
 color:black;
 margin-left: 3%;
}
/* checkbox style */
.container {
 display: block;
 position: relative;
 padding-left: 25px !important;
 margin-bottom: 12px;
 cursor: pointer;
 font-size: 16px;
 -webkit-user-select: none;
 -moz-user-select: none;
 -ms-user-select: none;
 user-select: none;
}
/* Hide the browser's default checkbox */
.container input {
 position: absolute;
 opacity: 0;
 cursor: pointer;
 height: 0;
 width: 0;
}
/* Create a custom checkbox */
.checkmark {
 position: absolute;
 top: 12%;
 left: 0;
 height: 20px;
 width: 20px;
 background-color: #eee;
 border-radius: 50px;
}
/* On mouse-over, add a grey background color */
.container:hover input ~ .checkmark {
 background-color: #ccc;
}
/* When the checkbox is checked, add a blue background */
.container input:checked ~ .checkmark {
 border-radius: 50px;
 background-color: #2196F3;
}
/* Create the checkmark/indicator (hidden when not checked) */
.checkmark:after {
 content: "";
 position: absolute;
 display: none;
}
/* Show the checkmark when checked */
.container input:checked ~ .checkmark:after {
 display: block;
}
/* Style the checkmark/indicator */
.container .checkmark:after {
 left: 8px;
 top: 5px;
 width: 5px;
 height: 10px;
 border: solid white;
 border-width: 0 3px 3px 0;
 -webkit-transform: rotate(45deg);
 -ms-transform: rotate(45deg);
 transform: rotate(45deg);
}
.address-checkbox{
 width: 70%;
 display:flex;
 justify-content:space-evenly;
 margin: 10% 0%;
}
3.11. Validate and pack the widget. Enter the below command in your terminal.
zet validate This command will validate the plugin-manifest configurations and throw error if any mismatch configurations.
zet pack This command will create a zip file for the project. Now you can upload the zip in the Zoho Finance application.
The last step is to upload the widget in Zoho Books. Here’s how:
- Go to Settings and navigate to the Developer Space and click Widgets.
- Click Create Widget.
- Enter the short description and upload the zip file.
Now, you can go to the customer creation page and pick your customer address.
 Yes
No
Yes
No
Thank you for your feedback!