


Creating Data Entry Forms for Zoho Analytics Using Zoho Creator
- Creating a New Form in Zoho Creator
- Entering Data in the Form
- Checking Data in Zoho Analytics table
- Sharing the Form and Embedding for User Access
Creating a New Form in Zoho Creator
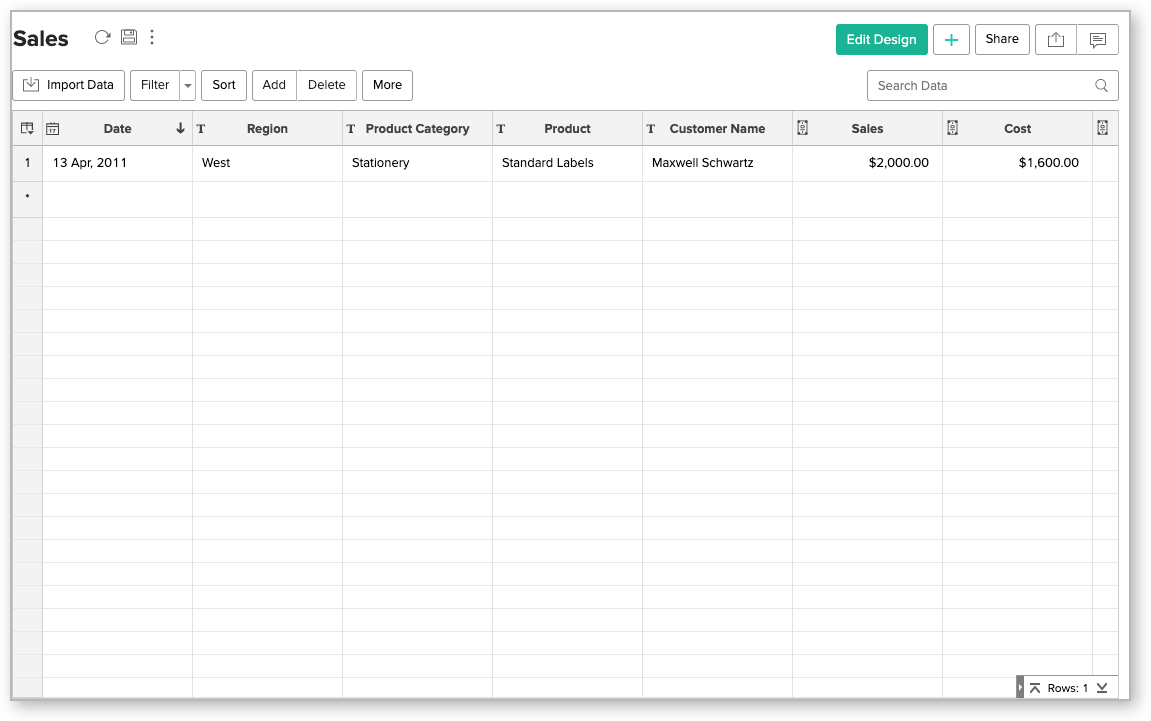
Let's say you have Sales table in a workspace called StoreSales in your Zoho Analytics account as shown below and you want to create a data entry Web Form to this table. To do this, follow the steps given below.

Login to Zoho Creator (http://creator.zoho.com/) with the same login credentials that you use for Zoho Analytics.
If you have already created an Application in Zoho Creator you can open the existing application. If not, create a new application by clicking the Create Application button available in the home page. You will have to provide a mandatory application name to proceed. You can learn more about Creating an Application from our Creator help document.

- Inorder to edit an existing Application you need to go to the Edit mode of the application by clicking on the 'Edit' icon beside the application name.
- To create a New form select Create New -->Form. You can create a form from scratch, import a file or use an existing template to build your form.
- In the New form window, Enter a form name and also select the section in which you would like to place the form when you access the application.
- Select the option Data will be stored in the creator and click Create . By default, Zoho Creator will have a table generated in the server to store data submitted through the Form. To save the submitted data into a Zoho Analytics table instead of in a Zoho Creator table, this option must be deselected.

Note:
A new blank Form named Sales Form will be created and listed under the Forms Tab.Now, drag and drop the required field types, depending on the kind of data that the Form should collect, from the Fields box displayed on the left-side of your Form.

- You can rename of the field, by clicking on the Field name label, from the field properties box as shown above.
- Click on the "+" button to add a button (rename it as Add to Zoho Analytics workspace) and select 'Field Type' as 'Submit'.
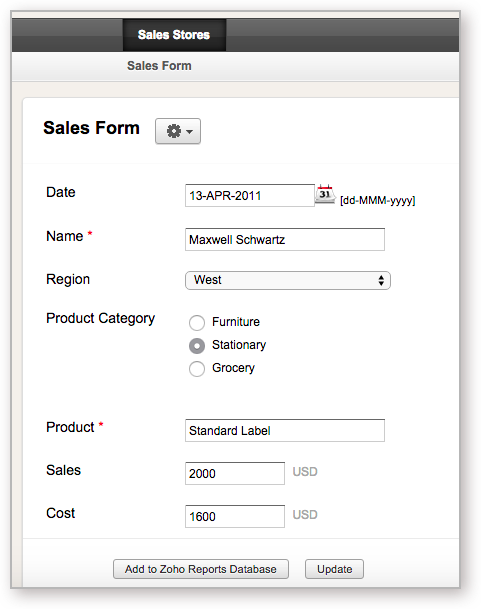
- Once you have added/renamed all the required fields, click Access this application. The resulting Form should look similar to the one in the below snapshot.

On Click Script
After you create the Form, you have to write a simple Deluge script which executes on clicking the button. Deluge script is an online scripting language which enables you to add the required logic to the Form to perform an action.
On Click Script to Add Data:
To add data submitted via Form, as a new row into the table in your Zoho Analytics account, we have to write a deluge with createRow() task.
Syntax: A generalized format of the deluge task to Add data is:
<return value as map> = zoho.reports.createRow(<Workspace Name>,<Table Name>,<Data as map>);
<Workspace Name> is the name of the Workspace in Zoho Analytics.
<Table Name> is the name of the table in the corresponding Workspace in Zoho Analytics .
<Data as map> is the map variable that holds key, value pairs. The map key is the column name of the table in your Zoho Analytics account and the map value is the field value submitted in the Zoho Creator Form.
<return value as map> is the map object containing response returned by Zoho Analytics.
Let's continue with the above example to illustrate how to use createRow() task to add data. Once you have dropped the required fields and added Add to Zoho Analytics Workspace button to the Sales Form,
- Hover your mouse over Add to Zoho Analytics Workspace button and select Action on Click option. This will invoke the script builder in the Script tab.
- Switch to Free-flow Scripting mode by clicking on the option present at the right side top corner of the script editor
- Write the following deluge script as shown below in script editor and click Save Script.
creatingMap = map();
creatingMap.put("Date", input.Date_field);
creatingMap.put("Region", input.Region);
creatingMap.put("Product Category", input.Product_Category);
creatingMap.put("Product", input.Product);
creatingMap.put("Customer Name", input.Customer_Name);
creatingMap.put("Sales", input.Sales.toString());
creatingMap.put("Cost", input.Cost.toString());
mapResponse = zoho.reports.createRow("StoreSales", "Sales", creatingMap);
In the above deluge script,
creatingMap is the map variable that holds the column names (Date, Region, Product Category, Product, Customer Name, Sales and Cost) and their corresponding values submitted in the Sales Form.
mapResponse is the variable which holds the XML string returned by Zoho Analytics as response on adding the row.
When a user enters data and clicks Add to Zoho Analytics Workspace button in the Sales Form, the given deluge script executes and adds submitted data as a new row into the Sales table in your Zoho Analytics account.
On Click Script to Update Data:
You can also use a Zoho Creator Form to update existing data of a table in your Zoho Analytics account. To update a row in Zoho Analytics using a Form created in Zoho Creator, we have to write a deluge script with task update data(). A generalized format of the deluge task to Update row(s) in Zoho Analytics is:
Syntax:
<return value as map> = zoho.reports.updatedata(<Workspace Name>,<Table Name>, CreatingMap, <Criteria>);
<Workspace Name> is the name of the Workspace in Zoho Analytics.
<Table Name> is the name of the table in the corresponding Workspace in Zoho Analytics.
<Data as map> is the map variable that holds key, value pairs. The map key is the column name of the table in your Zoho Analytics account and the map value is the field value submitted in the Zoho Creator Form.
<Criteria> must be in the format: {<colName> <operator> <colValue>}. For example ("Region"='East'). Refer here for more details about the format for the criteria.
<return value as map> is the map object containing response returned by Zoho Analytics. In the given example, to Update an existing row in the Sales table of the StoreSales Workspace in your Zoho Analytics account with the submitted data via SalesForm,
- Add a button (say, Update button) to the Sales Form following the same steps as described above.
- Hover your mouse over the Update button and select Action on Click option. This will invoke the script builder in the Script tab.
- Switch to Free-flow Scripting mode by clicking on the option present at the right side top corner of the script editor.
- Write the following deluge script as shown below in script editor and click Save Script .
creatingMap = map();
creatingMap.put("Date", input.Date_field);
creatingMap.put("Region", input.Region);
creatingMap.put("Product Category", input.Product_Category);
creatingMap.put("Product", input.Product);
creatingMap.put("Customer Name", input.Customer_Name);
creatingMap.put("Sales", input.Sales.toString());
creatingMap.put("Cost", input.Cost.toString());
mapResponse = zoho.reports.updatedata("StoreSales", "Sales", creatingMap, "Region = 'East' and Sales =10000 ");
When a user enters data in to the Sales Form and clicks Update button, the given deluge script executes and all the rows of Sales table in StoreSales workspace with Region as 'East' and Sales of '10000' will be updated with the submitted data.
On Click Script to Delete a Row:
To delete a specific row of a table in your Zoho Analytics, we have to write a deluge with deleterow() task.
Syntax : Format of the deluge task to Delete row(s) in Zoho Analytics is:
<return value as map> = zoho.reports.deleteRow(<Workspace Name>,<Table Name>, <Criteria>);
<Workspace Name> is the name of the Workspace in Zoho Analytics.
<Table Name> is the name of the table in the corresponding Workspace in Zoho Analytics .
<Criteria> must be in the format: {<colName> <operator> <colValue>}. For example ("Region"='East') . Refer here for more details about the format for the criteria.
<return value as map> is the map object containing response returned by Zoho Analytics.
For example, to delete all the Sales data of the 'West' region from the Sales table of the StoreSales Workspace in your Zoho Analytics account, deluge script as shown below should be written in the script builder.
s = zoho.reports.deleteRow("StoreSales", "Sales", "Region='West'");
Entering Data in the Form
To enter the data in the Form and add/update the entered data into the table in your Zoho Analytics account, select Access this Application option at the top right. Enter the required data into corresponding fields and click the required button to add or update the record in the corresponding table in Zoho Analytics.
Checking Data in Zoho Analytics table
Once the Form is successfully submitted, data will be added as a new row to your Sales table of StoreSales workspace when you click Add to Zoho Analytics Workspace button, as shown below.
Similarly, if a user clicks Update button, all the rows in the table of the Zoho Analytics that matches the given criteria will be updated with the submitted data.
Sharing the Form and Embedding
By default, only application owner can access the Form in a private application. To enable your users to access the Form, you have to Share the Form to your users or embed it in your Web Site/Blogs and set required permissions.
Sharing Your Form:
You can share your views to your user by providing the user's email address under Share tab. Please refer to the Zoho Creator's help documents on Sharing for details on how to share a Form and set different level of permission for each user.
If the shared user holds an existing Zoho account with login id as the shared e-mail id, he can just Sign in to Zoho Creator to access the application. If the shared user does not own an existing Zoho account, he has to Sign Up with this e-mail id specified in the invitation e-mail.
After login the user can access the shared Form by clicking the Shared to me tab provided in his login home page and selecting the corresponding application. Alternatively the user can directly access the form by clicking on the link provided in the Invitation Mail that would have been sent by you while sharing the form.

Embedding Your Form:
You can also embed your Forms in your Web Pages, Web applications or blogs by including a few line of HTML code snippet into your Web page HTML content. On including this code snippet, whenever the Web page is loaded in a browser, the embedded Form will also get loaded.
HTML code snippet can be generated by invoking More Actions -> Embed in your Website option from the Form header as shown below.

You can paste this HTML code within the relevant section in your Web page HTML content to see the embedded form. The following screenshot shows the Sales Form embedded into a web page.
Please refer to the Zoho Creator's help document on Embedding, for details on how to embed a Form and the various settings that are possible.