Managing Client Profiles
Filter & sort options for clients
Filtering clients
You can view clients on the basis of the available filters. Here’s how you can do this:
- Go to the Clients module from the sidebar in the homepage.
- Click the clients view dropdown at the top of the page.
- Select the required filter.
Now you can view the clients who apply to your selected filter.
Sorting Clients
You can also sort clients based on certain fields such as Name, Creation Time, Company Name, and more. Here’s how:
- Go to the Clients module from the sidebar in the homepage.
- Click the More icon in the top-right corner.
- Select the required field under Sort By.
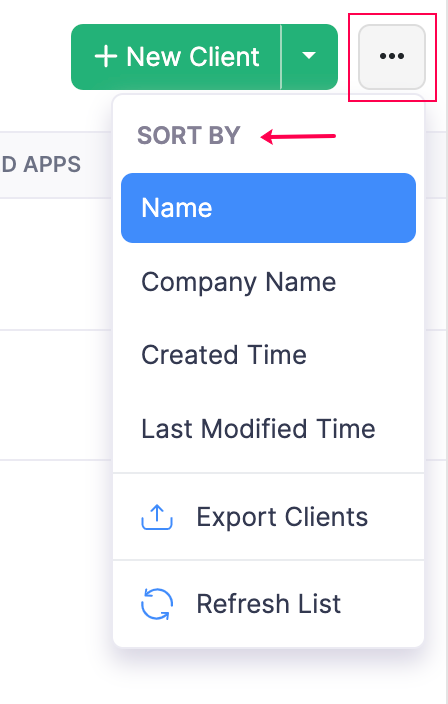
Insight: You can click the field to configure if you want to view the clients list in ascending or descending order.
Your clients in the list page will now be sorted and listed according to the selected fields.
Exporting clients
You can export your data from Zoho Practice in CSV or XLS format. Here’s how you can export your client details:
- Go to the Clients module from the sidebar in the homepage.
- Click the More icon in the top-right corner.
- Click Export Clients.
In the popup that appears, you can configure the necessary details of your export.

Select Module - Select the module that you’d like to export. Note that since if you’re initiating the export from the clients module, Clients will be selected by default.
Fields in Export File - You can choose which details of your clients to export by creating specific export templates. Here’s how you can do this from the export popup:
Click the Add New option in the Fields in the Export File dropdown.
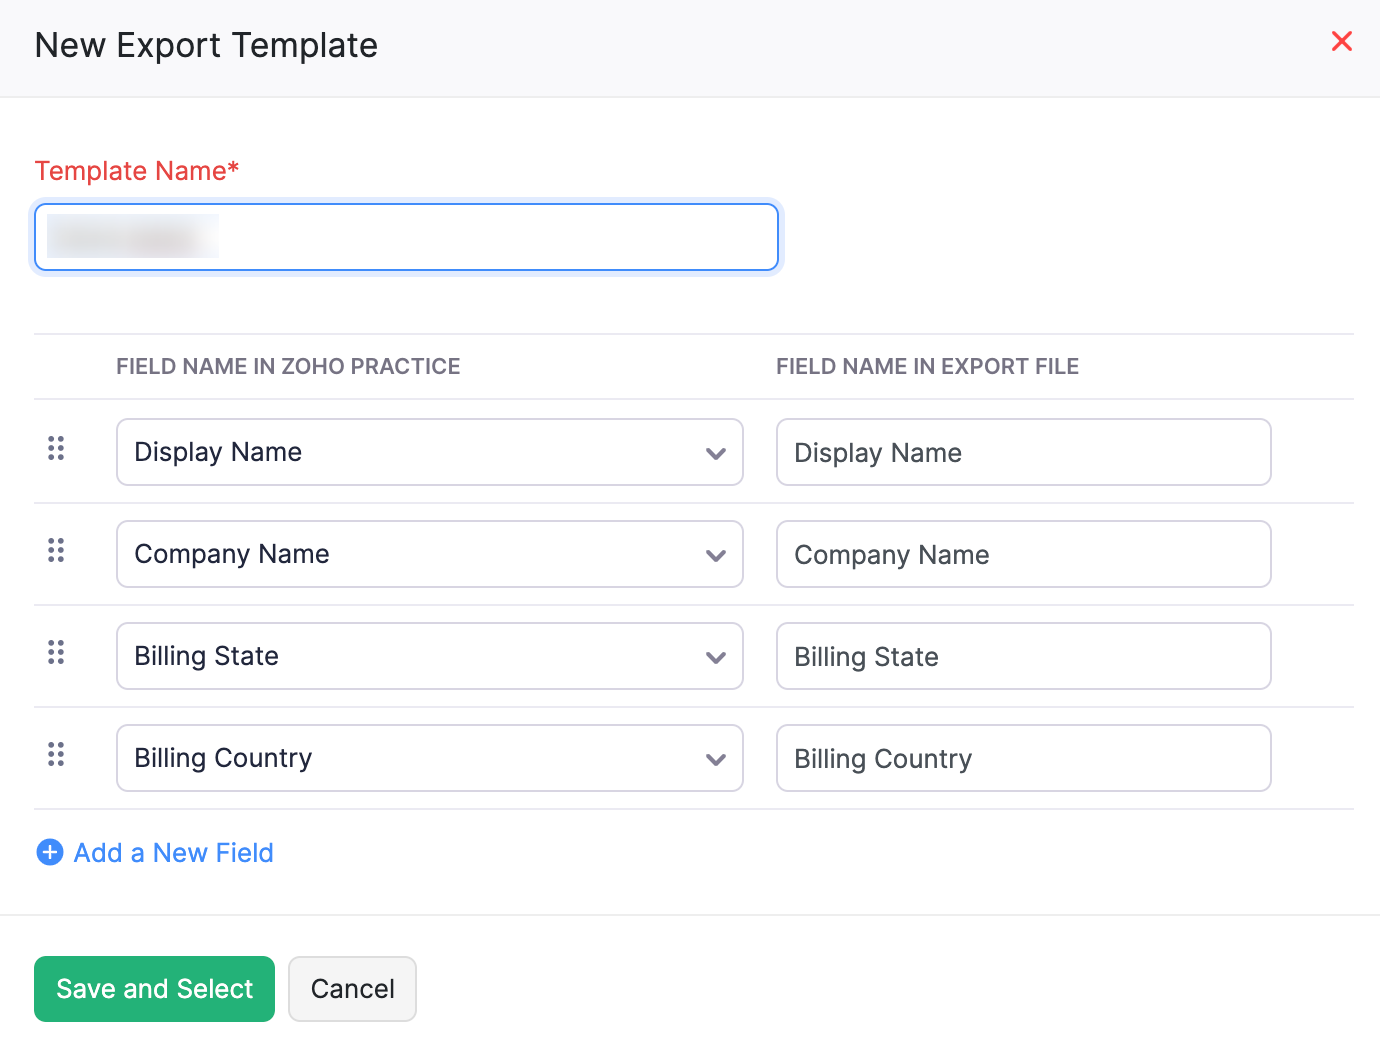
- Enter a name for the Export Template.
- Add or remove the fields, and edit the name of the fields in the export file as required.
- Click the re-order icon to change the order of fields in the export file.
- Click Save and Select.
- Export As - Select the preferred file format of your export. You can select from CSV, XLS and XLSX formats.
- Password to protect the file - You can choose to enter a password to protect the exported file. This way, your clients confidential information is protected.
- Click Export. Your file will now be exported, and downloaded to your local device.
Note: You can export only the first 25,000 rows. If you have more rows, please initiate a backup for the data in your Zoho Practice organization, and download it. Learn more about how to backup your data.
Editing client details
If you want to change or edit your client’s address or any of the primary information you entered while onboarding them, you can edit the client profile. Here’s how:
- Go to the Clients module from the navigation bar on the left.
- Navigate to the client’s profile page.
- Click the More icon on the top right corner of the page.
- Click Edit.
- Make the required changes to your client details and click Save.
Marking clients as Inactive
If a client is no longer associated with your accounting firm, you can mark them as inactive. You can mark a client as inactive either from the clients list view or the respective client’s profile. Here’s how:
From the Client List View page:
- Hover over the client whom you want to mark as inactive.
- Click the dropdown icon that appears to the right of the client’s list.
- Click Mark as Inactive.
From a Client Profile page:
- Go to the client’s profile whom you want to mark as inactive.
- Click the more icon in the top-right corner.
- Click Mark as Inactive.
Note: Once you mark a client as inactive, you won’t be able to create tasks or client requests for them.
Deleting clients
To delete a client:
- Go to the Clients module from the navigation bar on the left.
- Navigate to the client’s profile page.
- Click the More icon on the top right corner of the page.
- Click Delete.
Once a client profile is deleted, you will not be able to retrieve it.
Note: You will not be able to delete a client profile if they have associated tasks or clients requests. In these cases, you can either mark the client as inactive, or you can delete all the associated client requests and tasks.