Tasks - Preferences
General Preferences
Task Completion Notification
Once you set up this notification, the user assigned to a particular task will be notified via an email and in-app notification once a task’s status is marked as Completed.
Here’s how you can set up the task completion notification:
- Go to Settings > Preferences > Tasks.
- Click the General tab.
- Enable the Task Completion Notification by marking the Notify users when a task’s status is marked as Completed checkbox.
- Click Save.
Similarly, you can also set up notifications for the completion of sub-tasks.
Default Reminder Notification
You can configure a default reminder that will be sent to your users about their tasks. This is an organization level preference, which means that, this reminder you configure will be applied to all users and tasks in your organization.
Here’s how you can set up a default reminder:
- Go to Settings > Preferences > Tasks.
- Click the General tab.
- Enable the Default Reminder Notification by marking the Send default task reminder to users checkbox.
- Click the Reminder Type dropdown, and select the preferred option.
- In the Remind Before field, select the preferred frequency and enter the number of days, month or years before which the task is due.
- Click Save.
Similarly, you can also set up default reminders for sub-tasks.
Recurring Tasks
It is likely that you have tasks that you regularly do for certain clients. In such instances, you can set up recurring tasks in your organization. This way, you won’t need to manually create the same tasks. Here’s how you can enable recurring tasks:
- Go to Settings > Preferences > Tasks.
- Click the General tab.
- Mark Enable Recurring Tasks under Recurring Tasks.
- Click Save.
Users in your organization will now be able to create recurring tasks for your clients. You can view and track these recurring tasks from the Tasks module.
Similarly, you can create recurring sub-tasks for your clients and view them from the Tasks module.
Task Billing
Note: This feature is available only for Zoho Practice organizations that are integrated with Zoho Books.
The Tasks Billing preference allows your users to raise invoices for billable timesheets created in Zoho Practice and send them to your clients from Zoho Books. Here’s how you can enable this:
- Go to Settings > Preferences > Tasks.
- Click the General tab.
- Mark the Enable users to raise invoices for timesheets checkbox under Task Billing.
- Configure the required preferences.
- Click Save.
Similarly, you can create billable sub-tasks for your users in Zoho Practice.
How to integrate your organization with Zoho Books
- Go to Settings > Integrations > Accounting.
- Navigate to Zoho Books
- Click Access Zoho Books.
That’s it! You’re all set.
Creating a custom status
There are predefined statuses in tasks such as Yet to Start, In Progress and Completed. However, if you wish to create other statuses, you can do it by creating a custom status. These custom statuses will have to be created as a sub-status of a predefined status. Here’s how:
- Go to Settings > Preferences > Tasks.
- Click the Custom Status tab.
- Click the New Custom Status button in the top right corner of the page.
- Select the status under which you want to create this sub-status and enter the Status Name.
- Click Save.
Similarly, you can create a custom status for sub-tasks in Zoho Practice.
Note: If you create a sub-status under Completed, and if that status is applied on a task, no notifications will be sent for that task as it will be considered as completed.
Creating a custom field
You can use field customization to create custom fields. These are fields that you can create and add to the Client’s Creation page. You can use these fields to record additional information related to your clients that your organization requires.
To create a custom field:
- Go to Settings > Preferences > Tasks.
- Click the Field Customization tab.
- Click the New Custom Field button in the Field Customization tab.
- Enter the required details and configure the custom field you’re creating.
- Click Save.
The custom field will now be available in the New Client page when you’re creating a new client.
Similarly, you can create a custom fields for sub-tasks in Zoho Practice.
Task Templates
Accounting firms often need to perform the same tasks as parts of a service for multiple clients. For example, as part of yearly bookkeeping services, accounting firm staff will have to do tasks such as recording transactions, bank reconciliation, expense tracking, inventory management, etc. Creating each of these tasks over and over again for multiple clients would waste precious time that can be spent on actually getting on with the task.
This is where task templates come in handy. You can create a task template and add all the tasks that needs to be done for a particular service your firm offers. Whenever a client employs a service, you can simply use the template to automatically generate the required tasks. Let’s take a look at a scenario to understand this better.
Scenario: Meet Sarah, an accountant at a busy accounting firm. Every year, she helps many clients with their bookkeeping. Each client has similar needs, like recording transactions, reconciling bank statements, and tracking expenses. It used to be a real headache for Sarah to set up these tasks from scratch for each client.
But now, her firm uses task templates. They’ve created a “Yearly Bookkeeping” template that includes all these tasks. So, when a new client comes in, Sarah simply selects the template, and voilà! The necessary tasks are generated automatically and she can simply assign them to her staff. It’s like having a ready-made checklist for each client, making her work easier and more consistent.
Here’s how you can create a task template:
- Go to Settings > Preferences > Tasks.
- Click the Task Templates tab.
- Click New Template in the top-right corner.
- Enter a title and description for the template.
- Click Save.

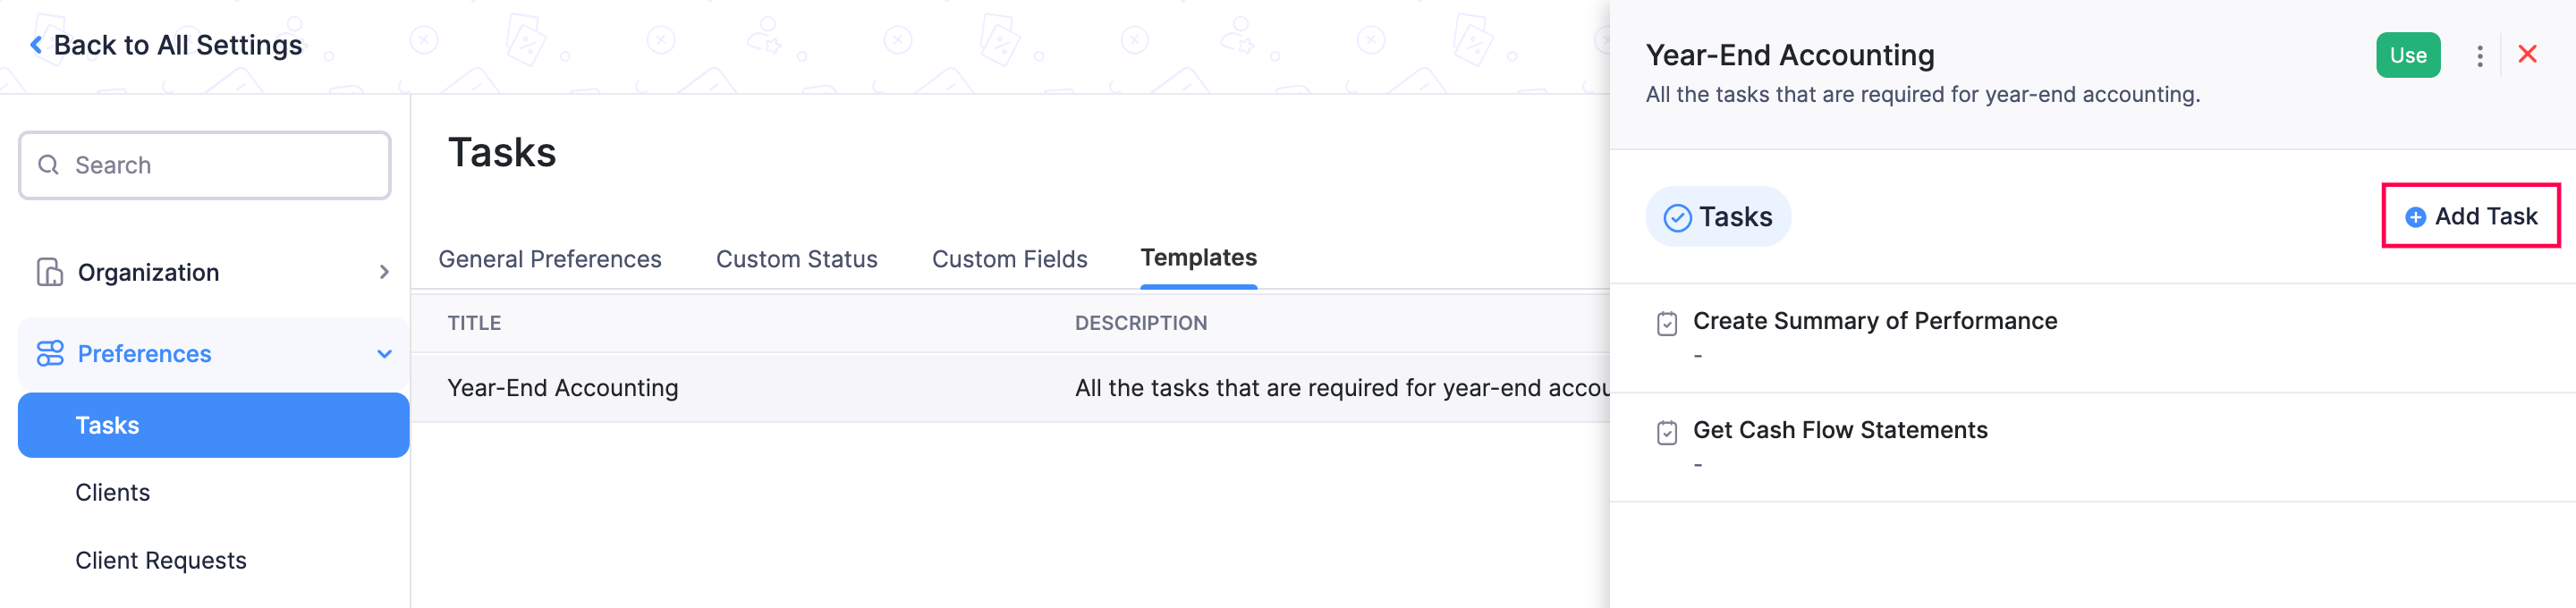
Your template will now be created. Next, you can add tasks to your template. Here’s how you can do this:
- Click the template in which you want to add tasks.
- Click New Task in the template popup that appears on the right.
- Create the task that you want to add to the template, and click Save.
- The task you created will now be associated to this template.
Note: The tasks you create from within a template will not be available in the Tasks module. They will be populated in Tasks only when the template is used.
Applying Task Templates
You’ve created the task templates, and added tasks to them.The only thing to do now is to use the template. Here’s how:
- Click the task template that you want to use to create tasks for a client.
- Click Apply Template in the top-right corner.
- Select the clients to whom you want to apply this template. You can select multiple clients at a time.
- Click Apply Template.
Once applied, the tasks will be automatically generated for the selected clients. You can view them from the Tasks module and set up the tasks in your organization by assigning users.
Managing Task Templates
Let’s take a look at how to edit or delete task templates.
Editing task templates
To edit a task template’s name and description:
- Go to Settings > Preferences > Tasks.
- Go to the Task Templates tab.
- Click the specific task template that you’d like to edit.
- Click the More icon in the task template popup that appears on the right.
- Click Edit.
- Make the required changes.
- Click Save.
Deleting task templates
To delete a task template’s name and description:
- Go to Settings > Preferences > Tasks.
- Go to the Task Templates tab.
- Click the specific task template that you’d like to edit.
- Click the More icon in the task template popup that appears on the right.
- Click Delete.
Sub-Tasks - Preferences
Create Sub-Tasks from Task Templates
To create a sub-task from a task template:
- Go to Settings.
- Select Tasks under Preferences.
- Navigate to the Templates section.
- Select the template with which you want to create a sub-task.
- In the right pane, select the task for which you want to create a sub-task.
- Click + Add New near Sub-Tasks.
- In the pop-up that appears, enter the required details and click Save.
Your sub-task template will now be created.
Managing Sub-Task Templates
Let us have a look about how to edit or delete a sub-task created under a task template.
Edit Sub-Task Templates
To edit a sub-task created under task templates:
- Go to Settings.
- Select Tasks under Preferences.
- Navigate to the Templates section.
- Select the required task template.
- In the right pane, select the task whose sub-task you want to edit.
- Select the sub-task you want to edit.
- Click the More icon in the top right corner and click Edit.
- Make the necessary changes and click Save.
Delete Sub-Task Templates
To delete a sub-task created under task templates:
- Go to Settings.
- Select Tasks under Preferences.
- Navigate to the Templates section.
- Select the required task template.
- In the right pane, select the task whose sub-task you want to delete.
- Select the sub task you want to delete.
- Click the More icon in the top right corner and click Delete.
- In the pop-up that appears, click Delete Task to confirm.
Your sub-task will now be deleted.
Validation Rules
Validation Rules help you create rules and set restrictions for the tasks you create in Zoho Practice. When a user tries to enter data in a field for which you’ve set a restriction, it passes through that validation rule. If the value violates the condition, an alert message is displayed, and the task won’t be created.
Scenario: Alex runs an event management firm. When recording client’s information, Alex creates tasks and associates them with users in the firm. At times, the users create tasks without due dates. To prevent this, Alex adds a rule: if a user enters a date earlier than today, the message Enter a Due Date appears and restricts creating the task. The user must enter a valid date and proceed to creating the task.
Note: This feature is available only in certain plans of Zoho Practice. Visit our pricing page to check if it’s included in your current plan.
Create Validation Rules
You can create a validation rule by setting specific criteria for the fields in a transaction. Here’s how:
- Go to Settings.
- Select Tasks under Preferences.
- Navigate to the Validation Rules tab.
- Click + New Validation Rule at the top of the page.
- In the New Validation Rule page, fill in the following details:
- Enter the Validation Rule Name.
- Click + New Rule.
- In the New Rule pop-up:
- Select the field for which you want to set a validation rule, and enter the required Alert Message.
- Click Continue.
- Click Save in the top right corner of the page.
The validation rule will be created.
Multiple Criteria and Subrules
If you want to apply validation rules for specific tasks based on multiple criteria, or create a rule with the same condition:
Adding Multiple Criteria
When you create a validation rule, it applies to all tasks. You can choose to apply rules to transactions based on a certain criteria.
To add multiple criteria:
Go to Settings.
Select Tasks under Preferences.
Navigate to the Validation Rules tab.
For new rules: While creating a validation rule, enter the details and click Continue. In the page that follows, click the Pencil icon near the rule.
For existing rules: Click the Edit option in the validation rules list page and in the details page, and click the Pencil icon near the rule.
In the Edit Subrule pop-up, check the option Based on specific criteria, and set the criteria with the options provided.
Click + Add Criterion for more options, and click the Remove Criterion icon to delete the criteria you’ve added.
Click the Edit icon to change the criteria pattern based on your preferences, and click Save.
Once you’ve edited the subrule, click Done.
The criteria will be added to the respective validation rule.
Adding Subrules
If you want to include additional rules to your existing condition, you can add them as subrules. Here’s how:
- Go to Settings.
- Select Tasks under Preferences.
- Navigate to the Validation Rules tab.
- Hover over the required rule, click the dropdown next to it, and select Edit.
- In the Edit Validation Rule page, click + Add Subrule next to the required condition.
- In the pop-up that appears, enter the Criteria and the Alert Message, and click Done.
- Verify the subrule you had created, and click Save at the top right corner of the page.
The subrule will be added for the respective validation rule.
Execute Validation Rules
Once you create and save a validation rule, it applies to all future tasks. If a new task violates the rule, the system displays an alert message to the user.
Other Actions
Once you create a validation rule, you can edit, mark it as inactive, or delete it. Here’s how:
- Go to Settings.
- Select Tasks under Preferences.
- Navigate to the Validation Rules tab.
- Hover over the required validation rule and perform the following actions:
- Edit: Update the message or criteria of the validation rule.
- Mark as Inactive: Temporarily disable the rule. To enable it again, click Mark as Active.
- Delete: Permanently remove the rule by clicking Delete.
The selected action will be performed.